Invite a User to Aptora 360
Setup & Administration
Use the Users list to add the people who sign in to Aptora 360, send each one an invite, and make them inactive when they leave.
Find it at Company > Lists > Users.
At a Glance
The Users list shows everyone who can sign in to Aptora 360 for your company. Use it when someone joins, needs a new invite link, or leaves. Every user is linked to an employee record and takes one license seat.
You do not set a password for the new person. Saving a new user emails them a link, and they choose their own password.
Before You Begin
- Permission: you see the New User button only if your own security lets you add on the Users list. To send an invite again or make a user inactive, you also need edit rights on the Users list.
- The person's email address: the invite goes to this address, and it becomes their sign in name. Each email can belong to only one Aptora 360 login.
- An employee record: every user must be linked to an employee. The employee must be active and not already linked to another user. See Create an Employee for the New User below.
- A free seat on your license: each user takes one seat, either an Aptora 360 User seat or a Mobile Only User seat. If all seats of that type are in use, Aptora 360 does not save the user.
Common Tasks
Create an Employee for the New User
Every user is linked to an employee record, so start there. If the person already has an employee record, go to Add a User and Send the Invite.
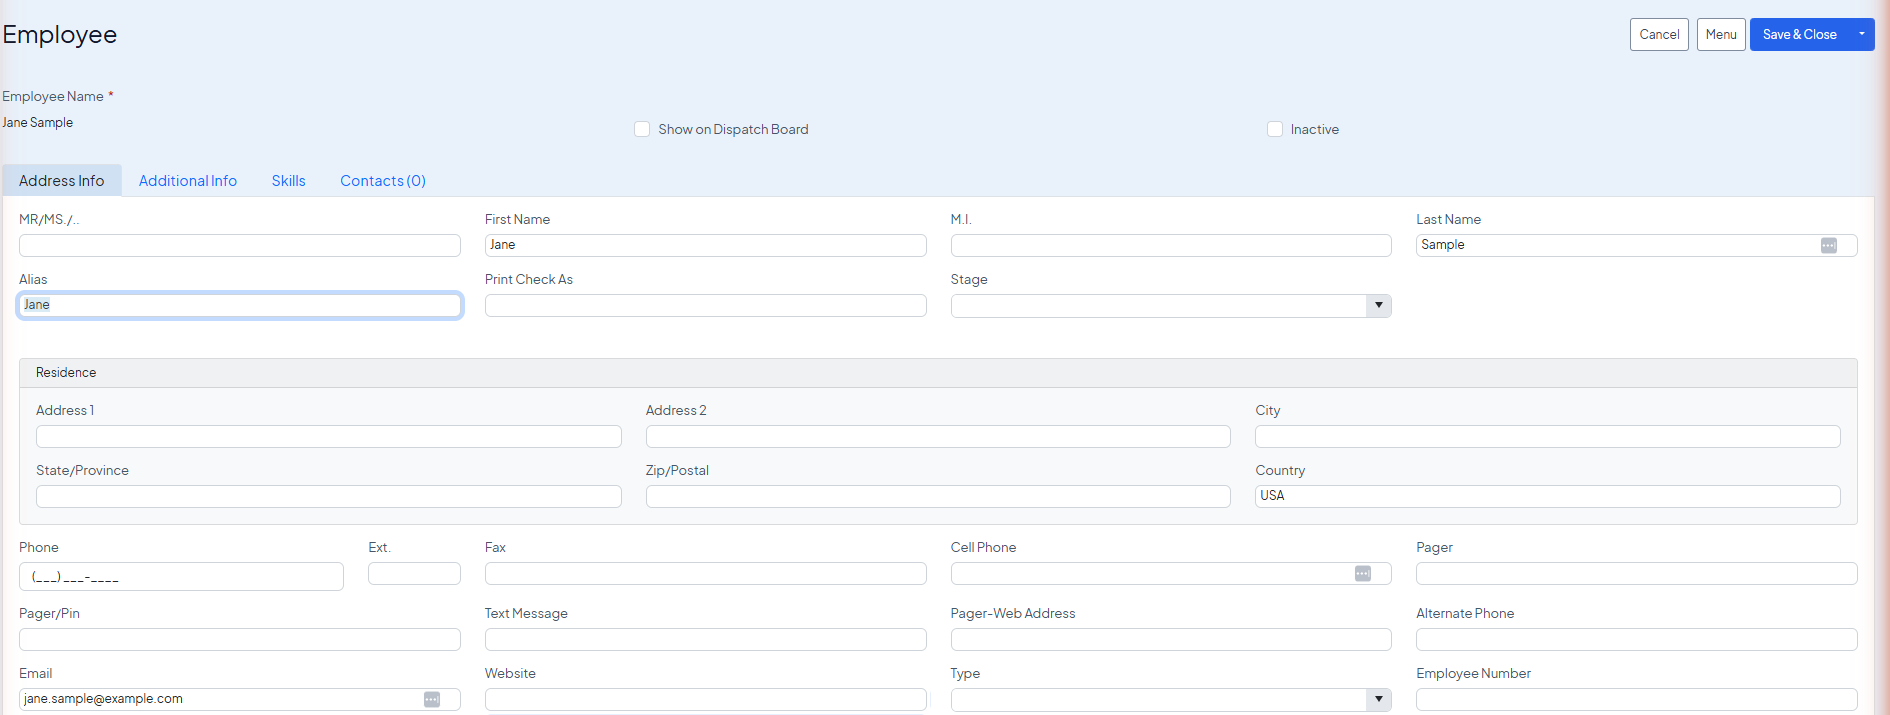
- At the top of the screen, click Company. Under New, click Employee. You can also open Company > Lists > Employees and click New Employee. A blank employee record opens on the Address Info tab.
- Type the person's First Name and Last Name. The Employee Name at the top is built from these. It is required, and each employee name must be unique.
- Optional: type their Email on the same tab. Aptora 360 then copies it into the user for you.
- Leave Inactive cleared. Only active employees can be picked for a user.
- Click Save & Close. The employee is saved and the record closes.
The employee record holds much more, such as address, phone, department, and job title. You can fill those in now or later. For every field on the employee record, see Employee List.
Add a User and Send the Invite
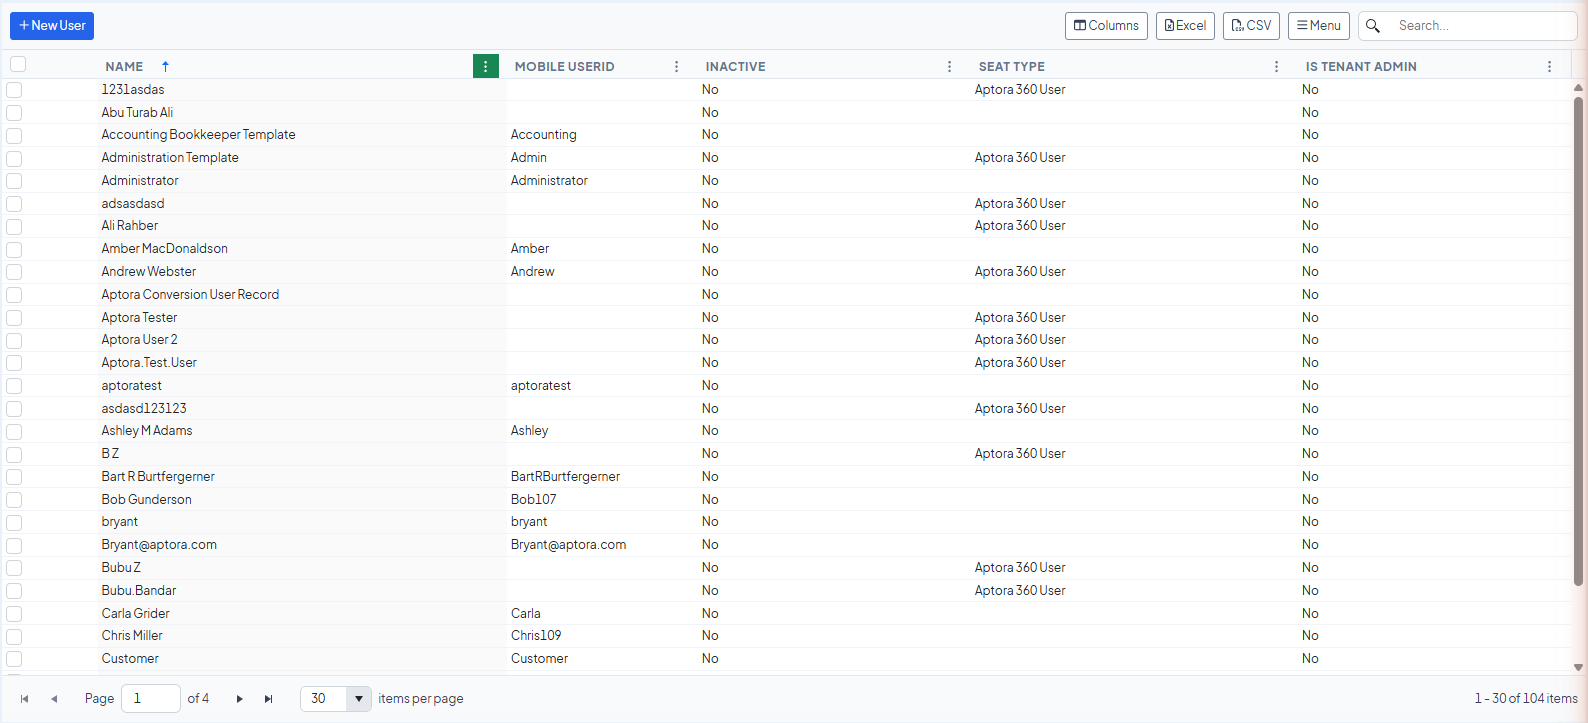
- Click Company. Under Lists, click Users. The Users list opens.
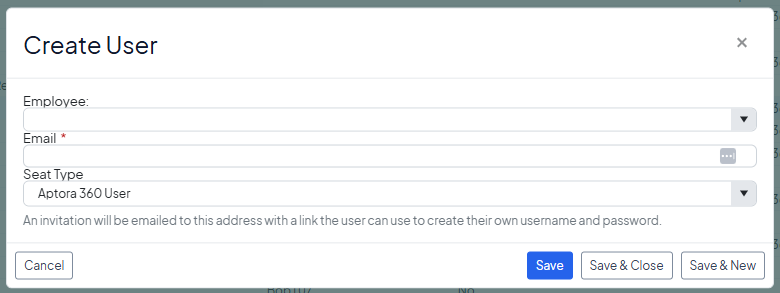
- Click New User at the top left of the list. You can also right click the list and choose New. The Create User window opens. It has three fields: Employee, Email, and Seat Type.
- Click the Employee box and pick the employee. Type part of a first or last name to search. The list shows only active employees who are not linked to a user yet.
- Look at the Email box. When you pick an employee, Aptora 360 copies the email from that employee record. If the record has no email, type it here. If you had already typed an email, a Confirm Overwrite box asks “Do you want to set the Email from the selected Employee?” Click Yes to use the employee's email, or No to keep what you typed.
- Check that the Email is right. It is required, so it has a red star. This is where the invite goes, and it is the address the person signs in with.
- In Seat Type, choose Aptora 360 User or Mobile Only User. Under the fields you see a short line that says an invitation will be emailed to this address.
- Click Save & Close. There is no separate send button: saving a new user sends the invite. A green message says “An invitation email has been sent to” the address, “with a link to create their username and password.” The window closes and the new user appears on the Users list. Use Save & New instead when you have several people to add.
If something is missing, Aptora 360 does not save and tells you why. For example, “An Employee must be specified.” or “Invalid Email address”.
Important: the invite goes out the moment you save, and a new Aptora 360 User starts with full access to every page. Set the person's security in User Security before they accept the invite.
Add the Employee from the Create User Window
Use this when you skipped the employee record.
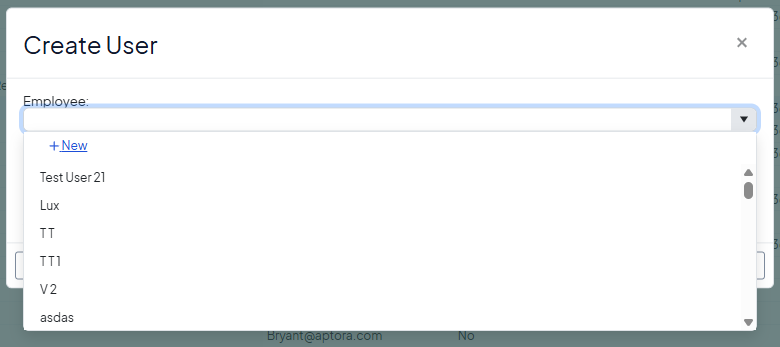
- In the Create User window, click the Employee box and then + New at the top of the list. A small New Employee window asks for one thing, the Name.
- Type the first and last name with a space between them. Use one first name and one last name: any word after the second is left out of the first and last name.
- Click Save & Close. The new employee is saved as active and is picked for you in the Employee box.
- Type the Email in the Create User window yourself. The quick add leaves the employee's email empty.
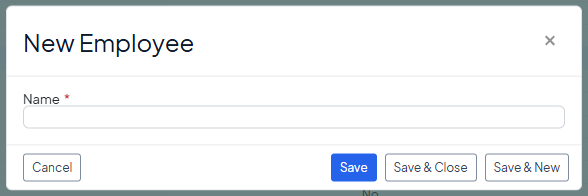
The quick add saves only the name. It also leaves the middle initial, address, phone and cell phone, job title, employee number, type, department, and skills empty. After you send the invite, open the new employee from Company > Lists > Employees. Fill in the rest: email, address, phone, department, pay details, and anything else your company tracks.
Send a New Invite Link
The link works for 24 hours, and only once. If the person waits too long, send them a new link.
- Open Company > Users.
- Select the check box next to the person. You can select several people at once.
- Right click the list and choose Resend Invite. A green message says “Resent invite to 1 user(s).” The person gets a new email with a new link. The new link also works for 24 hours.
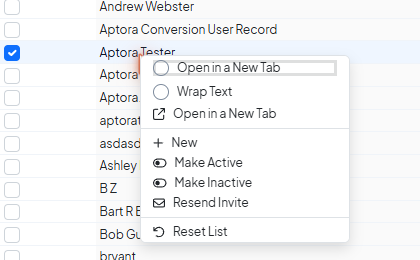
Tip: Resend Invite also works for someone who already set a password and forgot it. The link lets them choose a new one.
Your account owner can also send the same email from the Manage Users page of the Aptora license portal, using the Send Reset Link button. (to confirm: how admins reach this page)
Make a User Inactive
When someone leaves or no longer needs access, make them inactive. Their user record and history stay.
- Open Company > Users.
- Select the check box next to the person.
- Right click the list and choose Make Inactive.
- An Inactivate Users box asks “Are you sure you want to inactivate all selected Users?” Click Yes. The Inactive column for that person now says Yes.
To let the person back in, select them and choose Make Active. This needs a free seat of their seat type.
Buttons, Fields and Commands
Users List
The list shows the columns Name, Mobile UserID, Inactive, Seat Type, and Is Tenant Admin.
| Field, Button or Command | What It Does |
|---|---|
| New User | Opens the Create User window. Shows only if your security lets you add on the Users list. Right click > New does the same. |
| Name | Shows the linked employee's first and last name. On older builds it can show the person's sign in name instead. (to confirm: ships with Bug 17425) |
| Seat Type | Aptora 360 User or Mobile Only User. Each user takes one seat of that type on your license. |
| Resend Invite | Right click command. Emails the selected people a new link that works for 24 hours, once. Also works for a forgotten password. |
| Make Inactive | Right click command. Stops the selected people from using Aptora 360 and frees their seats. |
| Make Active | Right click command. Lets an inactive person back in. Needs a free seat of their seat type. |
| Double click a row | Opens Edit User, where you can fix the Email. Changing the email also changes the person's sign in name. |
Create User Window
| Field, Button or Command | What It Does |
|---|---|
| Employee | Required. Lists only active employees who are not linked to a user yet. Type part of a first or last name to search. + New at the top adds an employee by name only. |
| Required. Where the invite goes, and the person's sign in name. Copied from the employee record when you pick the employee. Each email can belong to only one Aptora 360 login. | |
| Seat Type | New users start as Aptora 360 User. Choose Mobile Only User for someone who uses only Mobile 360. |
| Save & Close | Saves the user, sends the invite, and closes the window. |
| Save & New | Saves the user, sends the invite, and opens a blank window for the next person. |
Important Rules and What Happens Next
- Saving a new user on the Users list sends the invite. There is no separate send button.
- A new Aptora 360 User starts with full access to every page: View, Add, Edit, Void, Delete, Print, and Export. Change it at Company > Settings/Security > User Security.
- A new Mobile Only User has no access to Aptora 360 pages, and the standard Mobile 360 permissions.
- A new user cannot approve Sales + Invoices, Estimates, Credits, or Purchase Orders until you turn it on. Use the Approvals button on the User Security page. User Can Approve Their Own Records starts turned on.
- The invite link works for 24 hours, and only once. After that, the set password page does not accept a new password.
- The same email and password also sign the person in to Mobile 360. (to confirm on a device)
- An inactive user can no longer use Aptora 360. If they open it, they see “Your account has been set as Inactive”. Their seat is freed for someone else.
- The user named Administrator cannot be made inactive.
What the new person sees after you save:
- The email. It comes from Aptora 360 (no-reply@aptora.com). The subject is Your Aptora 360 Account at your company name (or Your Aptora 360 Account Is Ready if no company name is set). The heading inside the email reads Your Aptora 360 Account Is Ready. It says who added them and has one button, Set Your Password. A box under the button says the link expires in 24 hours and works once.
- The set password page. The button opens a page titled Welcome to Aptora 360. Their email is already filled in and cannot be changed. They type a new password in Password and again in Confirm password. The password must be at least 8 characters. (to confirm: other password rules)
- Continue. They click Continue to Aptora 360. The password is saved and Aptora 360 opens.
- First sign in. Aptora 360 asks them to sign in once. They use their email address and the password they chose.
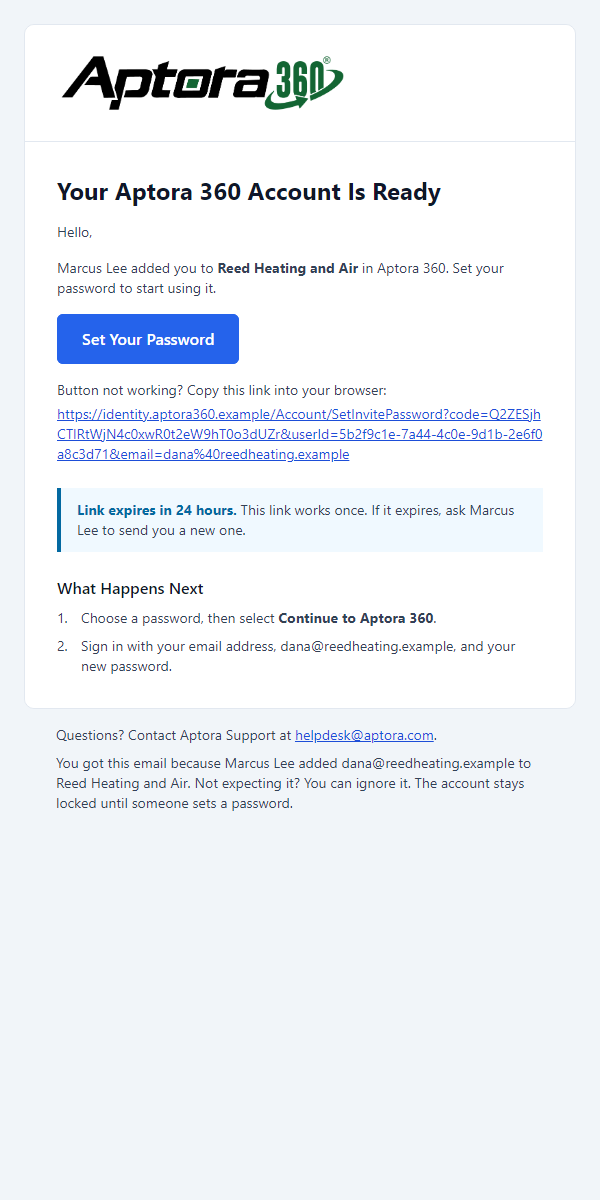
Note: on older builds, the email came from “Aptora Support”. Its subject was “You're invited to Total Office Manager NextGen”, and it had a link instead of a button. The page button said Set password, and a second page had a Sign in button. The steps are the same.
Important: the invite goes out the moment you save a new user. Set the person's security before they accept it.
Troubleshooting and Questions
Why did the person not get the invite email?
It may be in their spam or junk folder, or the email on the user may be wrong. Ask them to check spam for mail from Aptora 360. Double click their row on the Users list and check the Email. Then use Resend Invite. If it still does not arrive, contact Aptora Support.
Why does the invite link not work?
The link lasts 24 hours and works once. Use Resend Invite to send a new one.
How do I fix an email I typed wrong?
Double click the user to open Edit User. Fix the Email and click Save & Close. This also changes their sign in name. Then use Resend Invite so the new address gets a link.
“The Email … already exists”
A user in your company has that email. Look for them on the Users list. If they are inactive, use Make Active.
“Identity User exists already with this email”
That email already has an Aptora 360 login. Contact Aptora Support. (to confirm: support path)
Why is the person not in the Employee list?
They are inactive, or already linked to another user. Check the employee record, or click + New to add them.
Why will the user not save when my license is full?
All seats of that type are in use. Make an unused user inactive to free a seat, or contact Aptora to add seats.
“None of the selected users have an account to send an invite to”
The login is still being set up. Wait a minute and try Resend Invite again. (to confirm)
If You Used Total Office Manager
The Users list and adding a user work differently from the desktop program in these ways.
| In Total Office Manager | In Aptora 360 |
|---|---|
| Users and their security were one place: Company > TOM User List/Security. (to confirm: menu label) | Users are at Company > Lists > Users. Security is a separate screen: Company > Settings/Security > User Security. |
| New opened the New User Setup wizard: pick the employee, type a password, set security and approvals, then Finish. | New User opens Create User, with three fields: Employee, Email, and Seat Type. |
| You typed the person's password twice, then told them what it was. | You never set a password. Saving emails the person an invite, and they choose their own. |
| The person signed in with their employee name as the user name. | The person signs in with their email address. |
| You set the person's security inside the wizard, or used Copy From User. | A new Aptora 360 User starts with full access. Change it afterward in User Security. |
| Approvals were a step of the wizard. | Use the Approvals button on User Security. |
| You could select Password Never Expires. | Not in Aptora 360. |
| You typed a separate Mobile User ID for the mobile app. | There is no Mobile User ID to type when you add a user. The same email signs in to Mobile 360. (to confirm on a device) |
| You set the person's Time Clock Pin in the wizard. | Not in the Create User window. (to confirm: where Aptora 360 sets it) |
| A user had no seat type. | Each user takes an Aptora 360 User or Mobile Only User seat. When all seats of that type are in use, the user does not save. |
| For a forgotten password, an administrator opened the user and typed a new one. | Select the person and choose Resend Invite. They choose a new password from the link. |
| Making a user inactive needed the Void right. | Make Inactive needs the Edit right on the Users list. (to confirm: right names on User Security) |
Related Topics
- User Security (Setting What a User Can Do) (no Aptora 360 article on the support site yet)
- Approvals (Who Can Approve Records) (no Aptora 360 article on the support site yet)
- Employee List (slug employees-adding-new-and-editing)
- Signing In to Aptora 360 (no Aptora 360 article on the support site yet)
- Signing In to Mobile 360 (no Mobile 360 article on the support site yet)
Applies to: Aptora 360 · Last verified: October 5, 2026, against the code on origin/main (not yet released)