A Vendor Credit is money owed to you from a Vendor for return of items, warranty agreements, or overpayment on previous bills in the instance a refund check was not submitted. Credits do not need to be entered as a negative amount. Total Office Manager’s Vendor Credit knows this is a credit and takes care of the debit and credit entries of the transaction for you.
To create a new Vendor Credit, select New Credit from the Vendors main Menu option.
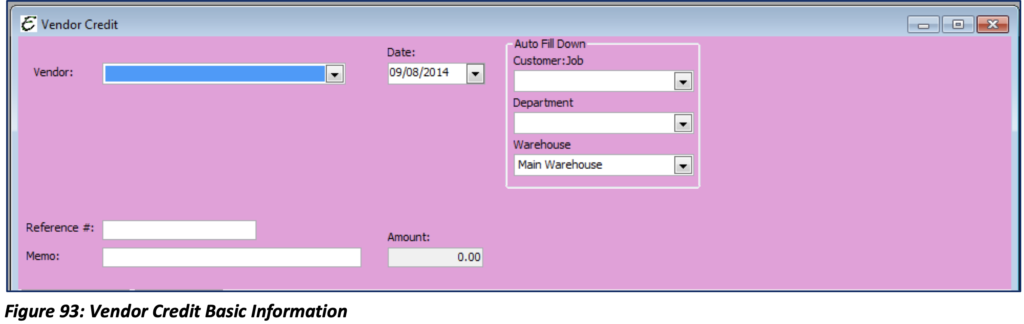
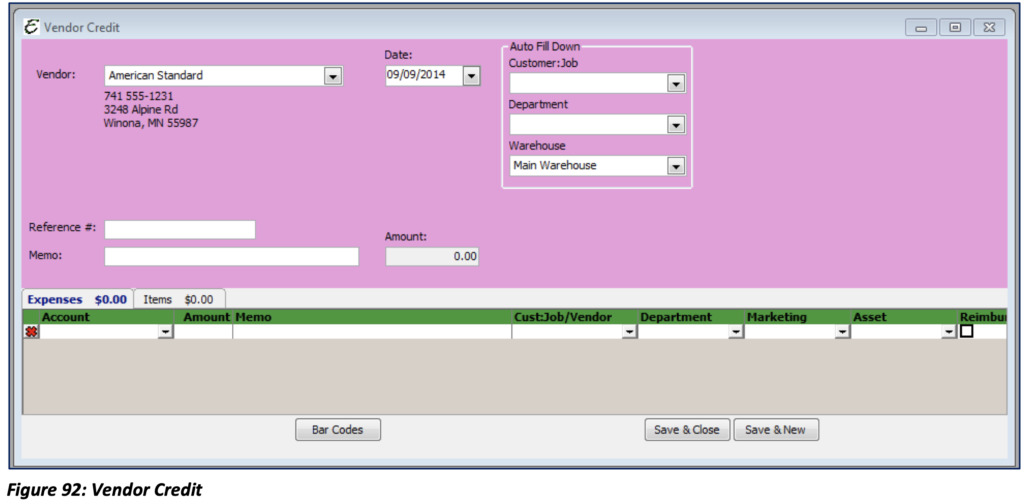
Vendor: Select the correct Vendor from the drop-down menu or create a new Vendor by clicking the <New Vendor> option.
Date: The current date will automatically populate in the field, or you can enter another date by clicking on the drop-down arrow for the calendar.
Amount: This field is a summation of the line item amounts. It will automatically populate with the correct dollar amount once all Items and Expenses have been added.
Reference #: Enter the Credit Memo number, or any number you would like to track to this Credit.
Memo: Enter any general information you might need to track this particular Vendor Credit. (Each “Memo” field should be utilized to communicate with all users the purpose of the corresponding transaction. This field will also provide documentation and audit security.)
Customer:Job: Use the dropdown to select the Customer:Job (if any) associated with this purchase. (This is important for accurate Job Costing purposes.)
Department: Use the dropdown to select a Department (if any) associated with this return. If Vendor has a default department, it will auto populate here.
Warehouse: If a Warehouse is associated with this credit, you will need to select it to remove the item from the Warehouse Expenses Tab

Account: Select from the drop-down menu the COGS/Expense account that is to be affected by the Credit.
Amount: Enter the amount of the Credit for the particular COGS/Expense being entered. You may be entering more than one account for a single transaction.
Memo: Enter any particular information pertaining to the Credit, which you may need to help track this Credit. (Each “Memo” field should be utilized to communicate with all users the purpose of the corresponding transaction. This field will also provide documentation and audit security.)
Customer:Job: Select from the drop-down menu the Customer:Job for this particular Credit, if applicable.
Department: Select the department (if any) to which this Credit is related. Marketing: Select the correct Marketing Type (if any) to which this Account is related. Asset: Select the Asset if any that is related to this Credit.
Reimbursable: If this item was Reimbursable and originally invoiced to a Customer:Job, you may want to check this box. This will store a reimbursable credit for the Customer:Job to issue a Credit Memo for the items or goods returned by the Customer.
WO: Select the Work Order associated with this Credit.
Items Tab

Item: Select from the drop-down menu the particular Name/Number of the line item you are entering.
Warehouse: Will auto populate with default Warehouse; otherwise, a Warehouse will need to be selected for Invoice or Serial Parts.
Qty: Enter the quantity of items for the item.
Cost: Will auto populate with the Estimated Cost from the particular Item selected
Amount: Item Amount is calculated by Cost time Quantity.
Customer:Job : Select from the drop-down menu the Customer:Job for this particular Credit, if applicable.
Purchase Description: The Purchase Description associated with the Item will auto populate in this field. Department: Select the department (if any) to which this Credit is related.
Asset: Select the Asset if any that is related to this Credit.
Reimbursable: If this item was Reimbursable and originally invoiced to a Customer:Job, you may want to check this box. This will store a reimbursable credit for the Customer:Job to issue a Credit Memo for the items or goods returned by the Customer.
WO: Select the Work Order associated with this Credit.
Serial #: If the Item has a Serial Number, this field will auto populate.
Sales Description: The Sales Description associated with the Item will auto populate in this field. Notes: This field is used for any Notes you would like to add concerning this return.
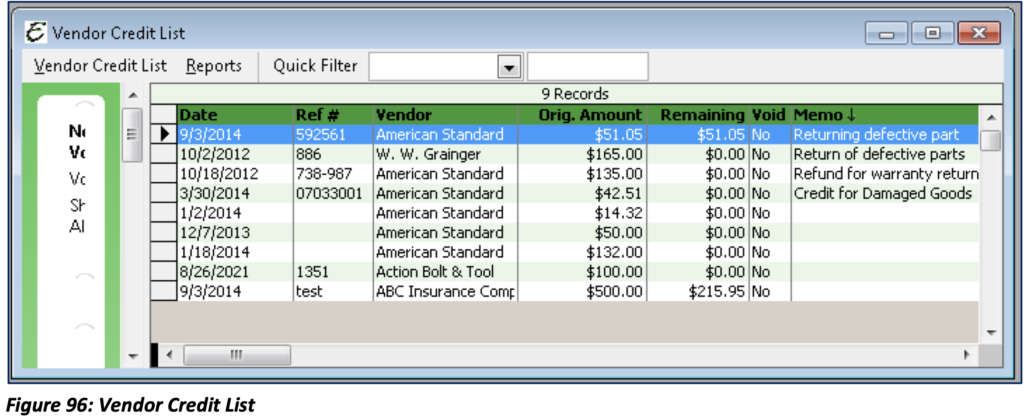
If you need to review your list of Vendor Credits, select Credit List from the Vendor Menu option. This will activate the Vendor Credit List.
Applying Credits
Once your Credit(s) have been created, they can be applied to existing Bills. To begin, you will need access Pay Bills form. To do this, select Vendors from the Main Menu and Pay Bills. This will bring up all open bills needing payment.
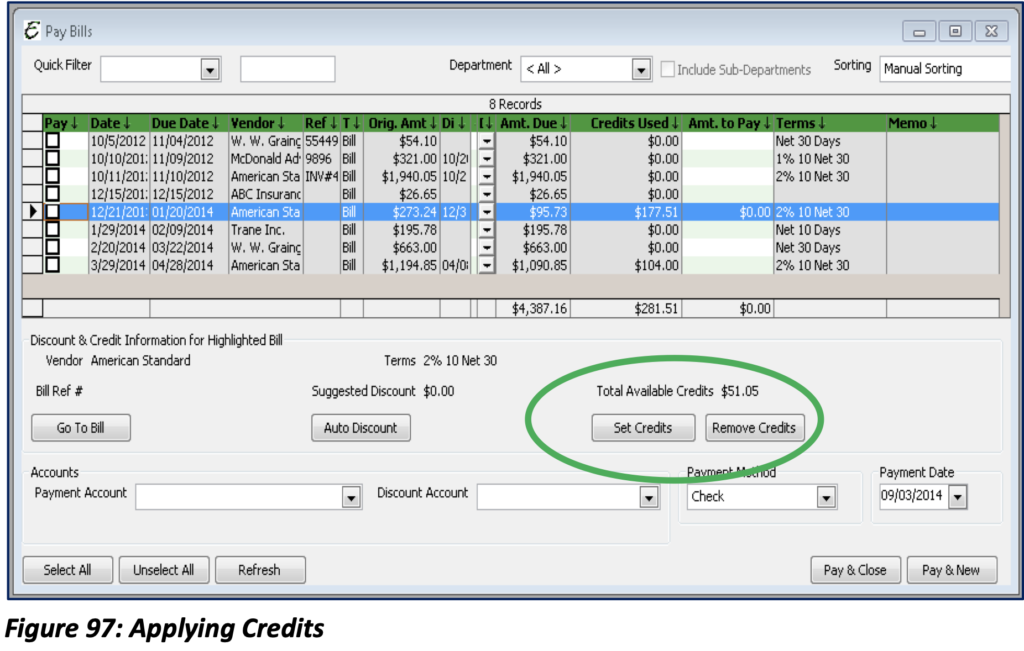
Select the Bill you wish to pay. Total Office Manager will automatically inform you that there are Credits available according to the Vendor associated with the Bill and the amount available. To apply the available Credits, select Set Credits.
Select from the list of available Credits (Credits never suggest that you use more than the balance due on the Bill or amount available on the Credit.) The Amount to Use of each available Credit can be changed if a specific amount needs to be applied.
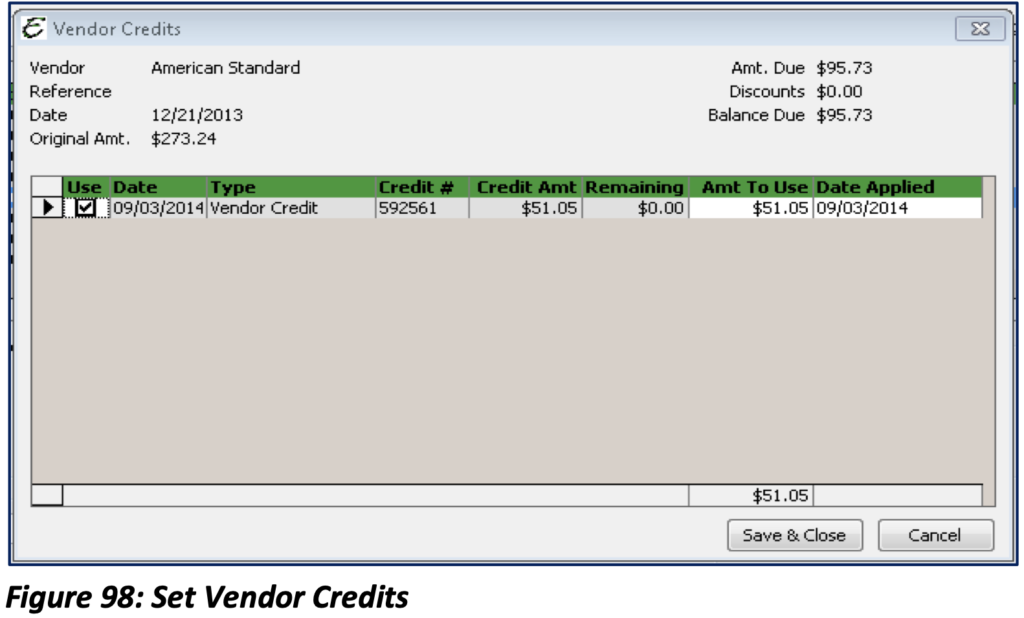
Once the Credit(s) have been applied the “Amount Due” will be updated to the difference of the amount of the Credit. If the Credit covers the entire amount of the Bill it will be removed from the list.
It is recommended that all Bills are paid for Vendors with Available Credits first. If there are more than one Vendor who has Credits available, you can pay each Vendor’s bills separately. Doing so will increase the likelihood of successfully applying Credits.
Please note: If you select more than one Bill, the Credit will only appear if the last Bill selected is for a Vendor who has available Credits.
Credit Cards
The Credit Card feature is located under the Banking menu. That is because a credit card company is technically a bank and they are loaning you money to make purchases. For training purposes, we will cover the topic here because the subject is very closely related to entering bills.
Credit Card Charges
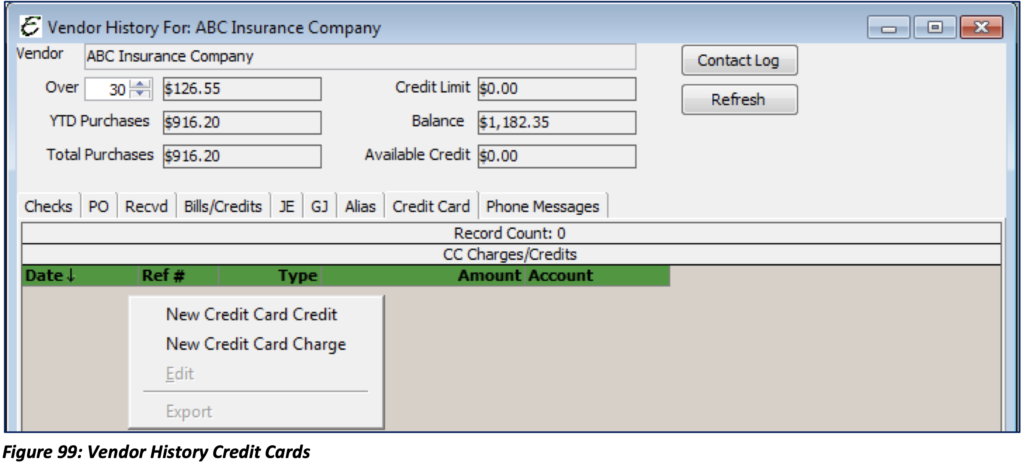
When you purchase something for your company using a credit card (not debit card as a credit card), you will need to ensure the charges are applied correctly in Total Office Manager. There are several ways to access this feature. You may go to the Vendor List, locate the Vendor, Right-Click and choose history. Once the Vendor history has loaded, go to the credit card tab. Right-Click to access the pop-up menu. If this is a new charge, simply choose new Credit Card Charge. If you need to edit the Credit Card transaction, simply highlight the transaction, Right-Click and then select edit. You may also double click to edit.
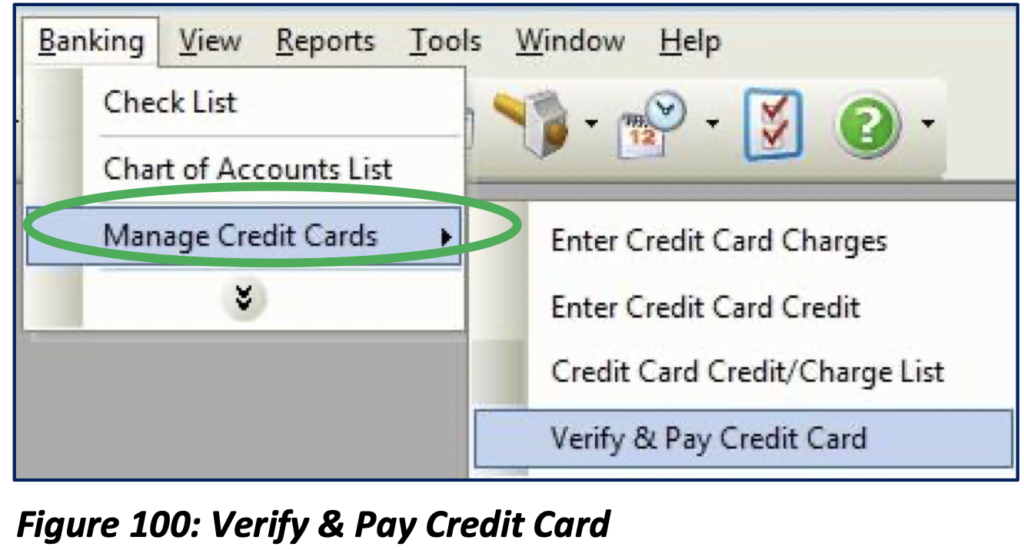
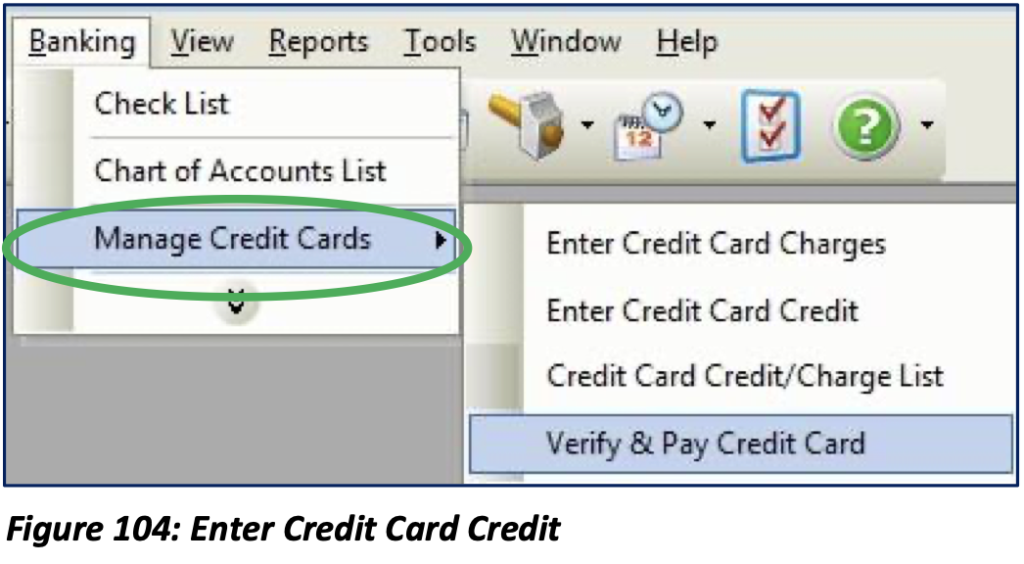
Another way to enter a Credit Card Charge or Credit Card Credit would be to go to the Banking Menu, Select Manage Credit Cards and then select either Enter Credit Card Charges or Enter Credit Card Credit. You may also access the Credit Card Credit/Charge List from this Menu Option or Verify & Pay Credit Card. The Verify & Pay Credit Card option will be discussed later in this section under Credit Card Reconciliations.
Once you choose to enter a New Credit Card Charge, you will be taken to the Credit Card Charge screen. Prior to entering the charge into Total Office Manager, ensure that you are working from a copy of the receipt as it will provide the most accurate information in regard to the charge.
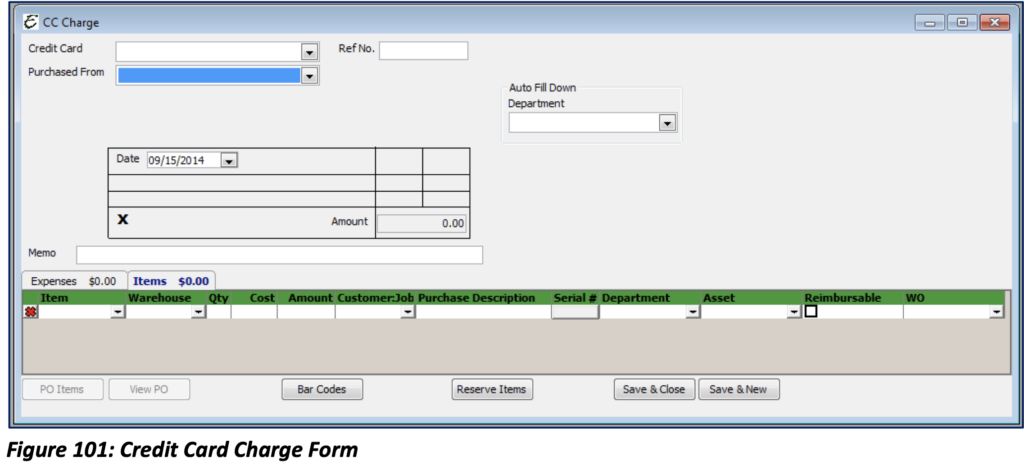
One of the first things you will notice about the CC Charge form is that other than the color, it is very similar to the Bills form. Credit Card Charges look and work exactly like Vendor Bills except for the fact it affects a Credit Card Balance rather than Accounts Payable. For questions on the form, see the Accounts Payable section.
Completing a CC Charge Form

Credit Card: Select from the drop-down menu the Credit Card used. This is required.
Purchased From: Select from the drop-down menu the Vendor from whom you purchased the items. This is required.
Ref No: Reference number of your choosing (not required).
Auto Fill Down Department: If applicable, choose the Department you would like to associate with this charge. This will auto populate from Vendor if the Vendor has a default department assigned.
Date: The current date will automatically populate but you can manually change this. It is recommended that the date of purchase is used.
Amount: The total amount of the CC Charge based on the Expense and Item tab entries. Memo: Enter any general information you might need to track this particular CC charge.
Other Charges

PO Items: This button will take you to any open purchase orders for the Vendor you are paying.
View PO: If you have tied to an open purchase order to this Credit Card Charge, then the View PO button will un-grey. Selecting this button will then take you to the purchase order to review.
Bar Codes: Click to generate Bar Codes for the Invoice Items entered on the CC Charge.
Reserve Items: This button will take you to the Reserve Item screen which was discussed in Inventory Management.
Save & Close: This button saves the Credit Card Charge and closes the form.
Save & New: This button saves the Credit Card Charge and opens a new form.
Please note: Once a charge has been cleared, you will only be allowed to alter non-accounting related fields. This will ensure that your accounting ledgers are remaining consistent. Unless, you have “Cleared Transaction Accounts” permission in User Security which allows you to edit accounts for improper account coding on cleared transactions.
Credit Card Credits
Occasionally, you will return an item to a Vendor or you will be awarded a credit from a dispute with a Vendor over such as a Hotel or Airline charge. Either way, these types of credits will show up on your credit card statement. Entering these credits into Total Office Manager is identical to entering credit card charges. Besides the color of the screens, what differentiates the Credit Card Credit from the Credit Card Charge is that the Credit Card Credit will show up as a debit on your financials where the Credit Card Charge will appear as a credit. Please refer to Credit Card Charges for information on how to fill out the Credit Card Credits form.
As mentioned above, you may access the Credit Card Credit form by going to the Vendor History of a selected Vendor and going to the Credit Card tab. You will then Right-Click to access the pop-up menu. You may also go to Banking, select Mange Credit Cards and select Enter Credit Card Credit.

Please note: The Credit Card Credit form is light blue, and the Credit Card Charge form is grey.
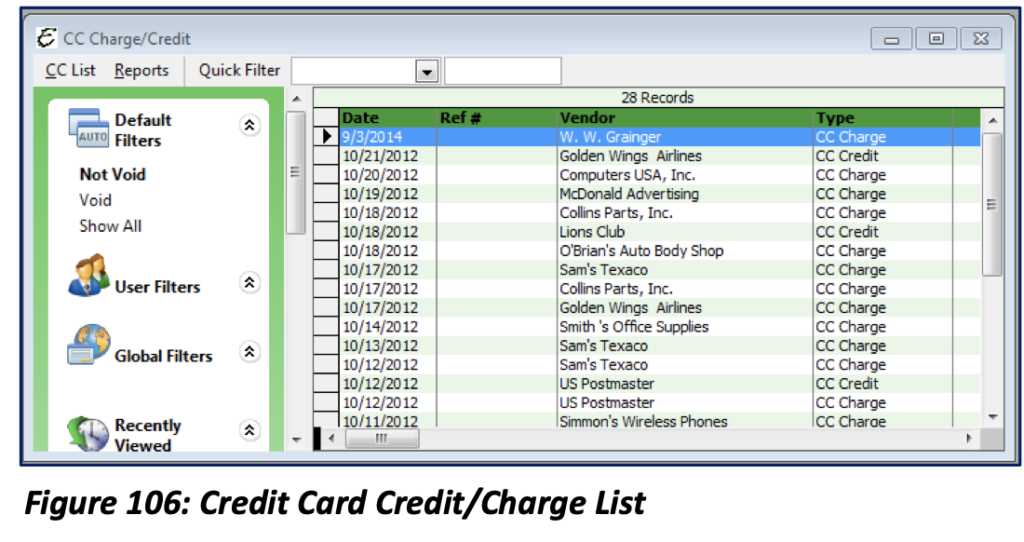
Credit Card Credit/Charge List
The Credit Card Credit/Charge List is accessed through Banking. You will need to select Manage Credit Cards and choose Credit Card Credit/Charge List to be taken to the Credit Card Credit/Charge List. You will be able to filter through these transactions to edit, delete, or void items. You may also Right-Click to access additional menu options. As with other lists, Right-Click to access Form Preferences to add or remove columns in the list.
Paying Credit Cards
As mentioned earlier, a Credit Card company is technically a bank. They are providing you with a short- term loan to make purchases on credit. The section on Banking will discuss how to reconcile and pay your credit cards.