The Sales Tax feature in Total Office Manager is both powerful and unique. You can calculate Sales Tax not just based on the retail price, but also based on direct cost and gross profit. In addition, Total Office Manager allows you to individually Tax each item on an Invoice.
Estimates can include the same Sales Tax items and options as an Invoice can. Estimates however do NOT create a Sales Tax Liability of any kind. Only when a Taxable Invoice is created and saved is a Sales Tax Liability created. If you create Estimates, include Sales Tax information. It will be copied over when the Estimate is converted into an Invoice.
If you do not wish to show your Customer the Sales Tax amount, you can suppress the Sales Tax amount in many ways. The Print/Email Setup includes an option called “Print Sales Tax Total”. Clearing this check box will prevent the Sales Tax from being displayed on a printed Invoice.
Sales Tax Setup
Sales Tax and how it is applied must be set up through a few different channels. In order to apply Sales Tax to your Invoices/Sales, you must include your Tax Rates and Tax Authorities (Vendors). To do this you will need to create Sales Tax Items. Sales Tax Items allow you to track a Sales Tax Liability to a specific Tax Authority, so you know the balance of Sales Tax collected and owed for each Tax Jurisdiction.
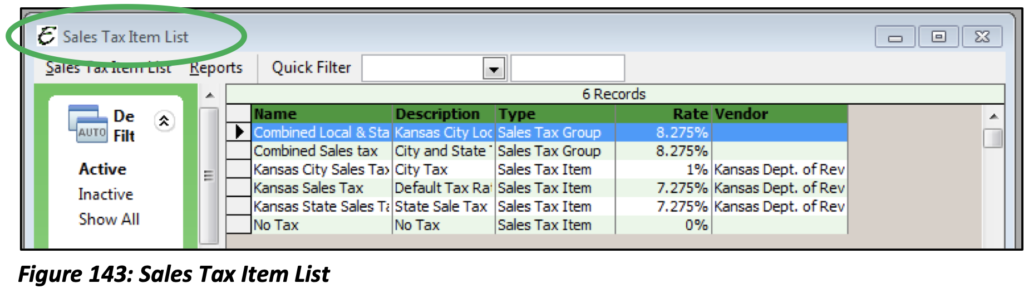
From the Customers main Menu option, select Sales Tax, and then select Sales Tax List.
Depending on the tax that your particular state requires you may need several Tax Items that will be applied to your Sales forms. Locality Tax will also be a Tax Item that will need to be created for any city tax that you are required to collect or pay. If your company does business in more than one state, then subsequently a Tax Item may need to be created for each state.
Please note: The Tax Authority will need to be set up as a Vendor. You will also need to create a Chart of Account for the Expense you will be incurring. If the tax is a company burden, Total Office Manager automatically creates and uses a Sales Tax Liability Account called, “Sales Tax Payable”. This is a designated account in Total Office Manager and must be used. You can, however, change the name or account number of the designated account.
Important: Any user created Sales Tax Liability Accounts will not be used for system tracking purposes.
Add New: Sales Tax
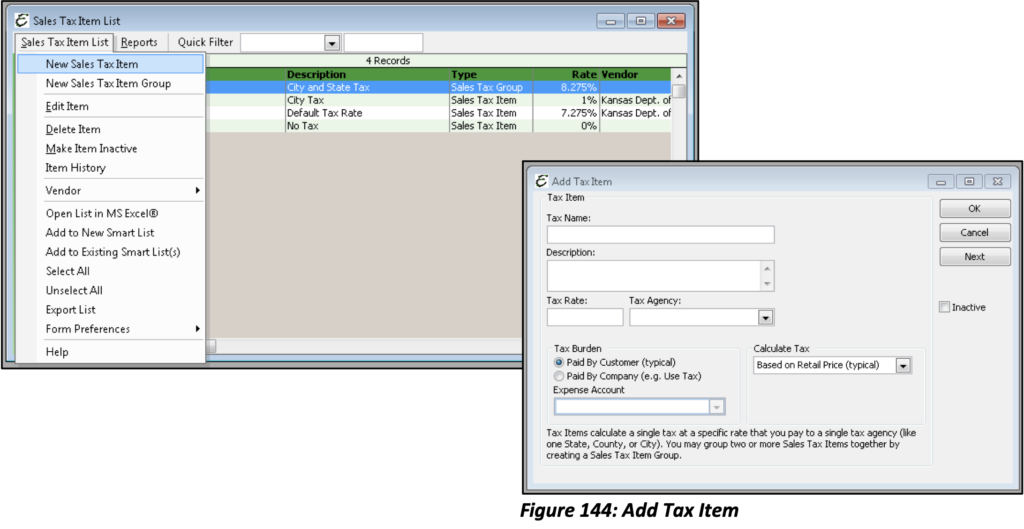
When you create a new Tax Item, the form that opens will ask you to provide additional information that pertains to how your business handles Sales Tax.
Tax Name: This is the identifying title to be recognized when being searched for and selected on Sales forms.
Description: A further explanation of the Tax.
Tax Rate: This is the Tax amount as a percentage. You will typically receive this information from your state.
Tax Agency: Choose from your Vendor list, the Tax authority to which you owe your Tax liability.
Tax Burden: This defines who pays the Tax, you as the company, or does the “burden” lie with your Customers?
Calculate Tax: There are three Tax calculations available based on: Retail Price, Gross Profit, or Direct Cost.
Retail Price: Calculates the Sales Tax Rate on the Item Amount.
Gross Profit: Calculates the Sales Tax Rate on the difference of the Item Amount minus the Item Cost.
Direct Cost: Calculates the Sales Tax Rate on the Item Cost.
Sales Tax Codes
Sales Tax Codes determines whether or not the Sales Tax Item should be calculated.
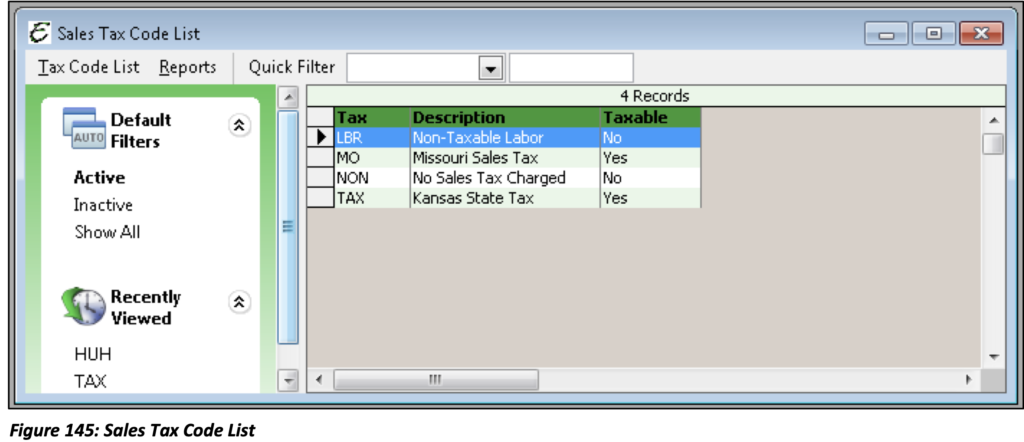
From the Customers main Menu option, select Sales Tax and then select Sales Tax Codes List.
A Sales Tax Code simply answers the yes-or-no question whether or not Sales Tax applies on a sale. The simplest of Sales Tax Code setups would perhaps only include two codes: one for tax (TAX) and one for non-tax (NON).
At some point, however, you may be audited by state Sales Tax officials who will want to know why tax was not charged on any given transaction. This is why it can be important to setup more than one non- taxable item, each one indicating why tax was not charged. Creating Sales Tax Codes allows for you to see the break out of Sales Tax by Sales Tax Item and by Tax Code.
A non-tax code of “EXT” (exempt) might be set up to indicate tax was not charged because the Customer was a church, or a non-tax code might be “LBR” to indicate tax was not charged on a particular line item because it was labor (a common scenario in many states). Creating Sales Tax Codes allows for you to see the break out of Sale Tax by Sales Tax Item and by Tax Code.
Add New: Sales Tax Code
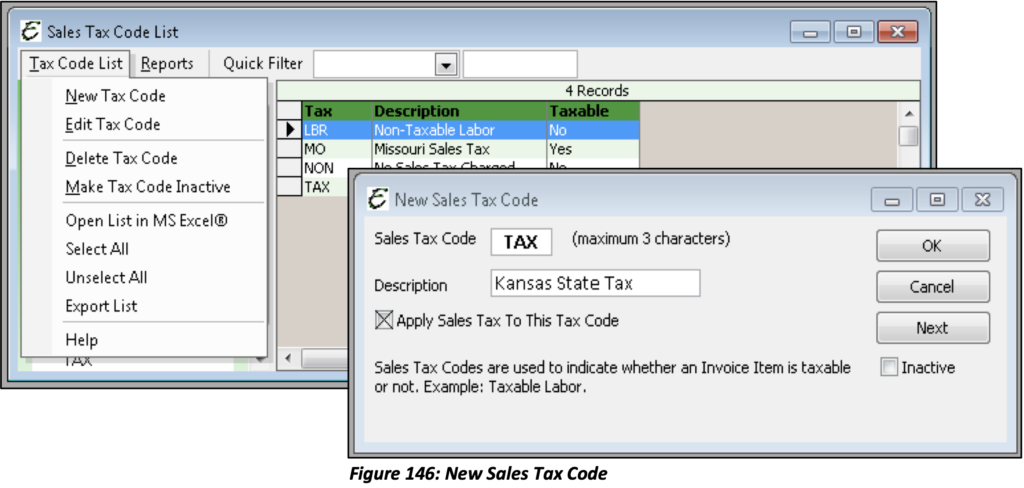
Create a new Sales Tax Code. Give it an alias (code) and a short description. The checkbox “Apply Sales Tax To This Tax Code” tells Total Office Manager to assign the taxable or non-taxable designation for each Invoice Item to which the code will be assigned. The Tax Code will let whoever creating the Sales form know to assign the applicable Tax Item(s).
Assigning Sales Tax Codes and Tax Items to Invoice Items
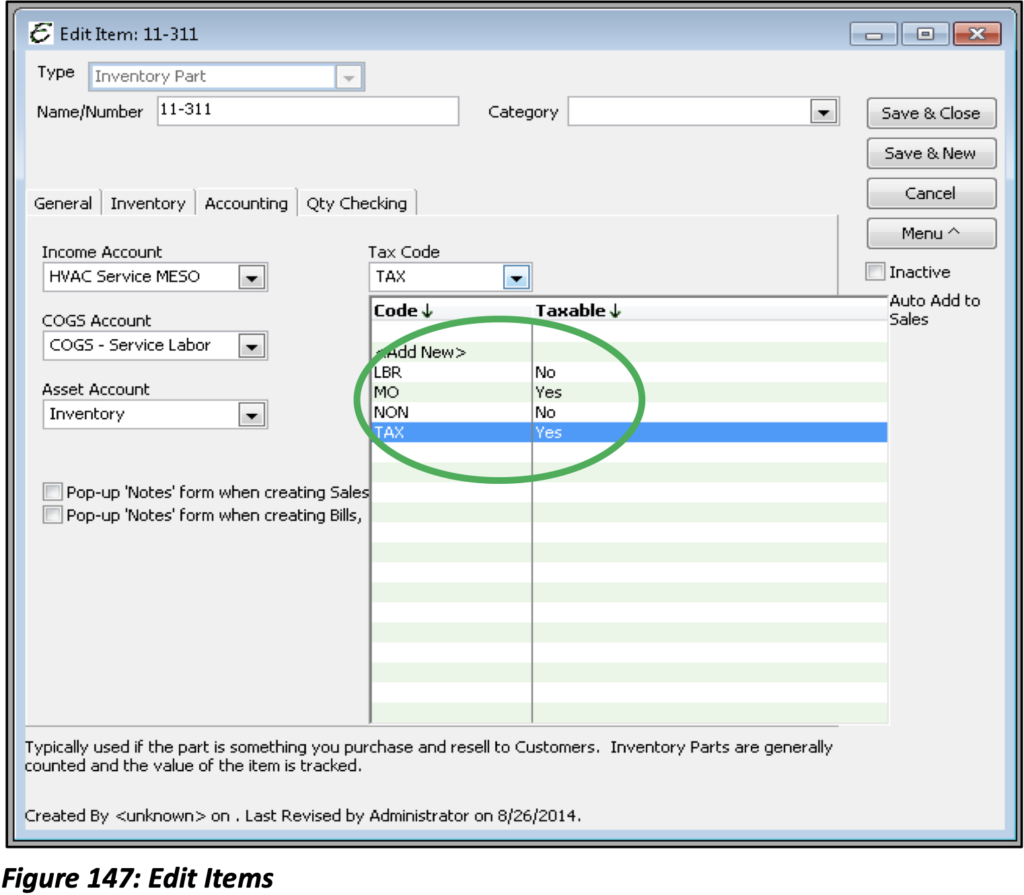
Now that your Sales Tax Codes and Tax Items have been created you can assign them to your Invoice Items. Sales Tax Codes and Tax Items can be assigned to each individual Invoice Item as they are added to a Sales form. Access your Invoice Item List to assign a default Tax Code or to your Invoice Items as you create new Invoice Items, add the Tax Code to the Accounting Tab of the New Invoice Item form.
Please note: You can leave the default Tax Code blank on Invoice Items to assign the Tax Code during the Invoice/Sales Process.
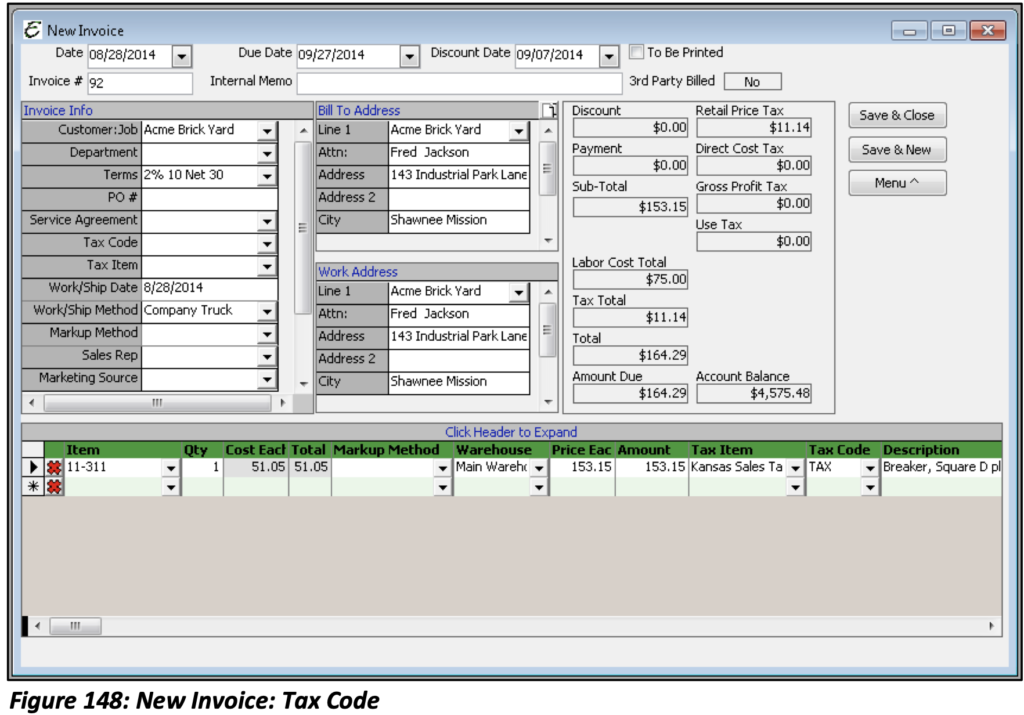
Once you’ve added the Item to the Sales form the Tax Code will automatically populate then you must choose the corresponding Tax Item. The Tax Code must have the “Apply Sales Tax to This Tax Code” checked so that the Tax Item selected will be calculated. If you choose a Tax Code without that designation the Tax Item selected will not be calculated.
Assigning Sales Tax Codes and Tax Items to Sales Forms
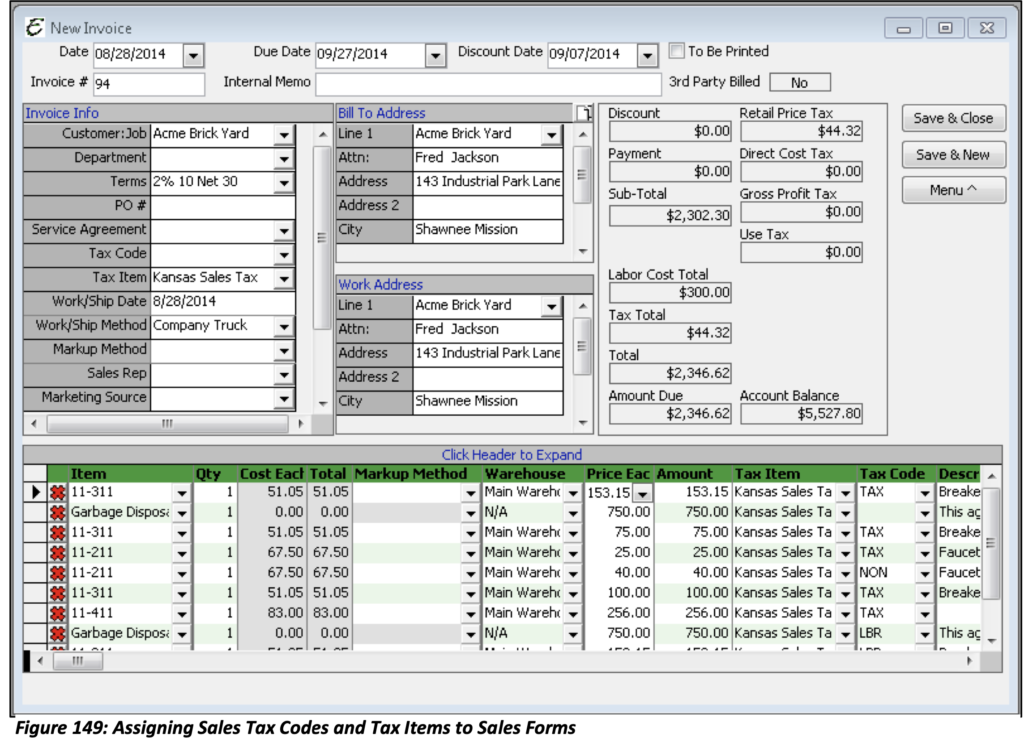
If your Sales form will include a large quantity of Taxable Invoice Items, instead of selecting the Tax Item for each individual item being sold, you can apply the Tax Item to the Sales form. Applying it to the Sales form will automatically populate the Tax Item for every Invoice Item that is added.
The Sales Tax Code, however; is not affected by the selection. This means that the Item’s specific Tax Code (that was assigned when the Item was created) will remain the same. So, even though a Tax Item will appear in the line; if the Invoice Item being sold is a non-tax item no Tax will be applied.
Tip: If you have Items that can be both Taxable and Non-Taxable based off the Customer or work performed, leave the Tax Code on the Item blank and assign a default Tax Code to your Customer(s). This way, a normally Taxable Item can be marked Tax Exempt if a government or religious organization has a Tax-Exempt Certificate. This prevents you from having to manually change the code of each Item.
Sales Tax Tracking
When setting up your Sales Tax Items there are several criteria that you can set that will determine how you track your Sales Tax responsibility. The typical scenario is such that the Tax burden lies with the Customer and the reports generated will reflect that.
Use Taxes, however, need to be given a different designation. Sales Tax paid by your organization should be marked as such when creating your Sales Tax Items. Along with this designation an Expense account needs to be selected so your Use Tax expense can be properly tracked.
Determining these criteria will figure how your Sales Tax will be calculated. Total Office Manager gives three calculation options:
Based on Retail Price: Items will be taxed using the price you CHARGE (retail price). This is the most common choice for typical Sales Tax.
Based on Direct Cost: Items will be taxed using the price you PAY (wholesale price or direct cost). This is common when you track Use Tax.
Based on Gross Profit: Items will be taxed using the gross profit (retail price less what you paid for it).
Choosing the best option for calculating your tax method will be based on your business operation and state, if you have any questions or would like assistance please contact your accounting or tax professional.
Using Sales Tax Group Items
Sales Tax Groups are a combination of two or more Sales Tax Items. Even though you may be charging your Customers a combination of Sales Tax Items, they may be used to seeing only one Sales Tax line and Rate on Sales forms. A Tax Group lets you track each Tax separately, yet show only the total Sales Tax on your Sales form.
Please note: Every state has a different Tax structure for their state, county, and municipality. Check with your own state and local Sales Tax agencies to find out their rules. Your state may have already combined all your Taxes into one Tax Amount.
Sales Tax Groups are useful when a special Tax or levy Tax was imposed for 1%, for duration of two years. Everyone must be charged the 1%. Set up a Tax Item Group and you won’t have to worry if you remembered to charge the Special Tax. At the end of the two years inactivate the Tax Group and continue charging the normal Tax Rate.
From the main Menu select Customers, then select Sales Tax, and then select Create Sales Tax Group.
If you collect Sales Tax at more than one rate, or if you pay Sales Tax to more than one agency, then you must set up a separate Tax item for each Tax you collect for each agency. If you sell to out-of-state Customers, then set up an out-of-state Sales Tax item that will help you to identify different rates for different locations. If you charge your Customers a combination of these Taxes, you’ll want to set up Tax Item Groups.
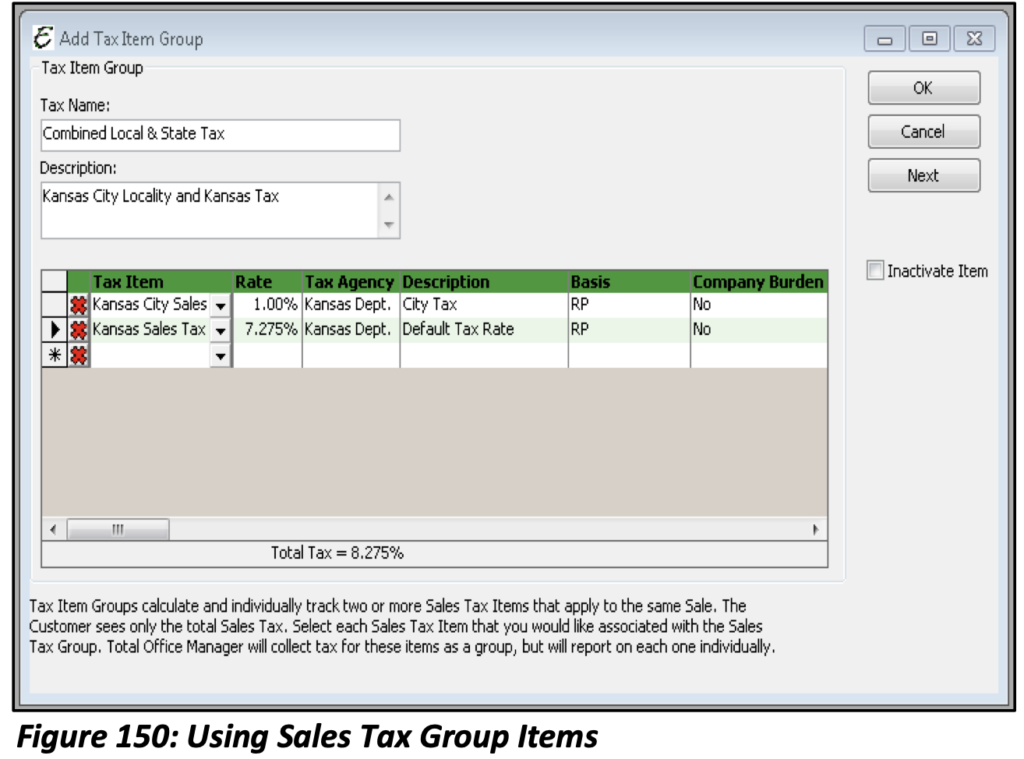
Give your Tax Group a name and description then select each Tax Item that will be a part of the group. You will notice the total will be the sum of each Item added.
Adding Sales Tax Groups to Sales Forms
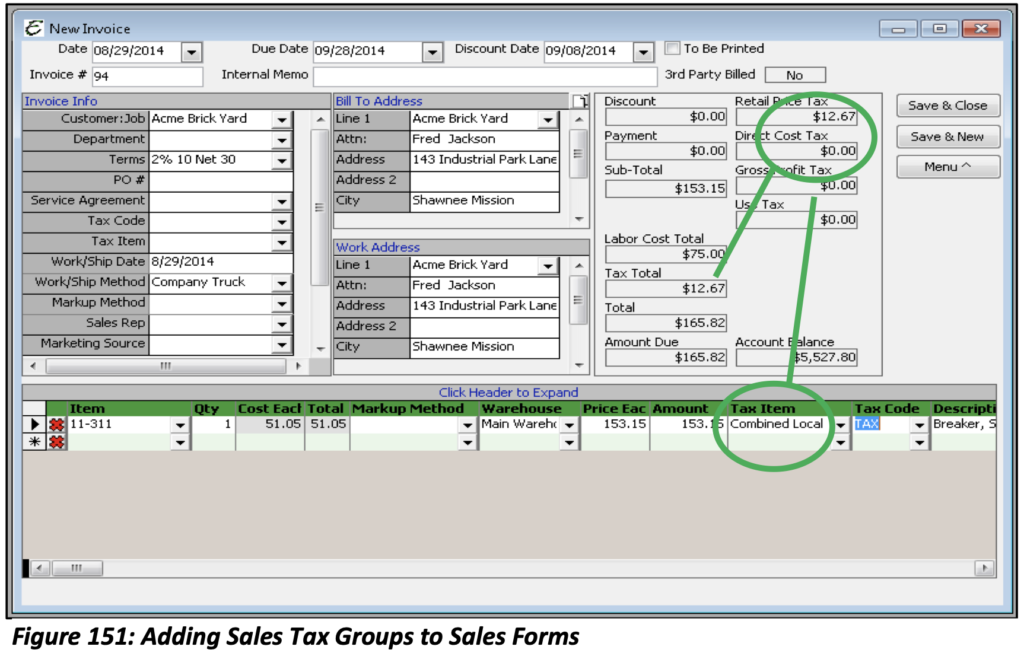
When adding Sales Tax Groups to Sales forms they are added in the same way individual Tax Items are added. The individual Tax Items that were applied as a part of the group: State Sales Tax 7.275% and City Sales Tax 1%. The retail price for this Item is $153.15. When the State Sales Tax is applied the Tax is calculated as $11.14 and the City Sales Tax is $1.53. The total Tax charged to the Customer is $12.67. The calculation of each individual Tax Item is not displayed. Total Office Manager does this automatically. Now when invoices are printed to be sent to Customers the one tax total will be displayed instead of each individual Tax Item that is a part of the group.
Paying Sales Tax
Each time you sell something, Total Office Manager offers you the chance to add Sales Tax to the Sale. Total Office Manager then keeps track of the Sales Tax collected and to whom you owe the money. This makes it easy to pay the particular tax authority to which the money is owed.
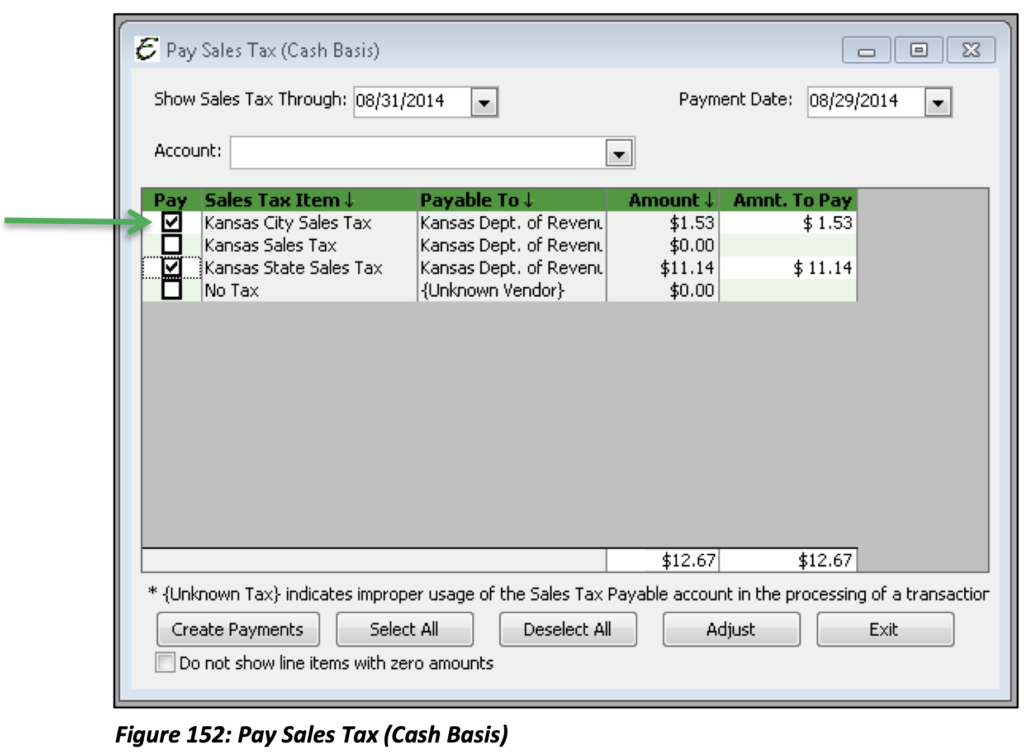
From the Customers main Menu option, select Sales Tax, and then select Pay Sales Tax. Choose the date through which you would like to see your Sales Tax Liability. The default date is the end of the current month. Payment Date is the date you are entering the payment. Both fields can be changed if necessary. Then select the Account from which the Liability Payment will be made.
Please note: If you pay Sales Tax monthly, the “Show Sales Tax Through” date should be set to the last day of the month for which you are paying the Sales Tax. If you pay Sales Tax quarterly, you would select the last day of the quarter for which you are paying Sales Tax. The payment date is always the actual date you paid Sales Tax.
Select which Tax Liabilities you wish to pay at this time. In the “Amt To Pay” column, each line field can be edited if you decide to pay more or less than what is owed. Once you have the Liabilities selected, click the Create Payments option. This will create checks that will need to be printed and submitted to the proper Tax Authorities. Open your Check List from the Banking main Menu option to view these checks. If your Sales Tax Liability is owed to only one Vendor, then just one check will be created for the total amount owed. Conversely, if more than one Vendor is owed a check will be created for each for the total amount owed to each. If you pay Sales Tax online, you can edit the check later and enter a reference number or “ACH” as the check number. To pay Sales Tax with a Credit Card Type Account rather than a Bank Account. Once you click Create Payments, a Credit Card Charge will be created rather than a check.
Sales Tax Liability Adjustments
Each time you sell something, Total Office Manager offers you the chance to add Sales Tax to the Sale. When you do, Total Office Manager keeps track of the Sales Tax collected and to whom you owe money. This makes it easy to pay the particular Tax Authority to which the money is owed. Total Office Manager also allows you to adjust the amount that you owe to a specific Sales Tax Vendor and by a specific Sales Tax Item.
Please note: This form should only be used when you are certain an adjustment is required.
From the main Menu select Customers, Sales Tax, and Sales Tax Liability Adjustment.

Adjustment Date: Total Office Manager automatically populates this date field with the current date (according to your computer’s date/time setting). You can change it if you need to. This date affects both the Sales Tax Item balance and the Sales Tax Liability balance (when “Do NOT affect accounts” is not selected).
Entry No.: Entry Number. Total Office Manager automatically populates the field with “Month End”. You can change it if you need to.
Vendor: Sales Tax Vendor. This refers to the Vendor to which you owe the Sales Tax. This is the entity to which you PAY Sales Tax. This may be your local state or county government.
Sales Tax: Allows you to select which Sales Tax Item to adjust.
Adjustment Account: The off-setting account (from Chart of Accounts) that will show this adjustment (typically a of type COGS/Expense or Income). Do NOT select the Sales Tax Liability account here as this account will already be affected based off the Sales Tax Item you select to adjust.
Increase Sales Tax By: Check this option if you are trying to INCREASE the amount of Sales Tax.
Decrease Sales Tax By: Check this option if you are trying to DECREASE the amount of Sales Tax.
Amount: This is the amount of money to increase or decrease the Sales Tax balance by.
Do NOT Affect Accounts: Check this option if you need to adjust the balance of a Sales Tax Item without affecting the Sales Tax Liability account balance. An example would be where your Sales Tax Payable account balance differs from that of the Sales Tax Item. Maybe you created a check and selected the Sales Tax Liability Account instead of paying Sales Tax through the Pay Sales Tax form. Doing so would cause the Sales Tax Item to still have a balance which would there need to be adjusted to match what was paid.
Understanding the Sales Tax Liability Report
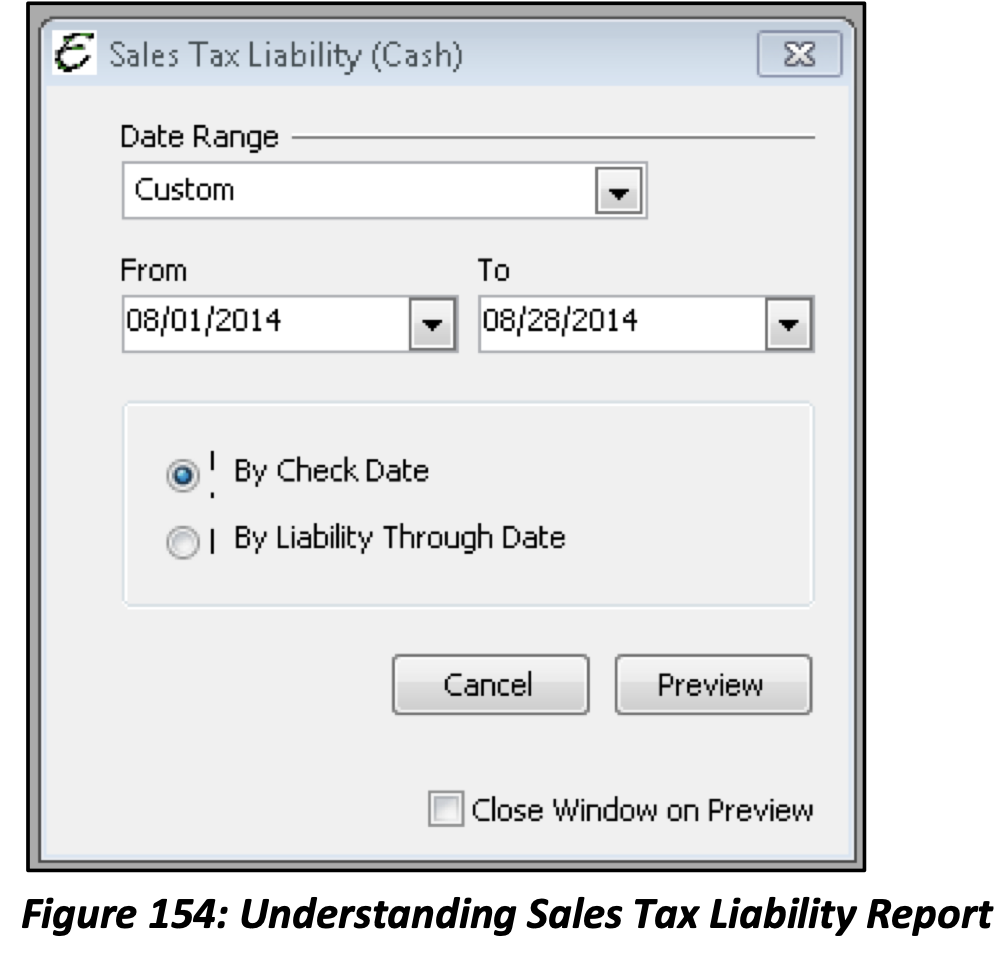
The Sales Tax Liability Report displays an overview of your Tax Liability by Tax Authority (Vendor). The Sales Tax Liability Report has two display options.
By Check Date: Displays the report based on a date range when Sales Tax Liability checks were written.
By Liability Through Date: Displays the report based on the date range selected through when the Liability was incurred.
Sales Tax Liability Report: Preview
The Sales Tax Liability Report displays your Sales Tax Liability by Tax Authority (Vendor) and lists each Sales Tax Item and Sales Tax amount owed to that particular Tax Authority (Vendor).
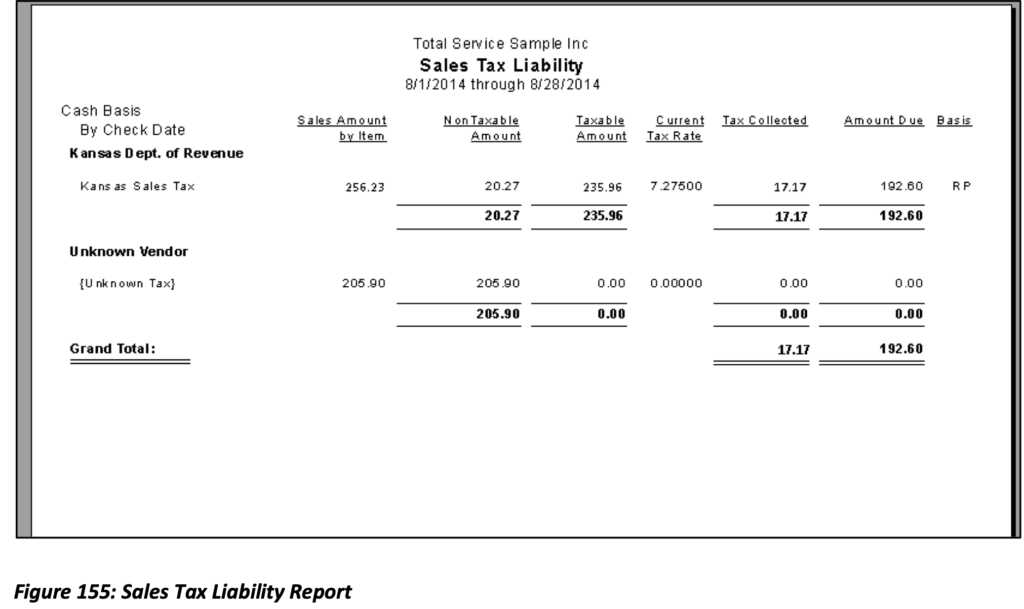
Sales Amount by Item: The figure in this column represents the combined Sales Amount of Taxable and Non-Taxable Sales for each Sales Tax Item.
Non-Taxable Amount: is the amount of Sales reported to the Tax Item with a Non-taxable Tax Code selected.
Taxable Amount: This is the amount of Sales reported to the Tax Item with a Taxable Tax Code selected. Current Tax Rate: This is the Tax Rate that was assigned to the Sales Tax Item.
Tax Collected: This is the value of the current Tax Rate times the Taxable Amount.
Amount Due: Amount of Sales Tax Liability still owed for the period (Date Range) of the report.
Basis: Calculation basis: Retail Price (RP), Direct Cost (DC), and Gross Profit (GP) for each Sales Tax Item.
Please note: Unknown Vendor and Unknown Tax refers to Sales Amounts reported to a Taxable or Non- taxable Tax Code that do not have a Sales Tax Item selected.
Understanding the Sales Tax Detail Report
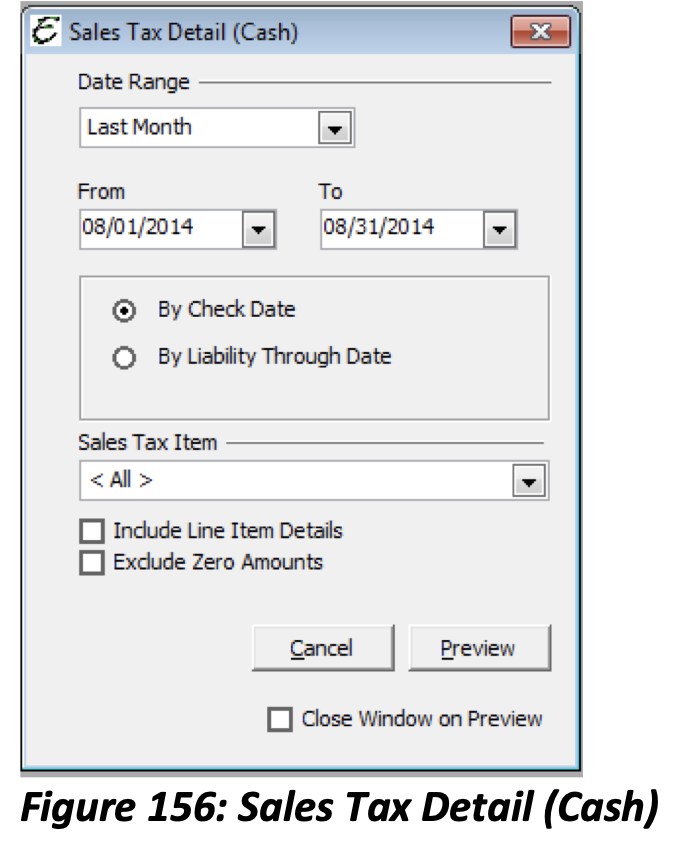
The Sales Tax Detail Report is an expanded view of the Sales Tax Liability Report that also provides transactional details. This report gives you the ability to further analyze your Sales Tax Liability. The Sales Tax Detail Report has two display options.
By Check Date: Displays the report based on a date range when Sales Tax Liability checks were written.
By Liability Through Date: Displays the report based on the date range selected through when the Liability was incurred.
Sales Tax Item: Allows you to filter by a specific Sales Tax Item or view all Sales Tax Items.
Include Line Item Details: Breaks out the detail of every transaction to see each Taxable and Non- Taxable Line Item. (When left unchecked, figures will be reported as a Total per Transaction.)
Exclude Zero Amounts: Remove any entries with a $0.00 Sale Amount (Tax Amount of $0.00 will still be included.)
Sales Tax Detail Report
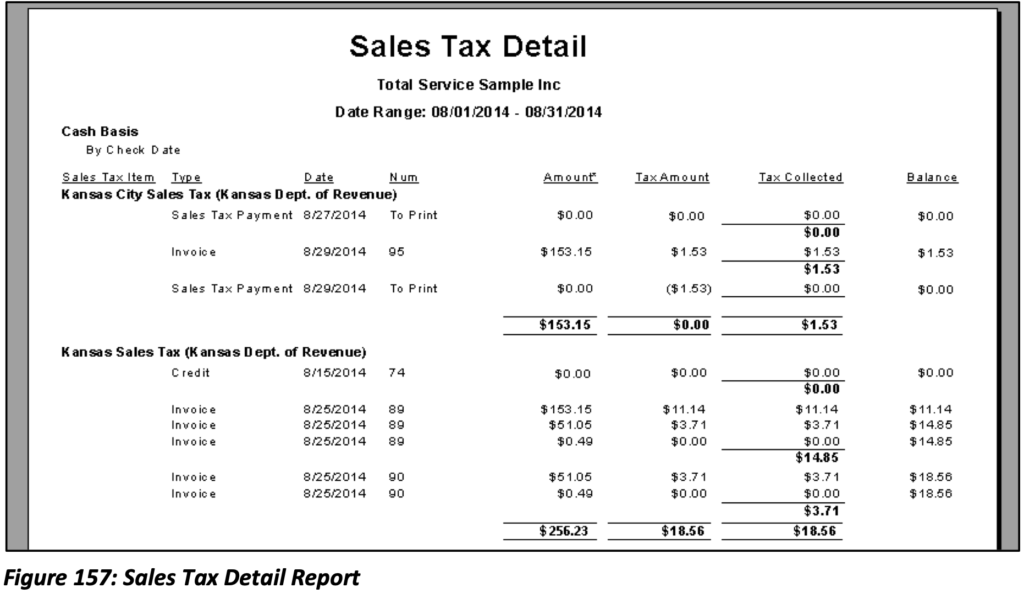
* Drill Down Capability: Opens the transaction selected.
The Sales Tax Detail Report displays the transactional history of Sales Tax Items that were affected given the date range chosen.
Sales Tax Item: The Sales Tax Item that was selected on a transaction.
Type: Type of transaction where the Sales Tax Item is applied (i.e. Invoice, Sale, and Credit).
Date: Date of the transaction.
Num: The Invoice, Credit or Check number associated with each transaction.
Amount: Displays the Taxable or Non-taxable Amount of each transaction/Item.
Tax Amount: Total Taxable Amount for each Item or transaction (different than Tax Collected) based off the Tax Item displayed.
Tax Collected: Total Tax calculated to the Customer for that transaction them for the Tax Item displayed.
Balance: Running balance of Tax Liability for each transaction displayed.
Please note: This report comes in handy when determining Sales Tax discrepancies or viewing the history of a particular Sales Tax Item.
Understanding the Sales by Tax Code Report
The Sale By Tax Code Report displays the total Taxable and Non-Taxable Sales for each Tax Item collected by Tax Code. (i.e. TAX, NON, CHU, etc.).
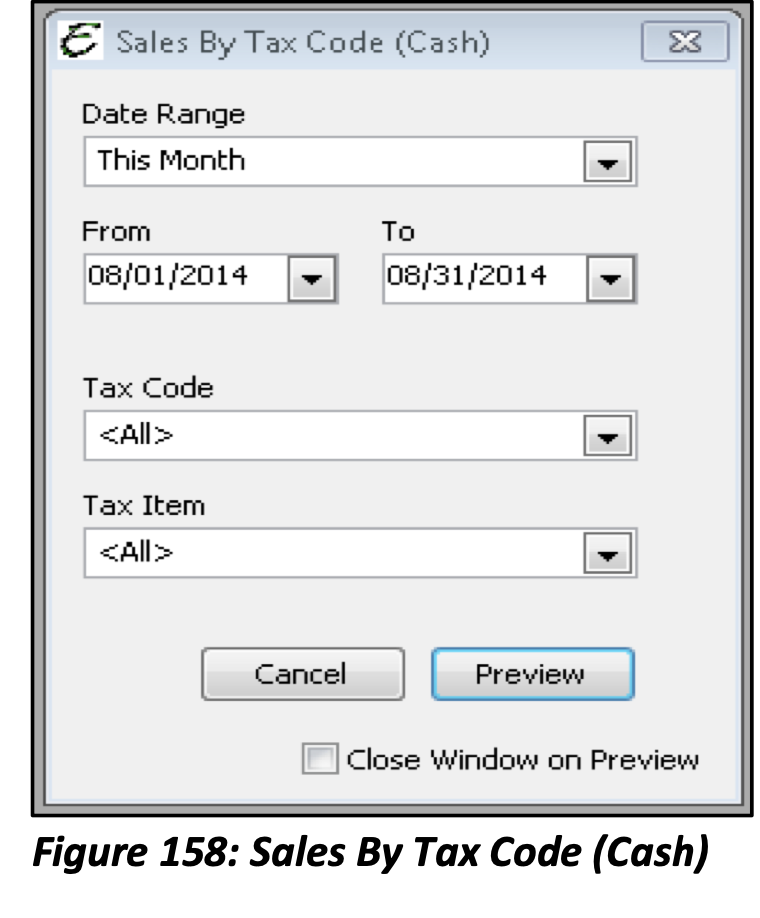
By Check Date: Displays the report based on a date range when Sales Tax Liability Checks were written.
By Liability Through Date: Displays the report based on the date range selected through when the Liability was incurred.
Tax Code: Allows you to filter by a specific Sales Tax Code or view all Sales Tax Codes.
Tax Item: Allows you to filter by a specific Sales Tax Item or view all Sales Tax Items.
Sales by Tax Code Report
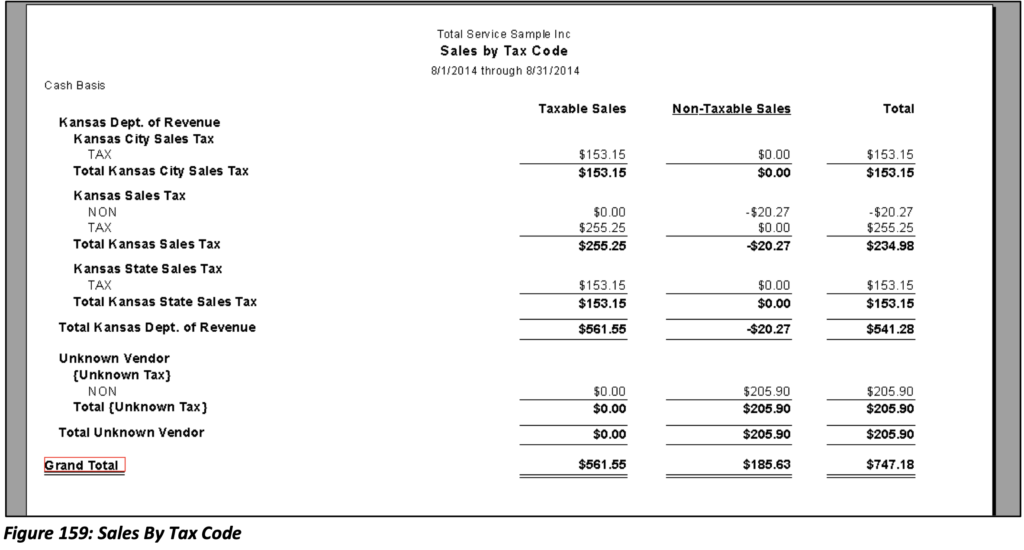
The Sale By Tax Code Report displays each Sales Tax Code applied beneath each Sales Tax Item. The first column lists the Tax Authority to which you owe the Tax Liability. (The Vendor assigned to the Sales Tax Item.)
Taxable Sales: Total Sales for each Tax Code by the Tax Item that were subject to Tax.
Non-Taxable Sales: Total Sales for each Tax Code by the Tax Item that were NOT subject to Tax.
Total: The combined total for Taxable and Non-Taxable Sales for each Tax Code by the Tax Item.
Please Note: If on any Sales Tax Report you notice “Unknown Vendor” or “Unknown Tax”, it means that either a Sales Tax Item or a Sales Tax Code was not chosen on the Sales Form at the time of the transaction. On the Sales Tax By Detail Report you may “Drill Down” to find where those figures come from and if there needs to be a Tax Code or Tax Item selected. If you find a Vendor listed with “Unknown Tax”, it means that the Sales Tax Payable Account was selected on a transaction that does not contain a Sales Tax Item. This can then cause your Sales Tax Item balance to be off or no longer match the Sales Tax Liability balance.
Sales Tax Liability Adjustment Tips
- The Memofield of this form is very important. Be sure to sufficiently document the reason for the adjustment to your Sales Tax Liability.
- Accountant’s Note: This form essentially does the same thing as an Adjusting Journal Entry, but keeps the Sales Tax Item in balance with the corresponding Sales Tax Liability.
- You can edit an adjustment by simply going back to the adjustment and changing it. To view/edit the Sales Tax Liability, select Journal Entry List from the Banking main Menu option. Use the “Sales Tax” quick filter and type “Yes” to Filter by Sales Tax Liability Adjustments.
Other Sales Tax Tips
- Total Office Manager will calculate Sales Tax Liabilities correctly. If you notice regular errors, be sure to carefully check how you set up your Sales Tax or review the Sales Tax Detail Report. We recommend that you quickly seek qualified help with Sales Tax setup and management.
- Be careful to pay your Sales Tax in full and on time. The interest and penalties can be significant.
- Make sure to select the correct “Show Sales Tax Through” date when paying your Sales Tax to ensure you are not over or under paying Sales Tax.
- Always use the Pay Sales Tax form when paying Sales Tax. If you select the Sales Tax Liability Account of Bills, Checks, Journal Entries, etc., you will receive a warning message stating why you should not do this.
How Sales Tax is Calculated
This is an advanced topic and may be skipped by most users.
When sales tax applies to an Invoice/Sale/Credit, Total Office Manager calculates sales per line item and then sums the total of sales tax. Often times this creates rounding differences when invoices with sales tax are calculated in the field by service technicians.
Example A- This is what Total Office Manager does:
Item A- $29.99 x 7.525% = 2.256 rounded $2.26 Item B- $68.76 x 7.525% = 5.174 rounded $5.17 Item C- $127.36 x 7.525% = 9.583 rounded $9.58 Total= $17.01 in Sales Tax
(Total Office Manager rounds on the thousandth and saves to the hundredth)
Example B- This is what people do:
Item A- $29.99
Item B- $68.76
Item C- $127.36
Totaled= $226.11 x 7.525% = $17.01 in Sales Tax
To complicate things further let’s add Group Items to the mix. Now you have a Sales Tax Group Item that contains 3 different rates.
Example A- This is what Total Office Manager does:
Item A- $29.99 x 7.525% = $2.256 rounded = $2.26 .63% = $0.188 rounded = $0.19
.745% = $0.223 rounded = $0.22
Total tax for Item A = $2.67
Example B- This is what people do:
Item A- $29.99 x 8.9% = 2.67
Unknown Tax, Unknown Vendor, or Vendor Name with Unknown Tax indicates data entry errors with Sales Tax. Review these entries by running the Sales Tax Detail Report and filter by “All” Sales Tax items.
When Sales Tax Report indicate a higher or lower balance for the amount due than the Tax collected this indicates an overpayment from a prior period or an underpayment from a prior period. Prior payments will affect the Liability balance going forward.
My Preferences
There are no preferences in My Preferences for Sales Tax
Company Preferences
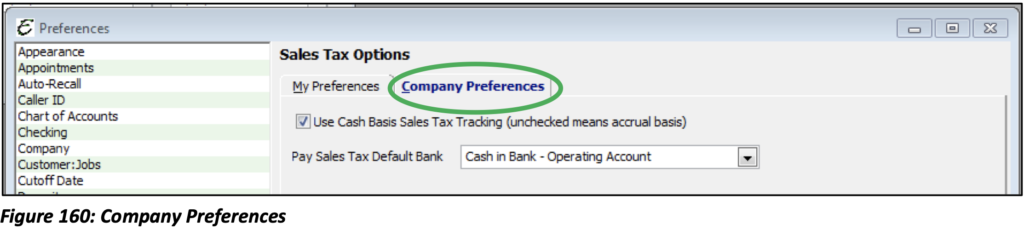
The Administrator User will have to set the Preferences for Sales Tax as the option will affect the entire Company.
Use Cash Basis Sales Tracking (unchecked means accrual basis): When enabled, Total Office Manager tracks Sales Tax Liabilities based on actual Sales Tax collected, rather than accrued Sales Tax due which may or may not end up being collected. With Cash Basis enabled, Total Office Manager looks at the “Paid Date” of the transaction. Sales Receipts would be considered as full payment received, and, therefore, include any Sales Tax Liability incurred. If you create an Invoice and receive a partial payment, Total Office Manager will look at the receive payment date and calculate the Sales Tax Liability based off the balance paid.
Pay Sales Tax Default Bank: Select the default Bank Account to propose when paying Sales Tax Liabilities. This can be changed when paying Sales Tax. Sales Tax can also be paid by a Credit Card instead of a Bank Account.