From Schedule Board
Complete/Un-Complete Work Order and Add/Delete Timesheet Entry: If the Work Order had been marked complete and was given a timesheet entry by mistake, this option un-completes the Work Order and removes the Timesheet. If the Work Order is not completed, you may complete the Work Order and assign it a timesheet entry.
Add Timesheet Entry: Opens the assigned employee’s timesheet. Many of the fields in the employee timesheet will automatically be populated with information from the Work Order such as Employee, Customer:Job, Work Order #, Start Time and Hours. Work Orders are calculated based off Start Time and Duration in minutes from the Work Order that suggests the End Time automatically.
From Timesheet Form
Timesheets are one way of telling Total Office Manager how to calculate an Employee’s pay. In the Employee Payroll Items, you can tell Total Office Manager to calculate an Employee’s hours via time sheet or not. Enabling timesheets forces the payroll administrator to add time to the timesheet.
For example, an Employee that always works 40 hours and does not need their hours tracked can be set up in Total Office Manager to not use Time Sheet Hours. However, this means that they must have default hours entered for their pay period.
To fill in timesheets, select Timesheet/Time Tracking from the Employees main Menu option. All timesheets are viewed in one-week time frames. The timesheet uses the Earning Types assigned on the Employee and all Customers/Jobs entered into Total Office Manager. The Earning Type is required, the job is not. However, if the users wish to track time against a Job, the Job ID information must be selected.
Daily Data Tab
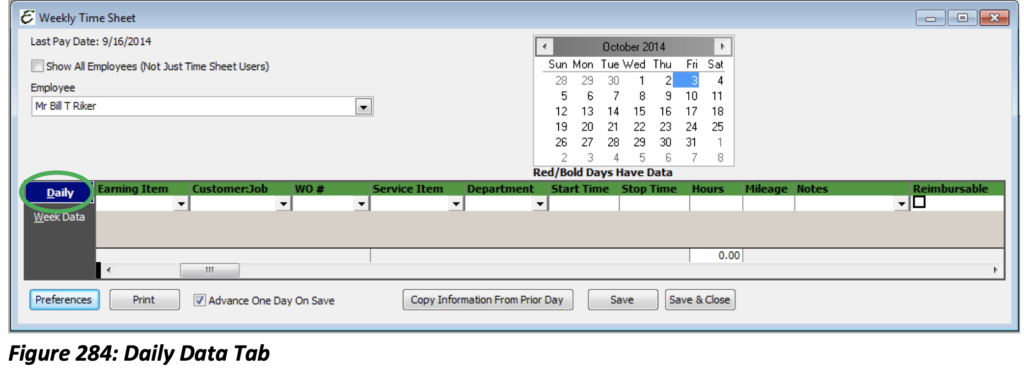
Show All Employees (Not Just Time Sheet Users): This displays both Time Sheet Users and Salaried Employee s. When this is selected, you are able to enter hours for a Salaried Employee for Job Costing.
Employee: Select the active Employee you want to enter the time for. All Employees can be displayed on this list; even if they are not set up as hourly.
Date Selection: Select the date to view using the calendar. If the day already has timesheet information, that day will be in red, bold font.
Delete: Click the red “x” to delete the line item and all data on that line including hours, earning type and job type.
Earning Type: Select from the drop list the Earning Type that applies to the selected Employee. This field is mandatory. You cannot enter timesheet data (hours) without first selecting an Earning Type.
Cust:Job: Select from the drop list a Customer:Job if one applies. (See Job Costing)
WO#: The WO field is used to indicate the Work Order to which the line item is associated. If the Customer field has been filled in, the WO drop-down list will display Work Orders for that Customer only. If the Customer field has not been filled in, the WO drop-down list will only make available <Lookup> as a selection. Clicking <Lookup> will open the Work Order Lookup List, which can be used to lookup any Work Order in the system. Double-clicking on a Work Order will populate both the Customer field and the WO field.
Service Item: Optional. Select a Service Item type from the list. This is used to associate the labor you need to charge to Customers for reimbursables.
Department: Optional. Select a department from the list to associate this labor expense with the department. This is a very important if you wish to track expenses by department. Choosing a department is highly recommended.
Start Time: Optional. Enter the “time in” or the starting time for this labor entry. This is handy if you wish to track the actual time Employees’ start and stop on jobs.
Stop Time: Optional. Enter the “time out” or the ending time for this labor entry. This is handy if you wish to track the actual time Employees‘ start and stop on jobs.
Hours: Required. The total hours worked for each entry. This field will auto calculate if you use the Start and Stop time fields, but you can still change it to any number.
Mileage: Enter mileage (if any) for a particular job or day. Mileage may be entered for each day. This information is saved only when you have entered hours for that day.
Notes: Enter notes (if needed) to explain the entry. Notes may be entered for each day. This information is saved only when you have entered hours for that day.
Preferences: Adds/Removes columns to display.
Print: Print previews a simple timesheet for the selected Employee and the selected week. The style of the report will depend on what tab you are viewing.
Advance One Day on Save: The next day will automatically be selected on the calendar when you click the Save button.
Copy Information from Prior Day: Copies all information from the prior day and enters it within the current day you are on. This does not apply when the prior day was Saturday or Sunday with no time entered.
Save: Saves changes and keeps the form open.
Save and Close: Saves changes and closes the form.
Tips
- If you wish to use timesheet hours when processing payroll, you will need to check the “Use Time Sheet Hours” check box Employee Payroll Items. You can still use the Time Sheet feature for Salaried Employees. This can be helpful if you wish to track time and other information for analytical purposes. When you complete a WO, you may select the “Complete/Add Time SheetEntry” option. This will automatically populate the Employee, Date, Customer:Job, WO #, Start Time, Stop Time, and Hours (duration). There are preferences to prevent one user from editing or adding timesheets entries and notes for another user.
- To set the start day for the timesheet calendar, go to Company│Company Information│Other Information tab and set the “Business Week Starts On” to the first day of your pay period.
- Assign a default Earning to each Employee to save time when entering timesheets. This can be changed within the timesheet after the default Earning populates.
- Once timesheets have been paid, meaning a Paycheck has been created using timesheet hours, the timesheet will be locked for editing with the exception of certain fields.
Important: When overtime hours need to be entered on timesheets, an Overtime Earning will need to be selected and overtime hours will need to be figured. Total Office Manager does not auto calculate overtime but does warn when more than 40 hours have been logged.