The Paycheck List from is a convenient way to look at Paychecks. This list displays each Paycheck that was created. It displays the progression from their Gross Pay amount to the Net Pay amount. To access this list, select Process Paycheck from the Employees main Menu option.
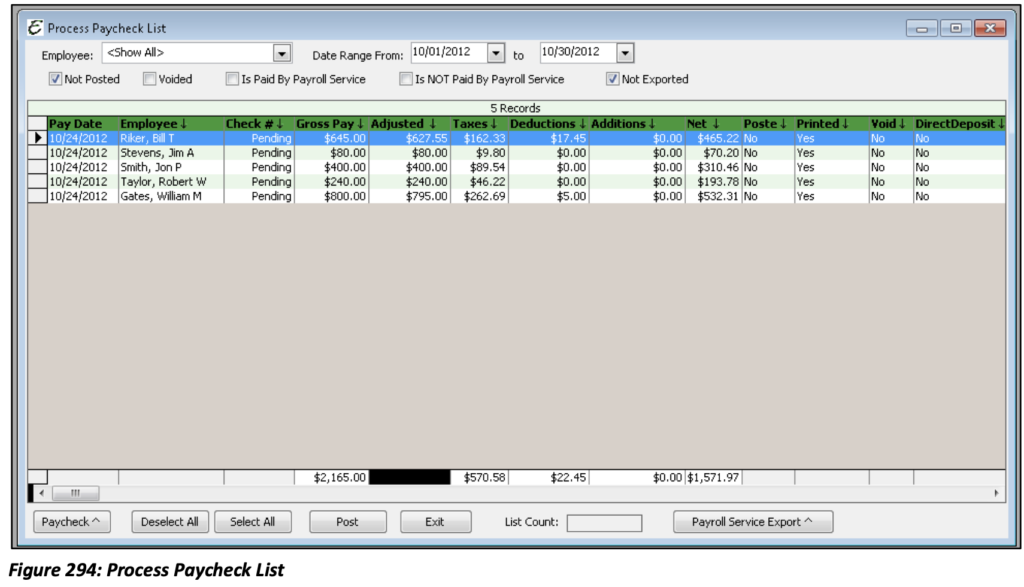
Employee: Select an Employee or view all.
Date Range From/To: The date range for when the Paychecks were marked to be paid. (This is not the pay period date; it is the Paycheck date.)
Additional Filter Options: Not Posted, Voided, Is Paid By Payroll Service, Is Not Paid By Payroll Service, Not Exported.
Paycheck Menu Options:
Edit Paycheck: Opens the Paycheck Details form. Here you may make any necessary changes to the selected Employee’s Payroll Check before the check is posted.
Post Paycheck: This function processes the Paycheck, completes the financial transaction and now the Paycheck is ready to be printed.
Un-post Paycheck: If checks were posted in error, or if errors are found once the check is previewed to be printed it can be un-posted. This removes the check form the print queue puts the check back to an un-posted status.
Void Paycheck: Stops payment on the check. The check still exists in your records but now does not affect your financial history. (This is recommended as opposed to deleting the check.)
Delete Paycheck: Deletes the check and its history. There will be no record of this transaction for audit purposes.
Select/Deselect All: Either selects/deselects each check in the list.
Post: This function posts or finalizes the Paycheck, completes the financial transaction and now the
Paycheck is ready to be printed or processed for Direct Deposit.
Exit: Closes the form.
Tip: When a bonus needs to be paid or a paycheck was accidentally shorted for an Employee marked to “Use Timesheet Hours”, simply edit the Employee’s Payroll Items, uncheck the option to “Use Timesheet Hours” and save & close the form. Now the Process Pay Group form will stop loading hours from timesheets. Use a prior pay period so you don’t lockdown future timesheet days and create the Paycheck for the date you intend on giving the Paycheck to the Employee. Once you have created thePaycheck, don’t forget to go back to the Employee Payroll Items to turn “Use Timesheet Hours” back on.