Entering Vendor Bills
When you purchase something and don’t pay for it until later, you enter a Bill for the purchase in Total Office Manager. Total Office Manager keeps track of these Bills. Bills are associated with your Accounts Payable so that you always know how much money is owed to your Vendors. To access your list of Bills, select Bills List from the Vendors main Menu option.
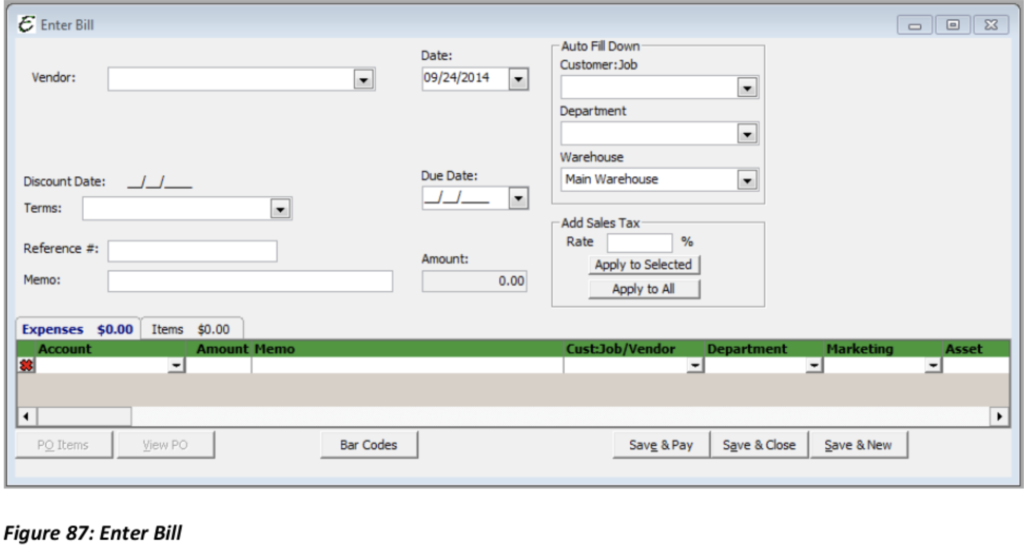
As Vendor Bills arrive, you will need to enter them into Total Office Manager. To enter a Vendor Bill, you will need to go to Vendor│ Enter Bills. This will take you to the Enter Bill form below.


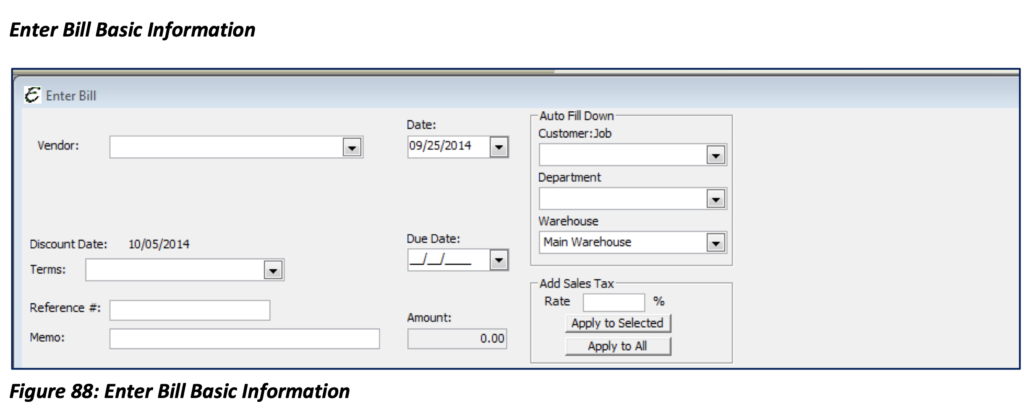
Vendor: Select a Vendor from the drop-down menu or create a new Vendor if not already set up. If there is an open Purchase Order for the Vendor selected, you be asked if you would like to receive items against an open Purchase Order.
Date: This field will automatically be populated with the current date. A calendar form is opened from the drop-down list if you would like to change the date.
Discount Due Date: The Discount Due Date is calculated by the Terms and the Date you enter for the Vendor Bill.
Due Date: This date is auto populated based on the Terms. This date can be overwritten.
Terms: This information auto populates if it is completed in the Vendor Information. If it is not, you will need to select from the drop-down menu the terms offered by the Vendor on their bills, 2% 10 Net 30 Days, Net 15 Days etc.
Reference #: Enter the Bill of Lading #, Packing Slip #, or any number that is available to help identify the Items being purchased.
Memo: Enter any pertinent information that may be helpful, if there would happen to be a problem with this order, for example. (Each “Memo” field should be utilized to communicate with all users the purpose of the corresponding transaction. This field will also provide documentation and audit security.)
Amount: As with Bills and Credits, amount populates from Expenses/Items.
Customer:Job: Use the dropdown to select the Customer:Job (if any) associated with this purchase.
Department: Use the dropdown to select a Department (if any) associated with this purchase. Department will also auto populate Vendor’s Default Department if they have one associated with them.
Warehouse: If a Warehouse is associated with this purchase, you will need to select it to what Warehouse the Item has been received in. Auto populates from Company Preference of Default Warehouse.
Show Tax Calculator: This option allows you to enter a Sales Tax % and have it update the Amount for each item or account by the % entered. Many accountants prefer this method of spreading the cost of tax over each line item. When this preference is enabled, the Sales Tax Rate field and options will appear on Item Receipts, Vendor Bills and Credit Card Charges.
Expenses Tab

Account: Select from the drop-down menu the COGS/Expense account that is to be affected by the Bill. Amount: Enter the amount of the Bill for the particular COGS/Expense.
Memo: Enter any particular information pertaining to the Expense you are entering.
Customer:Job: Select from the drop-down menu the Customer:Job for this particular Expense.
Department: Select the Department (if any) to which this COGS/Expense is related. This will also auto populate from auto drill down. If you need to, you can split up the check, using as many line items as needed. This allows you to have departmentalized financial statements.
Marketing: Select the correct Marketing Type (if any) to which this Expense is related. This is how Total Office Manager matches Marketing Types with Expenses. This information appears on certain reports and allows you to see which Marketing Types perform best by comparing its Expense with related sales.
Asset: Select the Asset if any that is related to this Item.
Reimbursable: Used in conjunction with the Customer field, will add the line Item to that Customer’s Reimbursables List.
WO: Select the Work Order associated with this Line Item.
Items Tab

Item Code/Description: Select from the drop-down menu the item name or number being received (the group number, if applicable).
Warehouse: The location where the item is to be stored.
Qty: Enter the quantity you received. If received against a Purchase Order, this information will auto populate.
Cost: Enter the dollar amount of the item. If received against a Purchase Order, this information will auto populate.
Amount: Calculated by Cost times Quantity . If received against a Purchase Order, this information will auto populate.
Customer:Job: Select from the drop-down menu the Customer:Job, if applicable.
PO: If the transaction was received against a Purchase Order, the PO# will auto populate.
Purchase Description: This field will autofill with the Purchase Description associated with the Item chosen.
Items Tab (Continued)

Serial #: If the Item has a Serial Number, this field will auto populate.
Department: Select the department (if any) to which this expense is related. If you need to you can split up the check, using as many line items as needed. This allows you to have departmentalized financial statements.
Asset: Select the Asset if any that is related to this Item.
Reimbursable: Used in conjunction with the Customer field, will add the line Item to that Customer’s Reimbursables List.
WO: Select the Work Order associated with this Item.
Sales Description: The Sales Description of the Item will automatically populate. Modifications to the Sales Description will not change the Item’s Sales Description. The Sales Description can be modified on the Purchase Order for use on Customer Invoice later when marked as Reimbursable and placed on the Customer’s Invoice.
Notes: Much like the memo field, enter any brief information to track. This information however will appear on the printed Purchase Order. To record large amounts of information, use the Details feature from the side Menu option.
Expense Vs Item Tab
The Expense Tab would be used for the expenses tracked through your Expense account, for example Copier Paper. The cost of the paper would most likely be assigned to an Expense account (i.e. Office Supplies). Also, often used for Freight, Mileage, or Shipping Fees.
The Items Tab deals specifically with Items you buy, sell or resell in the course of business, such as Material and Equipment.
When you enter a Bill, you fill in the Expense or Items tabs as appropriate to correspond to what you’re buying.
At any time, you can run reports to analyze unpaid Bills for information such as to which Vendors you owe the most money. From the Pay Bills window, you can pay with a Check, or a Credit/Debit Card.

