To access the list of your Bills to pay, select Pay Bills from the Vendors main Menu option. Each Bill with a balance due, appears in the list. Each column gives you a method for filtering this list. There are three column fields that can be edited, Discount Amount, Discount Account, and Amount to Pay. All other fields will auto-populate according to the information entered on the Bill.
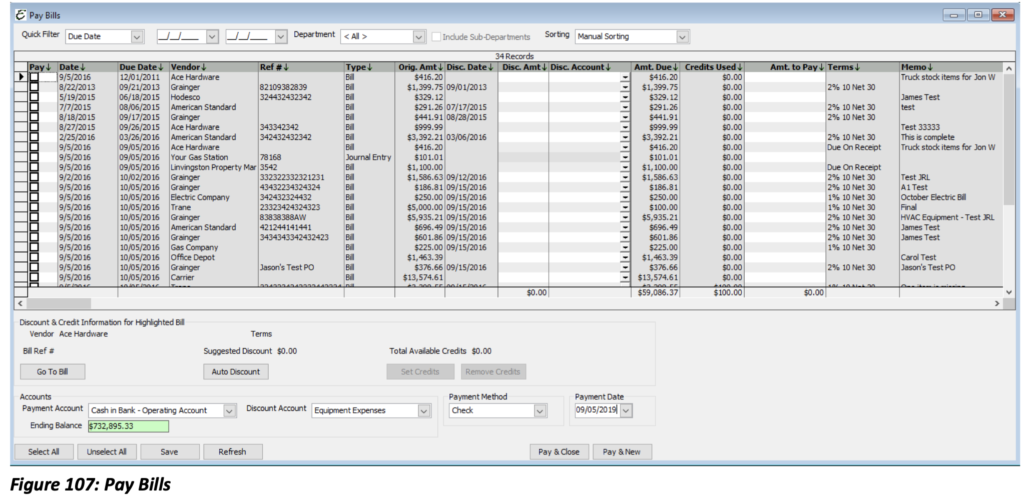
Go To Bill: Click this button to go the actual Bill.
Auto Discount: Click this button to apply any Discounts that have been earned. The Auto Discount button will calculate and apply discounts on any bills that qualify based off the terms assigned to the Bill.
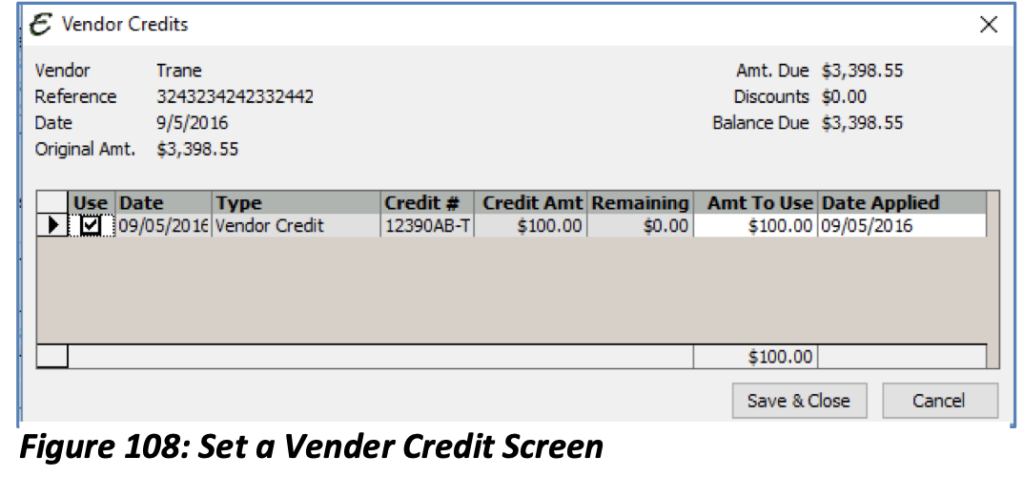
Set Credits: Click this button to apply any unused Credits to the Bill. A selection form will open.
Payment Account: Select an account from the drop-down menu or create a new account.
Payment Method: Select from the drop- down menu the method for which you are going to use to pay the Bill.
Payment Date: Enter the date you paid the Bill.
Save: This button will save your selections and other entries so that you can close the screen and continue at a later time.
Refresh: This button will refresh the form. This is handy if you can go back and modified a bill or some other transaction that affects this form. Important: Be sure to use the Save button before refreshing (if needed).
Pay & Close: Click this button to pay the selected Bills and close the form.
Pay & New: Click this button to pay the selected Bills, but keep the form open to prepare another payment.
Tip: Use the Save button to save your Bill Pay selections and close out of the form without losing your work.
Bill Payment Steps
- Select each Bill that you wish to pay. The “Amount to Pay” field will auto populate with the amount that is due. This field can, however, be edited. For partial payments, simply change the “Amount to Pay” to represent the actual amount you wish to pay.
- Select the Payment Account from which the funds will be drawn to make the payment(s). (If this is set in Preferences, you won’t have to worry about selecting the account each time you pay bills.)
- Choose the corresponding Payment Method. For example, Credit Card Accounts should have a Payment Method of Credit Card.
- Click Pay & Close or Pay & New once your work is completed.
Printing Checks/Full Voucher
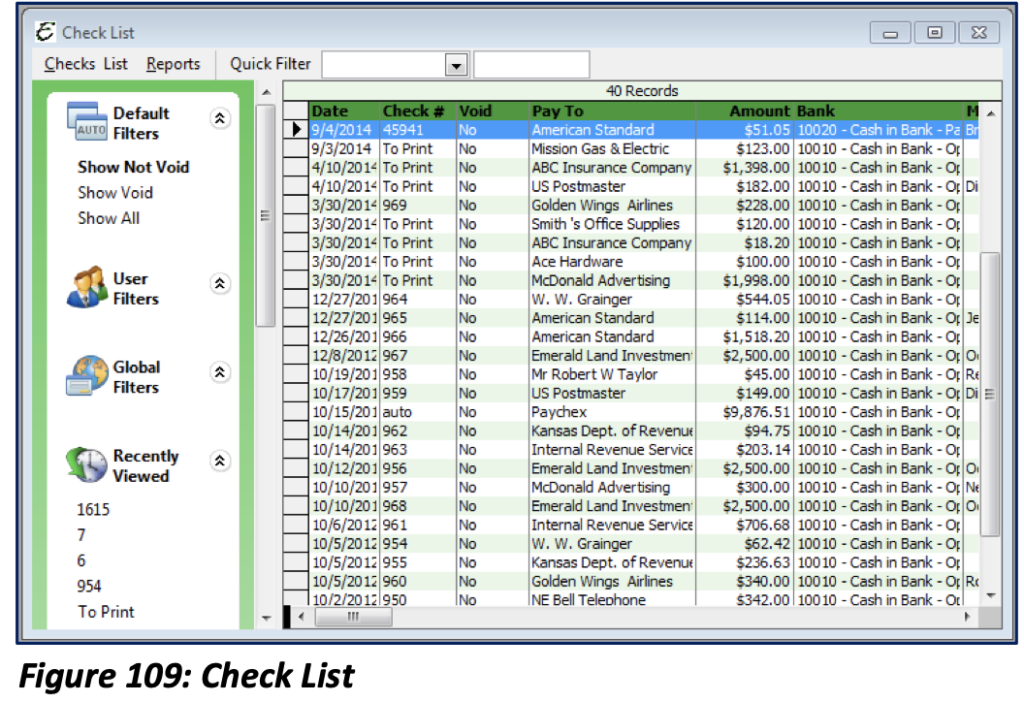
Once Credits have been applied and the selected Bills have been paid, the Checks for each Vendor will need to be printed. The Checks have already been generated and can be viewed in the Check List. To access the Check List, you will need to select Banking from the Main Menu, and then select Check List.
Use the Quick Filter to show only Checks for a specific Vendor or for all Checks that were generated for a specific date or range.
Printing Checks
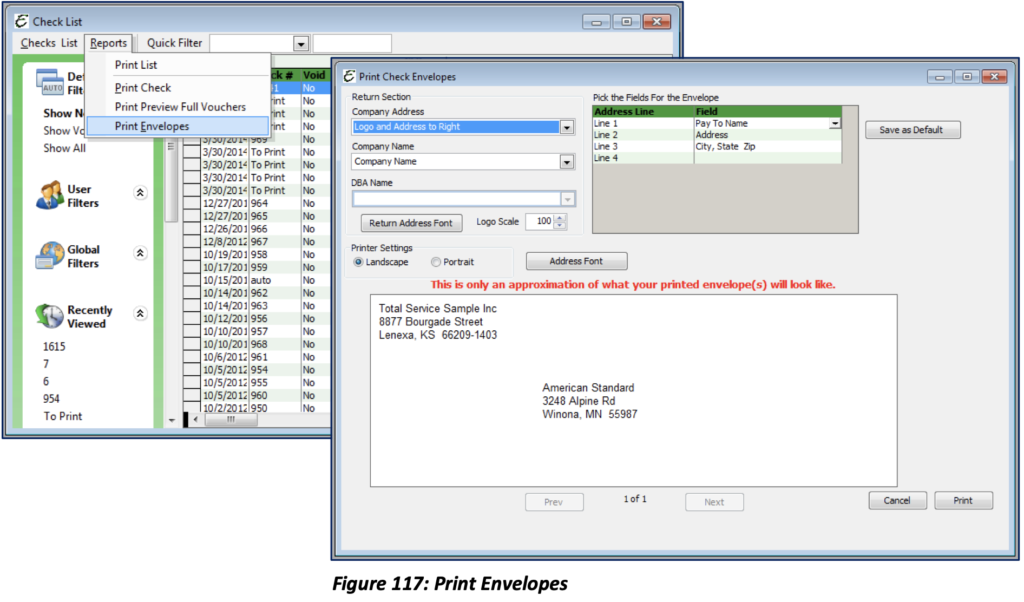
The Print Checks function in Total Office Manager offers several different options in printing your Checks. From the main Menu of your Check List select Reports.
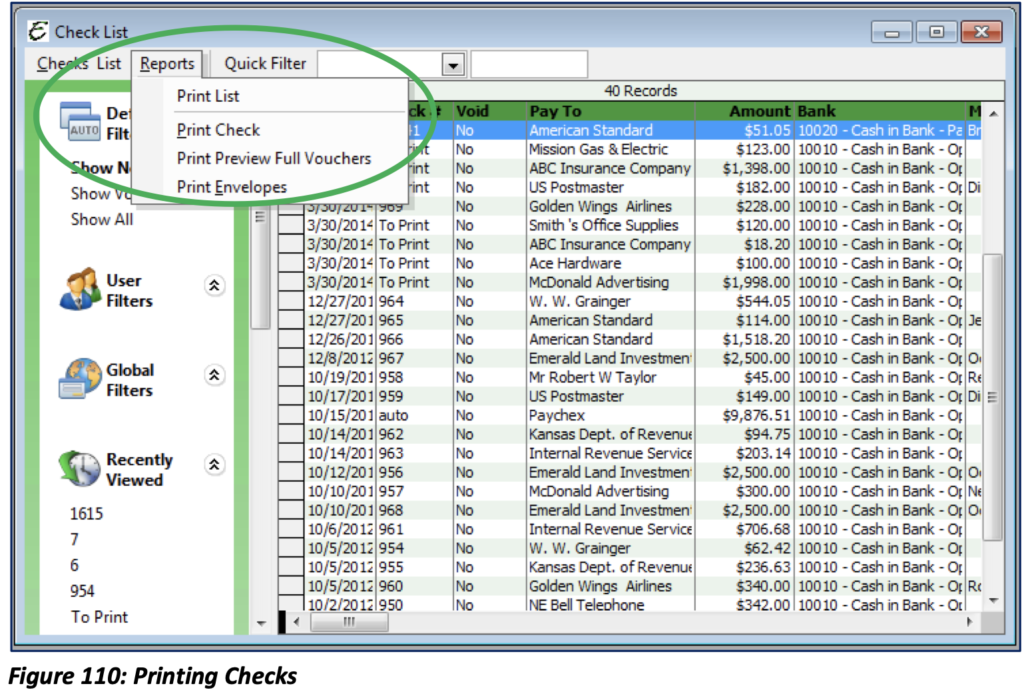
There are four options under Reports from which to choose:
Print List: Prints the actual Check List as seen in Total Office Manager
Print Check: Opens the Check Printing Setup Form to view or change printing options before you proceed to preview or print checks. .
Print Preview Full Vouchers: Prints the Full Vouchers for each Check selected. This Voucher Option is handy for Checks that paid more than 10-15 bills as actual check stock vouchers can only include so many items.
Print Envelopes: Prints the Vendor’s address and your company’s address in envelope format.
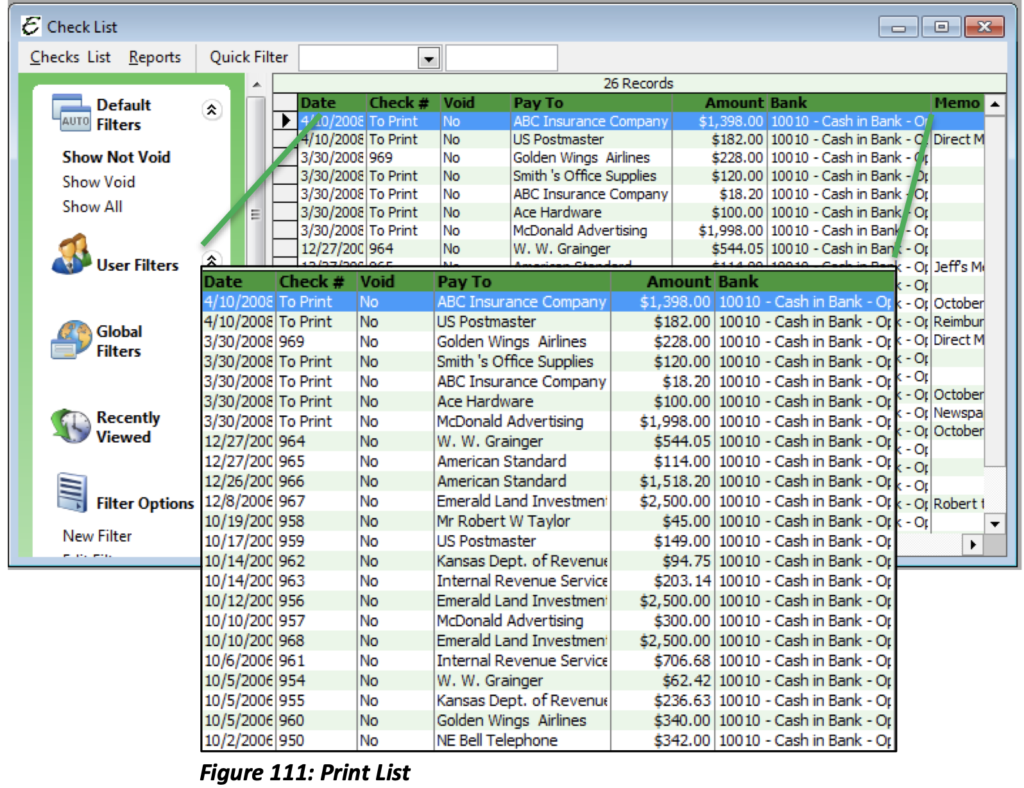
Print List
Print Checks
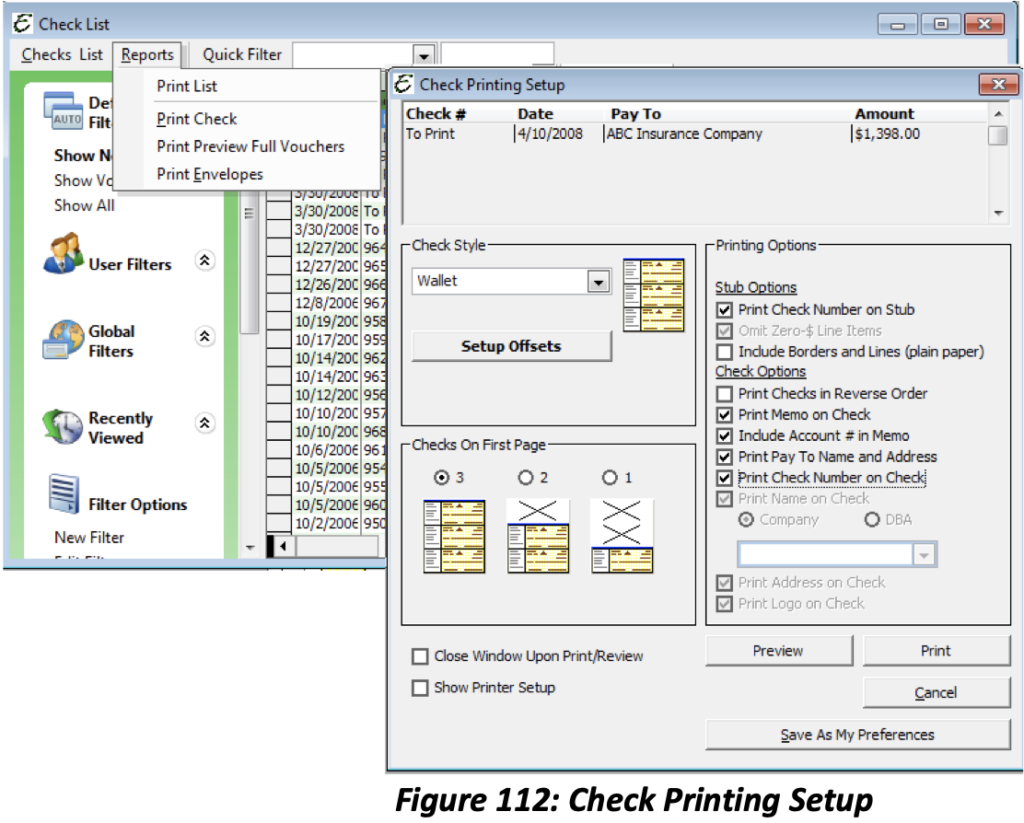
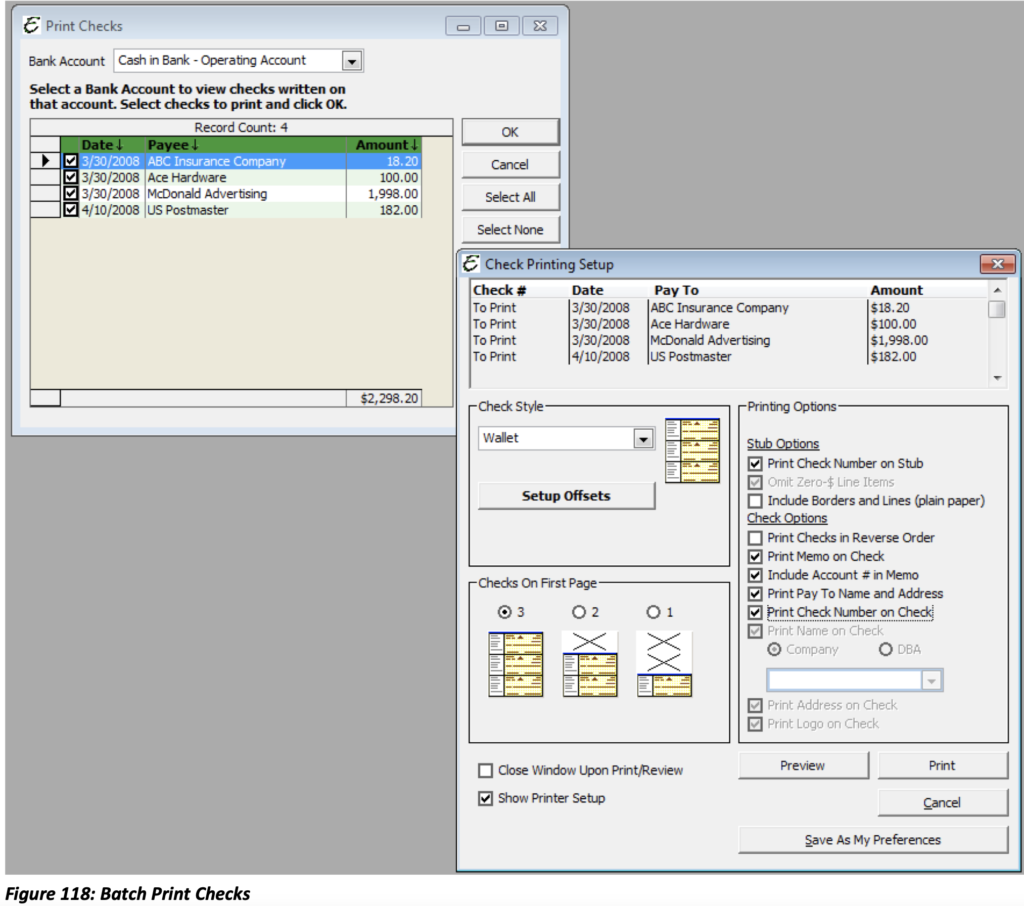
Print Checks will take you to the Check Printing Setup form. This form allows you to determine how you want your checks to print. Once you have made your selections, you may choose to preview your Checks prior to printing them. You may also save your selections as Save As My Preferences.
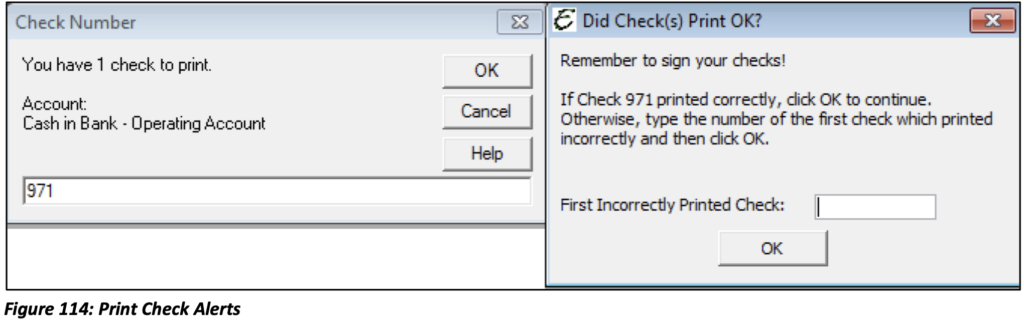
Clicking on Print will activate an alert concerning the Check Number. After verifying the Check Number, you will click “OK” to print. This will activate another alert verifying the Check printed properly.
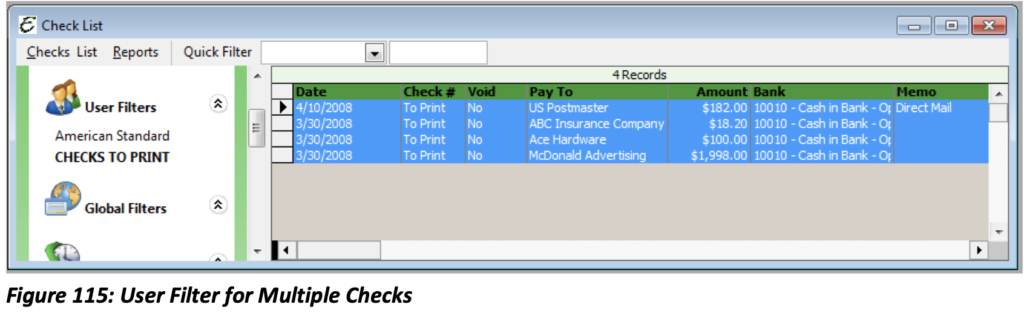
Please note: You may print multiple Checks at a time, by creating a User Filter to sort through the Check List by Check Number. The Check Number in this case would be “To Print.” The User Filter will populate the Check List with only Checks needing to be printed. Highlight all the Checks you will be printing and then select Report│Print Checks and begin the process.
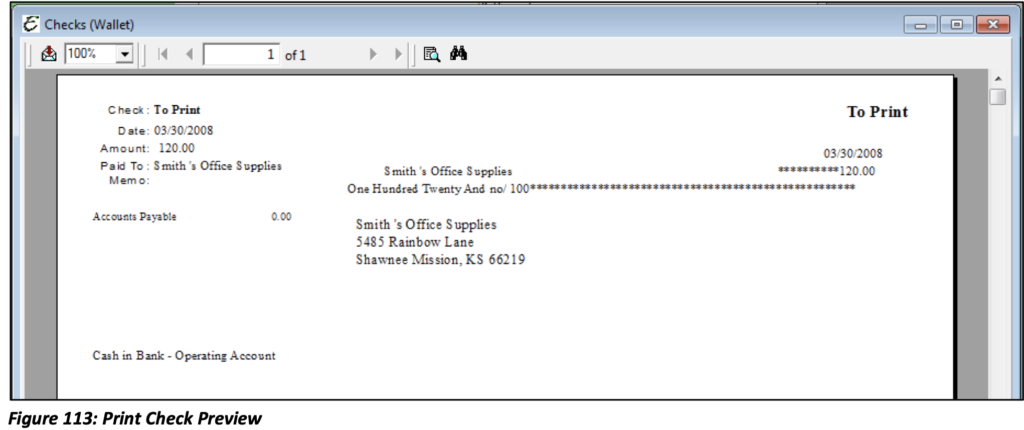
Full Voucher Preview

Print Envelopes
Batch Print Checks
As mentioned in the User Introduction section of this manual, you may always Batch Print Checks by going to File│Printing│Print Forms│Vendor Checks. Select all the Checks you will be printing and then click “OK”. This will take you to the Check Printing Setup. At the top of the Check Printing Setup, you will see a brief summary of each Check that you have selected to print. Select Print, to begin the printing process.
AP Reports
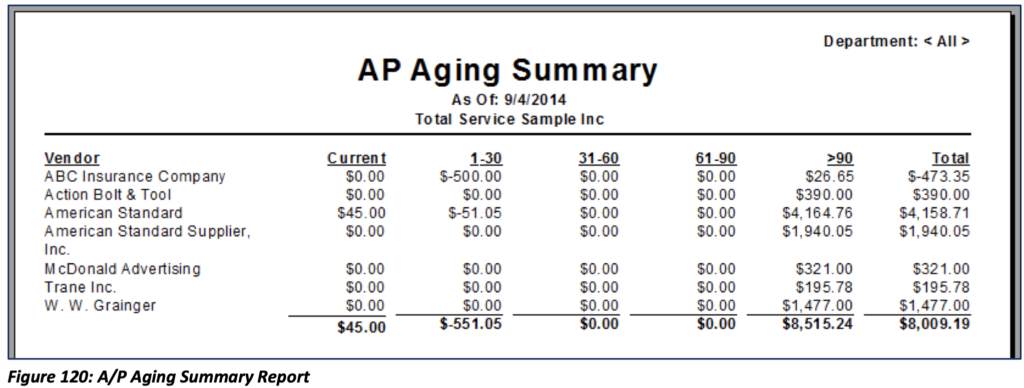
The A/P Aging Summary Report shows the amount of money you owe to your Vendors along with the time in which the amount has been owed (age of the bill).
To access this report, select Reports from the Main Menu, then Company, Purchasing, then A/P Aging Summary.

A/P Aging Summary Report: This report can be viewed by the following criteria:
As Of: Date that you would like the Report to end.
Filter By Department: Shows Accounts Payable balances for each Vendor by Department selected.
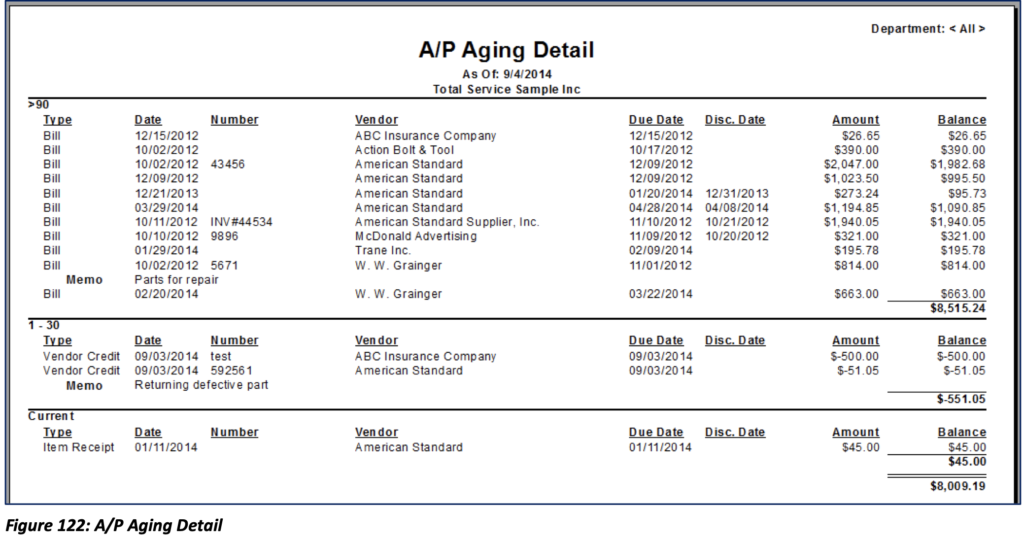
The history and information of your Accounts Payable can also be viewed in more detail by accessing the A/P Aging Detail Report.
*Drill Down Capable (Takes you to the AP Aging Detail for the specific Vendor you double click.)
To access this report, select Reports from the main Menu then Company, Purchasing, then A/P Aging.
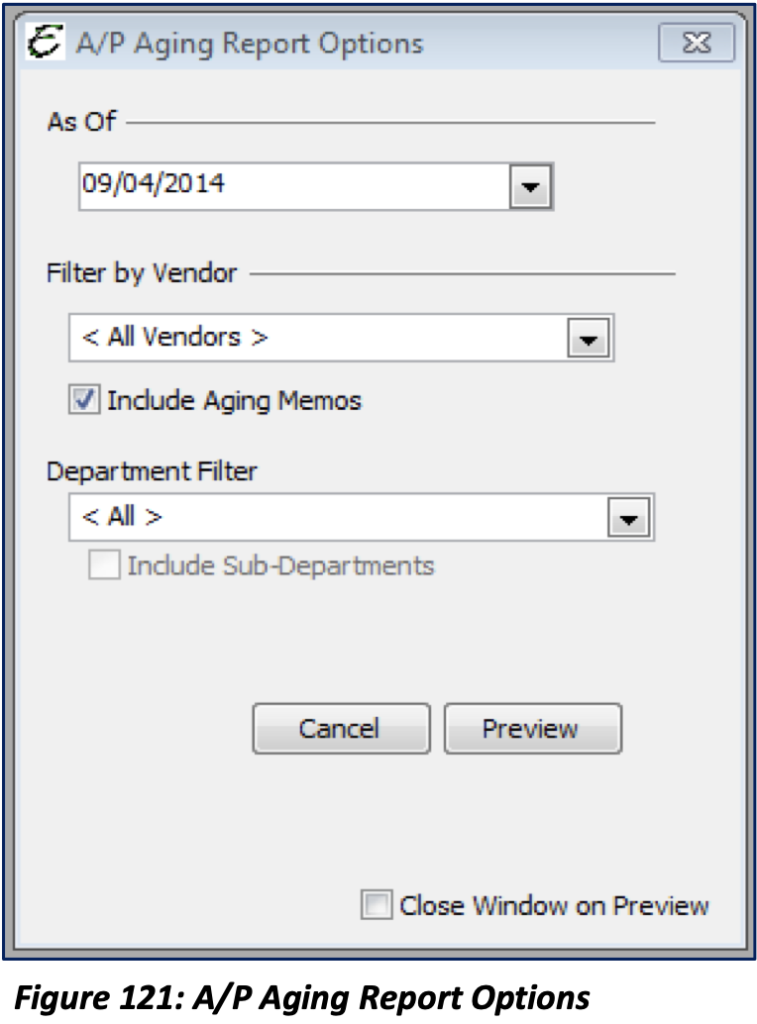
The A/P Aging Report can be viewed by the following criteria:
As Of: Date that you would like the Report to end.
Filter By Vendor: Select a specific Vendor or view all.
Department: Select a specific Department or view all.
You may also include the Memo that was entered for each Bill.
Criteria can be selected individually of each other. (i.e. you may select a particular Vendor for a particular Department.)
*Drill Down Capable (Opens the transaction.)
Payment Methods
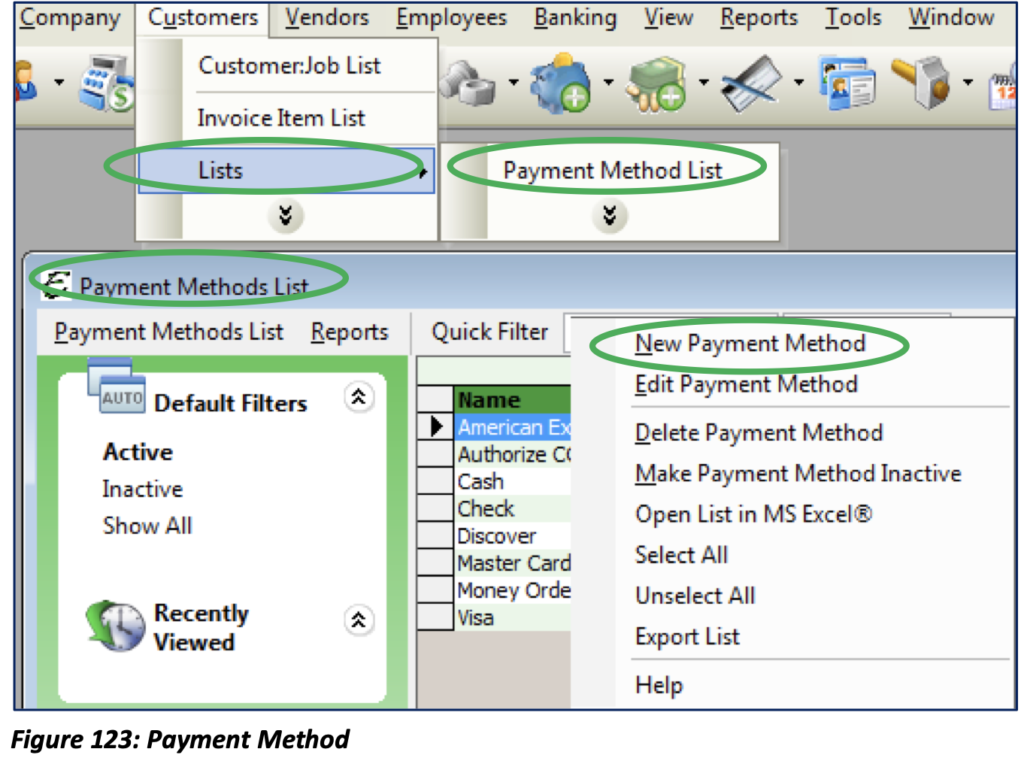
Payment Method is often underutilized by the users of Total Office Manager. If created and used consistently and correctly, the user will be able to accurately make deposits, apply payments and run reports. To create payment methods, you will need to go to the Customer Menu and select Lists. From Lists, you will select Payment Method List. Once the Payment Method List is up, Right-Click to access the pop-up menu and choose New Payment Method.
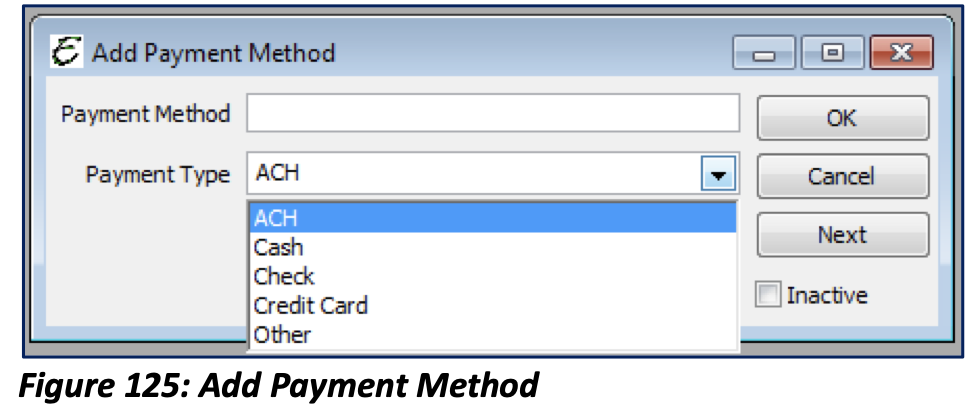
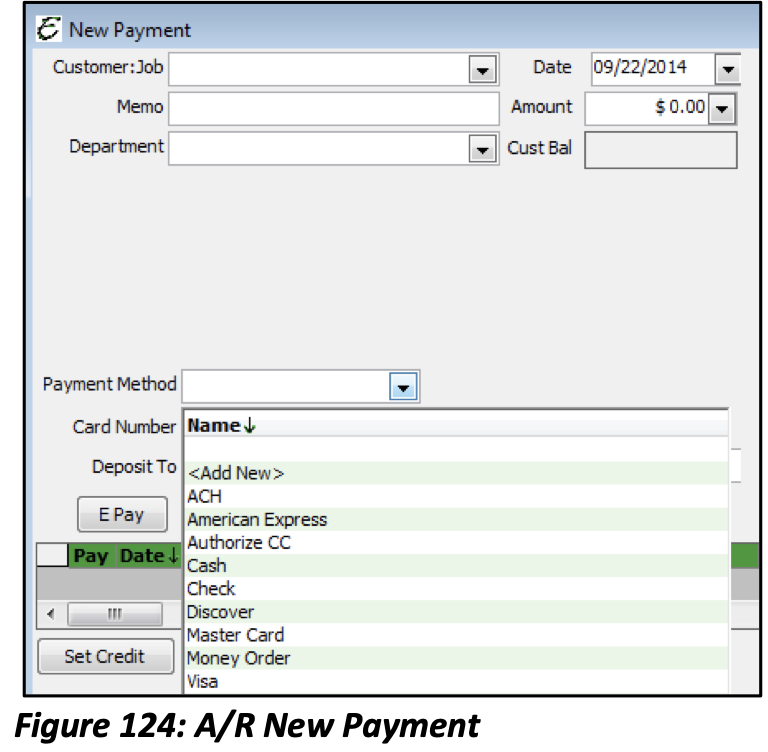
By selecting New Payment Method, you will be taken to the New Payment Method Form. From here, you will be able create the Payment Methods you use for your company. There are only five types to choose from: ACH (Automated Clearing House), Cash, Check, Credit Card or Other. An ACH Payment Type is used to describe electronically processing a check. Other can be used to describe a PayPal payment or a miscellaneous payment from Google. The credit card payment type can be split up into the type of credit cards you accept, for example, Visa, MasterCard, Discover or American Express.
Therefore, your payment method would be Visa and your payment type would be credit card. You would need four different payment methods to fit each credit card type.
In Accounts Receivable, you will find the Payment Method in Receive Payments. The physical payment method you receive should match the payment method you enter into Total Office Manager.
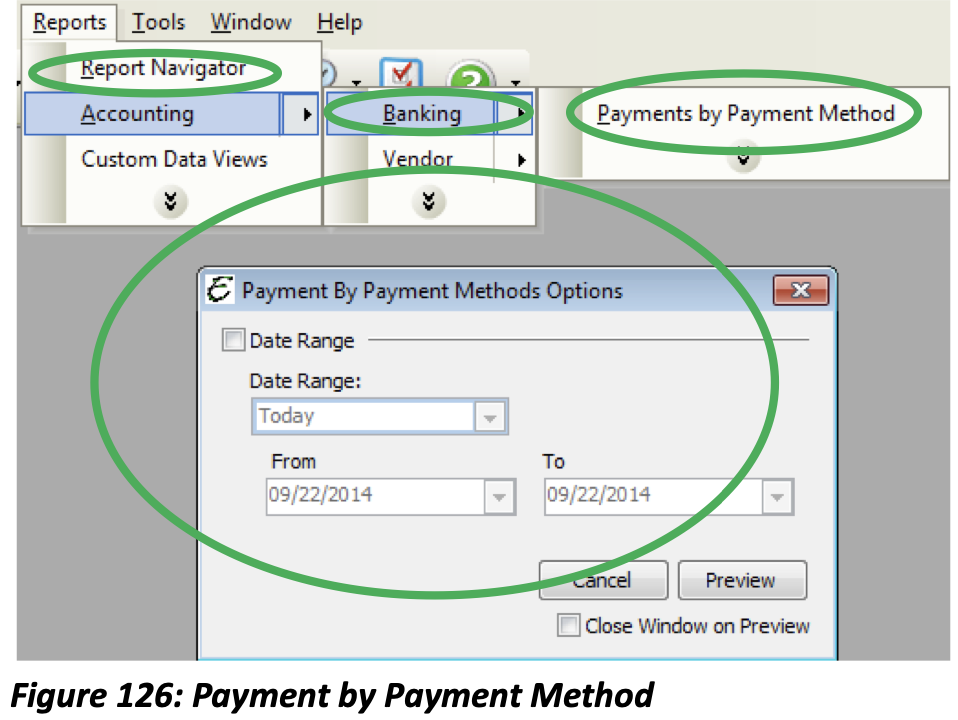
You may run a report for Payment by Payment Method. This allows you from an Accounts Receivables perspective to see a summary of payments you’ve received by each payment method. You may access this report through the Report Menu.
Tips
- Invoice items (with a positive quantity) remove items from inventory.
- Customer Credit items (with a positive quantity) add inventory items back to inventory.
- Vendor Credit items (with a positive quantity) remove items from inventory.