Sales Commission
Sales and Invoices include a Sales Commission Tracking form that allows selected Employees to receive a commission. Commissions are calculated by selecting Employees on Sales/Invoices and using pre- defined calculation methods. When processing payroll, these Employees and their commissions are selected and may be edited or changed prior to the creation of the check.
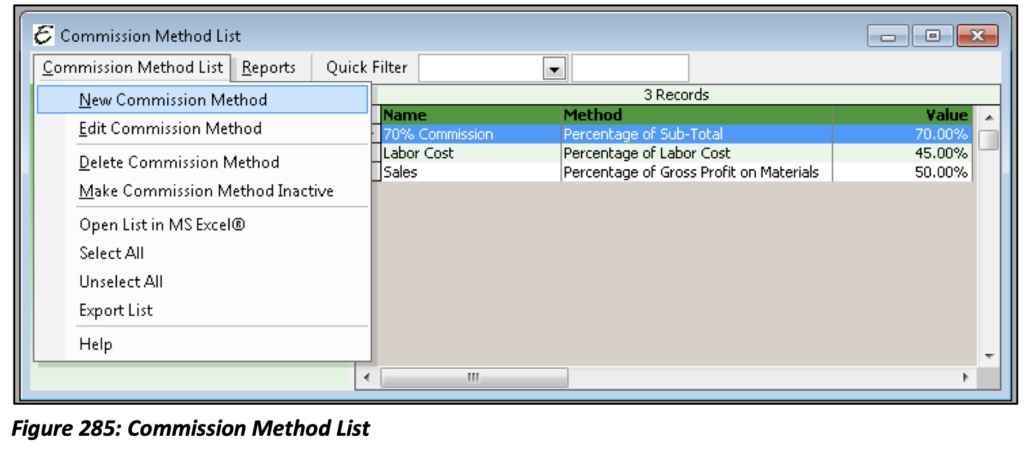
Total Office Manager offers seven types of Commission Methods.
Percentage of Sub-Total: This method allows you to enter a Sales Commission percentage rate. The Sales Commission will be calculated by multiplying the sub-total (total before Tax) by the commission rate (percentage). For example, 10% of the amount sold.
Fixed Dollar Amount: This method allows you to pay a set dollar amount commission for each Invoice or Sale created. For example, $15 per transaction.
Percentage of Direct Cost: This calculation will consider the Average Cost of the Item(s). If the Average Cost is zero, the Estimated Cost will be used. If Average Cost and Estimated Cost are zero, the commission will be zero. This method always uses the Cost from the Sale/Invoice.
Adjustable: This method allows you to enter a variable dollar amount of commission for each Invoice or Sale created. If there is never a set dollar amount then this commission method would be used.
Percentage of Gross Profit on Materials: This method allows you to calculate commission based off a percentage of the Gross Profit on Materials. This calculation will look at Inventory, Serialized, Non- Inventory, Other Charge and Service Type items with an assigned COGS Account and take the Retail Price minus the Item Cost to total the Gross Profit of Materials. (Non-Inventory, Other Charge and Service Items must have the check box checked within the Item form to allocate both an Income and COGS account. Each one of these items has a labeled check box such as, “This item is purchased for and sold to…”).
Percentage of Labor Cost: This method allows you to calculate commission based off a percentage of Total Labor Cost. The Labor Cost is figured by assigning a Labor Cost value to each item. Only Item Types of Inventory, Serialized, Non-Inventory, Other Charge and Service can have a Labor Cost. (Non- Inventory, Other Charge and Service Items must have the special check box option selected with the Item to assign a Labor Cost). In order to assign Labor Cost to items you must enable the Preference,“Use Labor Cost for Commission”. This is a Payroll Company Preference.
Percentage of Retail Labor: This method allows you to enter a Sales Commission percentage rate. This Sales Commission will be calculated by multiplying the Total Retail amount of all Service Items that are marked Labor Only by the commission rate (percentage). For example, 15% of the Retail Labor Total.
Creating Sales Commissions
To access your list of Sales Commission Methods or create new Sales Commissions select Lists from the Employees main Menu option then select Commission Method List. From the main Menu of the Commission Method List, select New Commission Method.
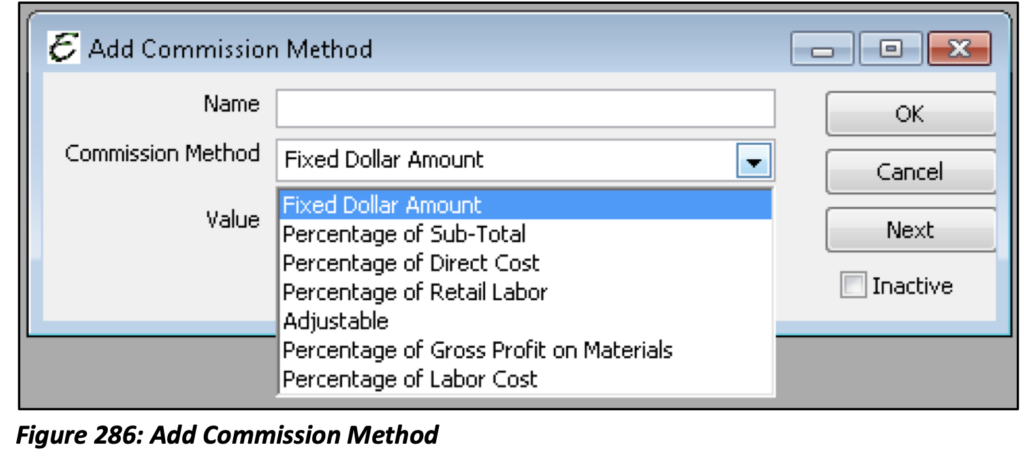
After giving a name to the new Commission Method, enter the rate or dollar amount according to which method you choose in the “Value” field.
Sales Commissions can be applied to your Employees a couple of different ways; when creating the Employee, or when processing payroll or at any time the Sales Commission can be created/edited/deleted for a particular existing Employee.
Applying Sales Commission (New Employee Setup)
Once your Sales Commission methods have been created they can be applied to your Employees. When setting up a new Employee and you come to adding his/her Payroll Items, the default Sales Commission Method and Earning Item can be chosen.
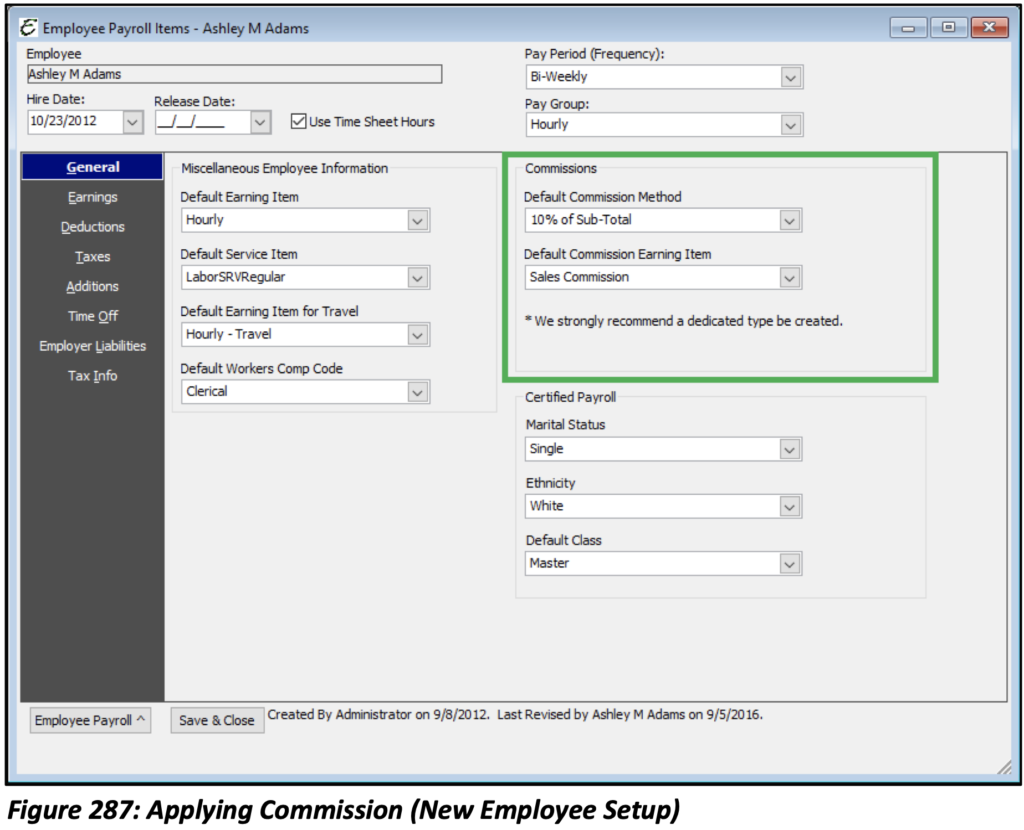
Applying the Commission Method/Earning Item will apply the Commission Method to each Sale/Invoice transaction in which this Employee will be involved. The option to set a default Earning Item is given to populate the Earning for you when you go to add commissions in the Process Pay Group form. This can be a real time saver. It is recommended that you set up an Earning Item specifically for Commissions to pay. This Earning should be a Calculation Type or Fixed Amount.
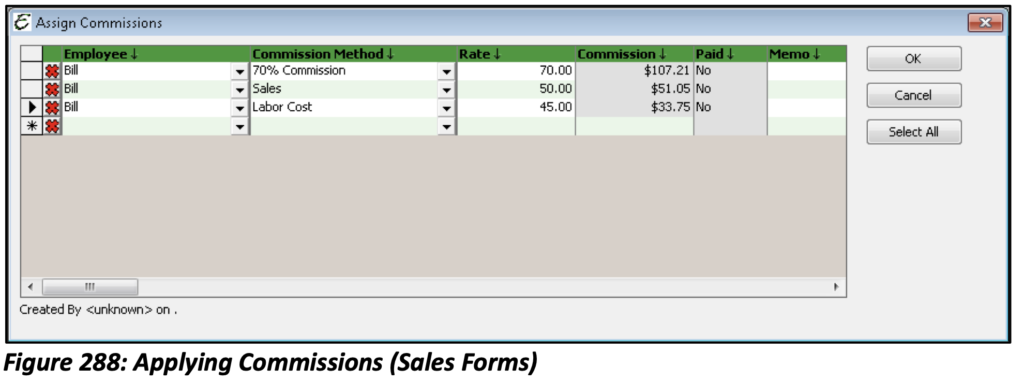
The Assign Commissions form allows you to add as many Commissions earned for as many of your Employees who have earned one. A particular Employee may have even earned more than one commission. From the Employee drop-down list select the Employee who has earned the Commission, then select the Commission Method that was earned. Based on the calculation method, the form will use the information within the Sales form to calculate the Commission amount. This will auto populate the Rate and Commission Amount fields. (The default Commission Method will auto populate if the Employee has one assigned.) Add a Memo if necessary and click “OK”. This will not affect the Sales form, so if you see that the amounts have not translated they won’t. The Commissions you have just added will appear when processing your Payroll.
Process Pay Group
Once all of the timesheets for your Employees have been entered and verified, you are ready to Process Pay Group. From the Employees main Menu option select Process Pay Group.
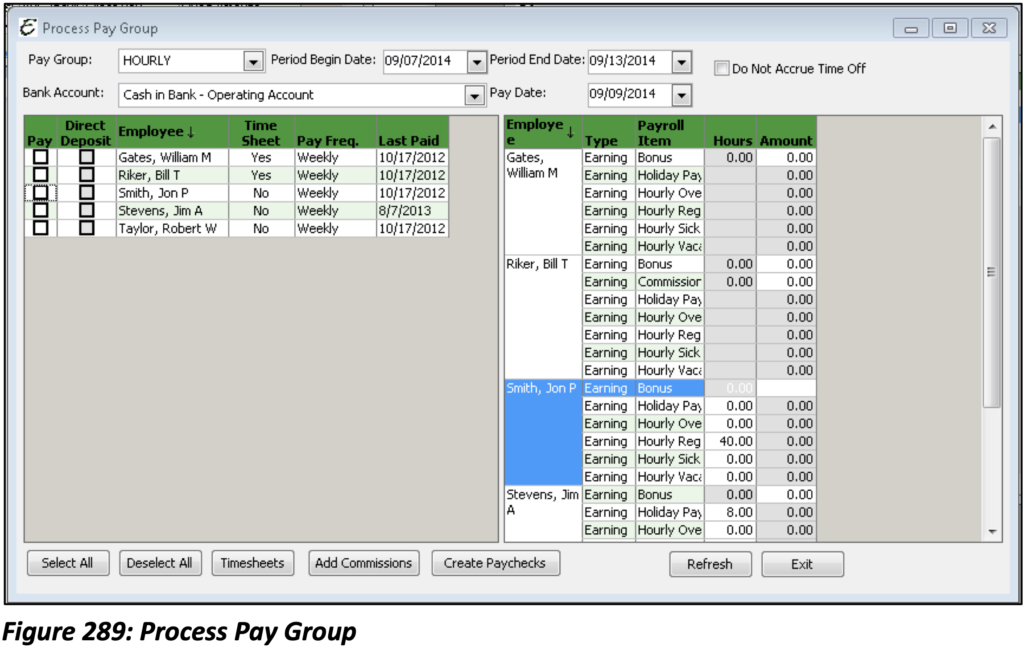
Pay Group: This lists all of the active pay groups. When a pay group is selected, the Employee grid below is populated.
Period Begin/End Date: This is the date on which the period is going to begin/end.
Do Not Accrue Time Off: When checked, Employees will not accrue time off.
Bank Account: The Bank Account to use for processing this particular Pay Group (will auto populate if set in Payroll Preferences).
Pay Date: This is the date for which the Paychecks will be disbursed to Employees.
Pay: Click this check box for each Employee being processed. If the Employee has been set up to use Direct Deposit, click Pay and Direct Deposit.
Direct Deposit: If the Employee is set up for Direct Deposit, you will need to ensure this box is selected; otherwise, a live Paycheck will be created for the Employee.
Employee: Name of the Employee.
Time Sheet: Yes/No field indicating whether or not the Employee is selected to use timesheets.
Pay Frequency: The pay frequency for the selected Employee.
Last Paid: The date of the last Paycheck for this Employee.
Employee Details Grid: Displays Employee, Payroll Item Type, Payroll Item Name, hours, and amount information for the pay group. The white fields in the grid can be edited. The Earning Type of the Employee and whether or not he/she uses timesheets will determine what fields can be edited. Hourly Rates and Salary Amounts will never display here for security purposes. If Salary Employees use timesheets, the hours will not be shown here either. The hours will, however, populate on the Paycheck once it has been created.
Employee Details Grid: Explained
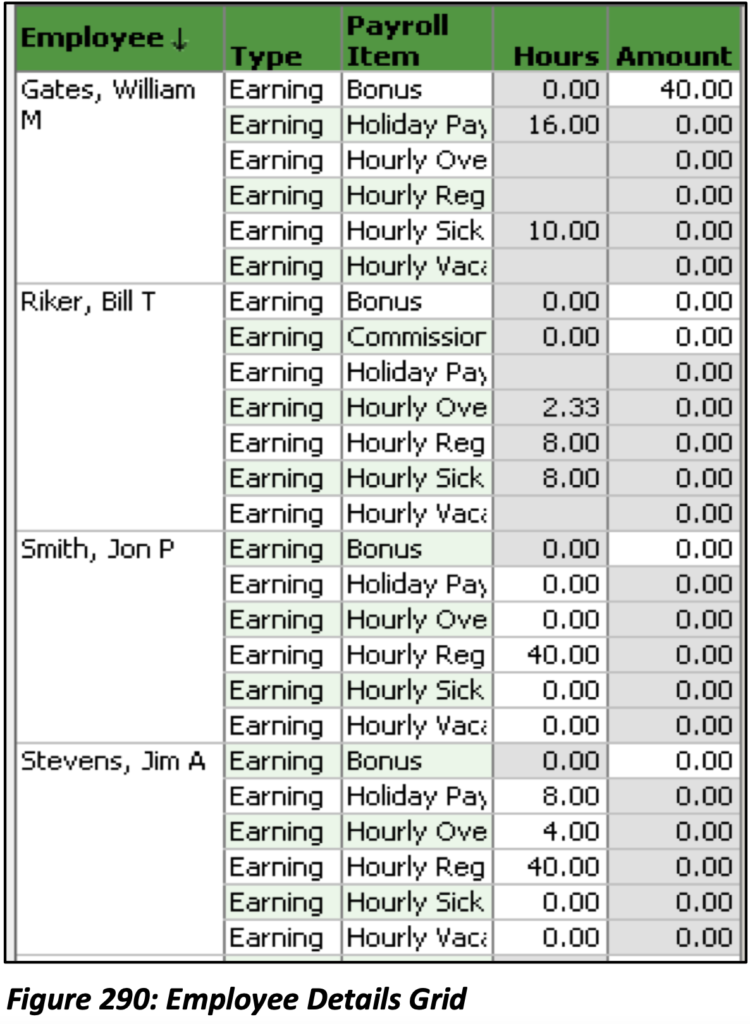
William and Bill are both Timesheet Employees. The “Hours” and “Amount” field are both greyed out. These figures are brought over directly from the timesheet Entries made during the pay period. Notice that even though the hours have been populated there is no calculation to display the wage amount. It says “0” but the amount has calculated and will appear on the Paycheck once it is processed. This is a privacy and security feature.
Neither Jon nor Jim uses timesheets. Their hours must be entered in manually based on your own record keeping. Again, the amount fields will not display the wage amount but will be calculated and appear on the Paycheck. This is a privacy and security feature.

Select All: Activates the Pay check box for every Employee in the Pay Group. If Direct Deposit is enabled for all Employees, the Direct Deposit check box will also be selected.
Deselect All: Clears the Pay check box for all Employees selected in the Pay Group.
Timesheets: Opens the Weekly Time Sheet form. Same as going to the main Menu and selecting Employees, Timesheets/Time Tracking.
Add Commissions: When clicked, this will take you to the Add Commissions form.
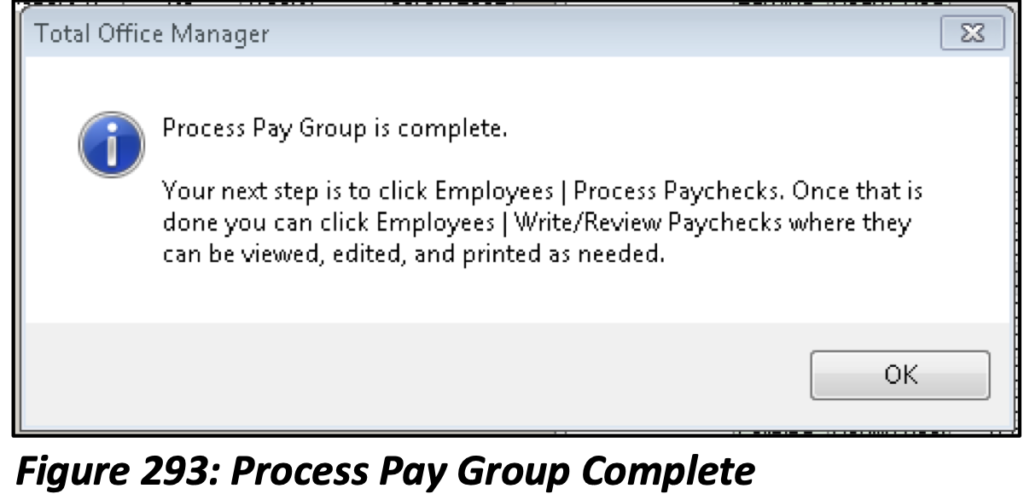
Create Paychecks: Creates all Paychecks for the Employees selected. Now you are ready to Process Paychecks.
Refresh: This MUST be clicked after entering the pay period begin and end dates so that Time sheet hours will load accordingly.
Exit: Closes the form. Any manual values will be saved if a Paycheck wasn’t created after entering the value. This prevents you from having to re-type information.
Add Commissions
When Add Commissions is selected, the form below will open displaying all commissions earned for each Employee who earned one.
Employee: The Employee who earned the Commission.
Date: The date the Commission was earned. (Date of the Invoice/Sale where the Commission was entered.)
Sub–Total: The sub-total of the Invoice on which the Commission was earned.
Commission Method: The Commission Method.
Earning Item: The Earning Item to which the Commission is assigned. (Loads the default Commission Earning when one is assigned to the Employee.)
Commission: The Commission Amount. This can be modified before Commission is added to the Paycheck.
Invoice Balance: The total amount due of the Invoice on which the Commission was earned.
Process Pay Group (Step by Step)
- Choose a Pay Group.
- Choose the Bank Account from which you wish to draw the funds.
- Set the Period Begin and End Dates.
- Set the Pay Date.
- Click the Paycheck box for each Employee being processed.
- Make any necessary adjustments/additions toeach Employee’s Hours/Amounts in the DetailsGrid.
- Click to refer to load timesheet information.
- Click Create Paychecks.