Work Orders
Work Orders are essentially orders from customers which authorize work to be performed. This work may include service calls, maintenance, or installation. Work Orders are not typically the same as Jobs. Work Orders are more short term in nature and handle the tasks of the day for Schedule Management. Jobs are typically projects which span a longer period of time than a Work Order. Prior to working with Work Orders, it is important to set up all the possible preferences. There are a several of preferences to choose from for Work Orders.
Tip: Work Orders are essentially a “permission slip” to perform work. They tie in closely with Payroll. We recommend that no employee be allowed to perform any Customer work without a corresponding Work Order.
Work Orders Types
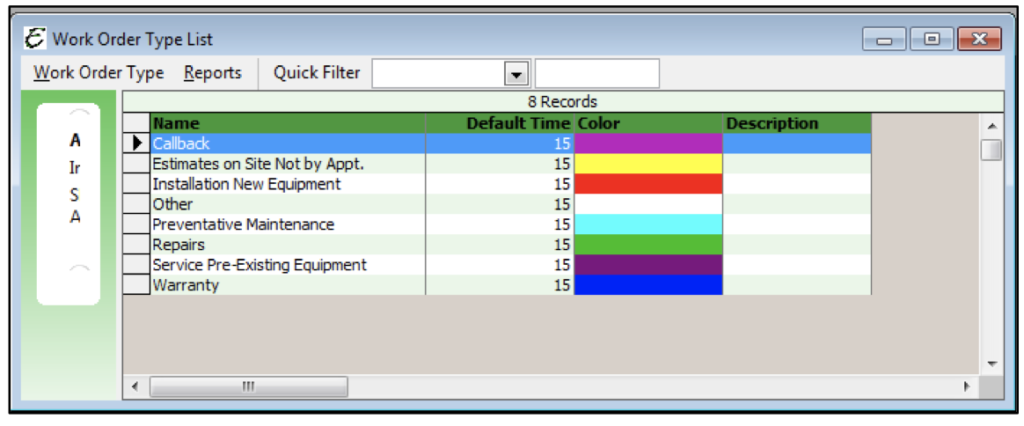
Work Order Types are a way of categorizing Work Orders to help sort, organize, and manage them. Examples may include HVAC Service, Warranty Call, New Construction, Replacement, Re-Pipe, and others. Work Order Types are also used for skill checking when assigning Work Orders to Technicians, ensuring that Work Orders are assigned to Technicians qualified for the job. To access your Work Order Type List, select Lists from the Company main Menu option and then select Work Order Type List.
Add New
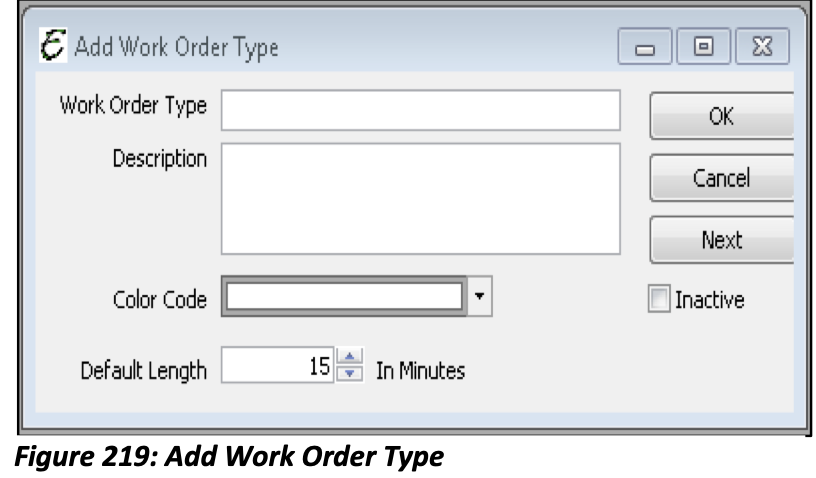
Work Order Type: Give the Work Order Type a name.
Description: Provide a brief description of the Work Order Type.
Color Code: Select a color for this Work Order Type (This is how the Work Orders will appear on the Schedule Board).
Default Length (In Minutes): How long will it take to perform Work Orders of this type (In Minutes).
Please note: After setting up a new Work Order Type, it will appear on the Skills Tab of each employee record. It will then be necessary to open each employee’s record who is qualified to perform that skill and mark it as such. When a new Work Order Type is created, it will also need to be added to any existing Schedule Profiles that should display the new Work Order Type. More about Schedule Profiles will be discussed later in this section.
Once you have your Preferences set up creating and working Work Orders will be much more streamlined. To access a list of your Work Orders, select Work Order List from the Company main Menu.

Add Work Orders
To create a new Work Order, select “New Work Order” from the Work Order List or Schedule Board.
Header Information
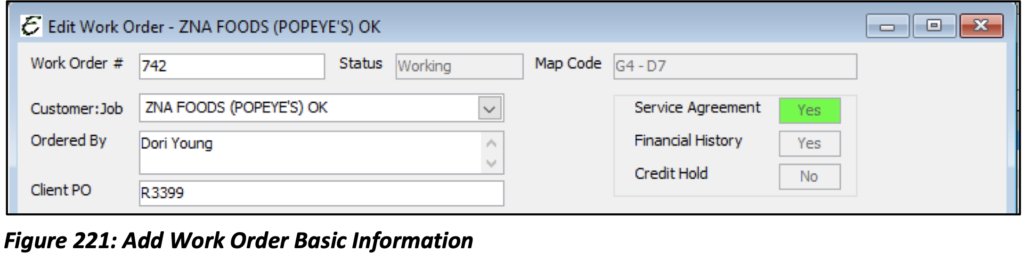
Work Order #: Use this area to enter a number to refer to this WO. Total Office Manager will assign a WO number automatically. You can change this number if needed. Total Office Manager will warn you if the WO number has already been used, thus avoiding duplicating WO numbers.
Status: Displays the status of the WO once it has been created (Scheduled, En Route, Working, Completed, Canceled, or Not Scheduled).
Map Code: Displays the Map Code as entered in the Customer:Job form.
Customer:Job: Use the drop-down to select the appropriate customer.
Ordered By: Use this area to enter the name of the person who ordered the Work Order. This will auto populate with the “Contact” field from the Customer:Job.
Client PO: Use this area to enter a Purchase Order number from your client. This is not your own PO.
Address Tab
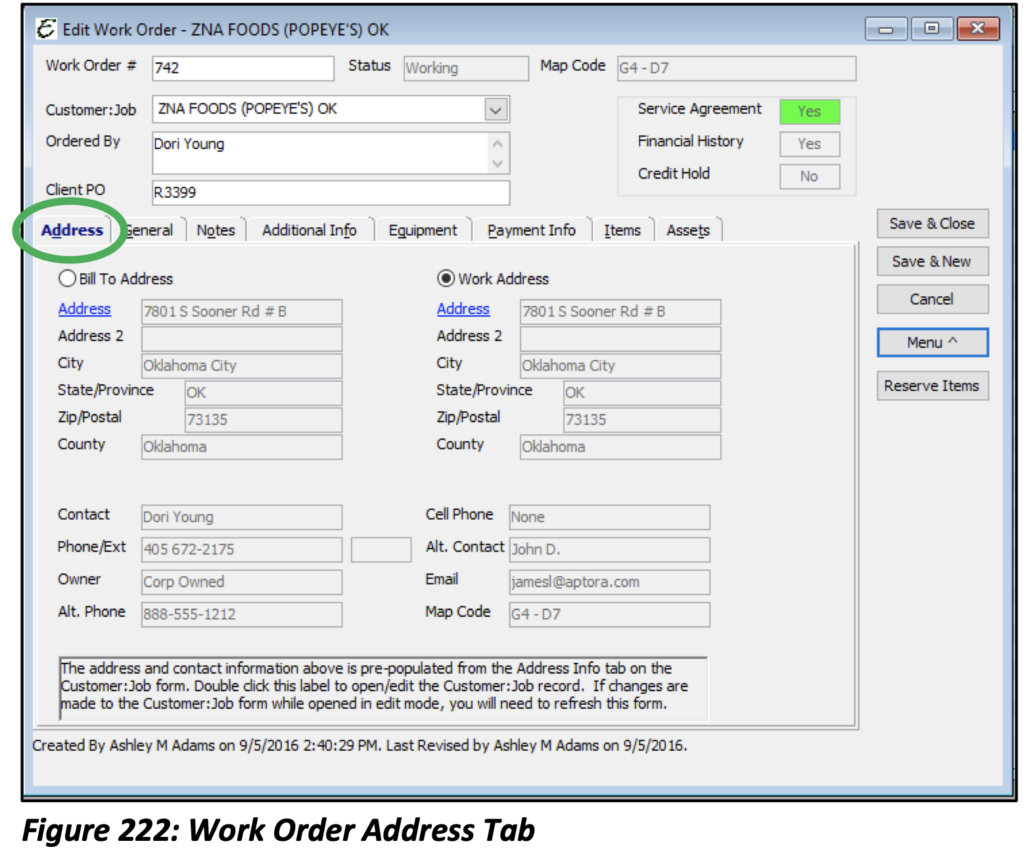
Bill to Address: This is typically where you plan to send the invoice.
Work Address: This is typically where you plan to do the work.
The radio button you select the location of where you plan to do the work. It also determines what address will be displayed on the schedule board.
This information cannot be edited here. Double click on the label box to open the Customer:Job form. You may edit the addresses there.
General Tab
Brief Description: Use this area for a brief description of the work to be performed. This field is like the subject line of an email. It allows up to 100 characters.
Detailed Description: Use this area to enter any directions or any special instructions for this Work Order. The Info Stamp Button adds the date, time, and user name to the text box.
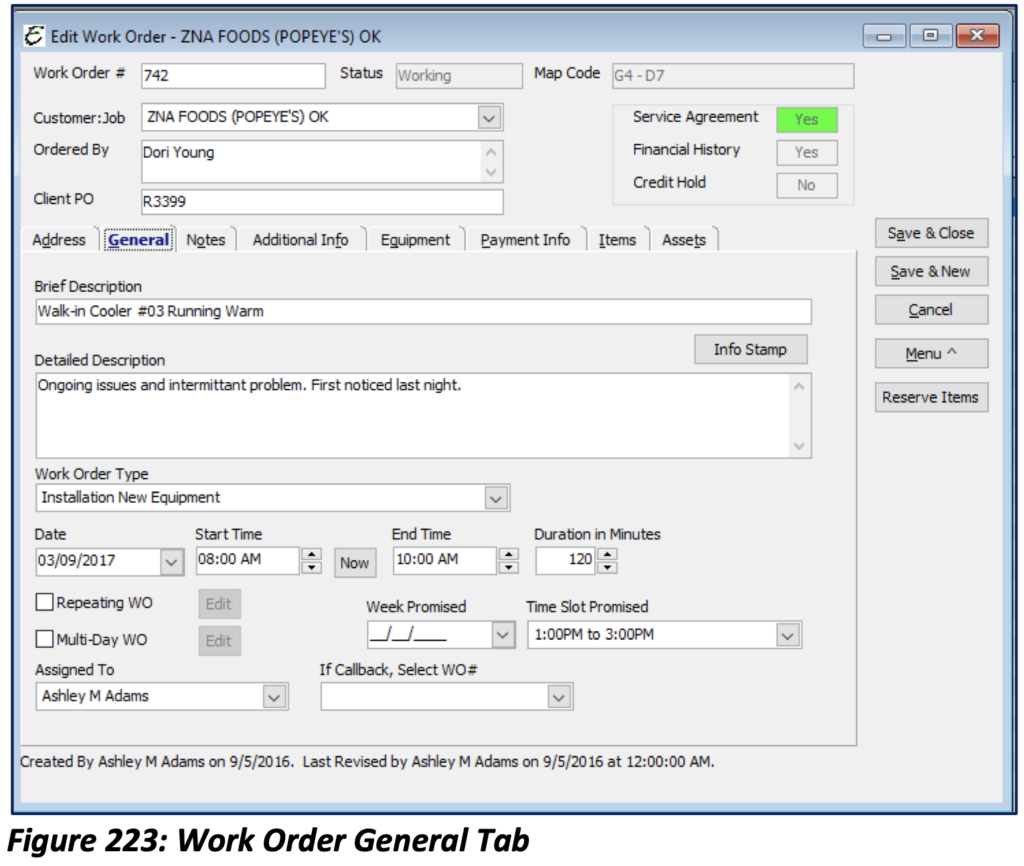
Work Order Type: Select the particular type of Work Order.
Date: Enter the date for when the work is to be performed.
Start Time: Enter the time of day when the work is to be started.
Now: This button enters the current date and time into the respective fields with a single click.
Duration in Minutes: This field is usually pre-populated from the default duration associated with the Work Order Type. This field can be edited if necessary.
Assigned To: Choose the technician to which the Work Order will be assigned. If the skills checking feature for the employee has been enabled, a warning will appear if the technician is not qualified for that type of WO.
Notes Tab
Private Notes: This information cannot be printed or emailed as part of the work order. The customer should never see it. Use this area to communicate things you would not want the customer to read.
Technician’s Notes: This area is typically reserved for the technician in the field. Notes entered into Aptora Mobile II® would appear here.
Additional Info Tab
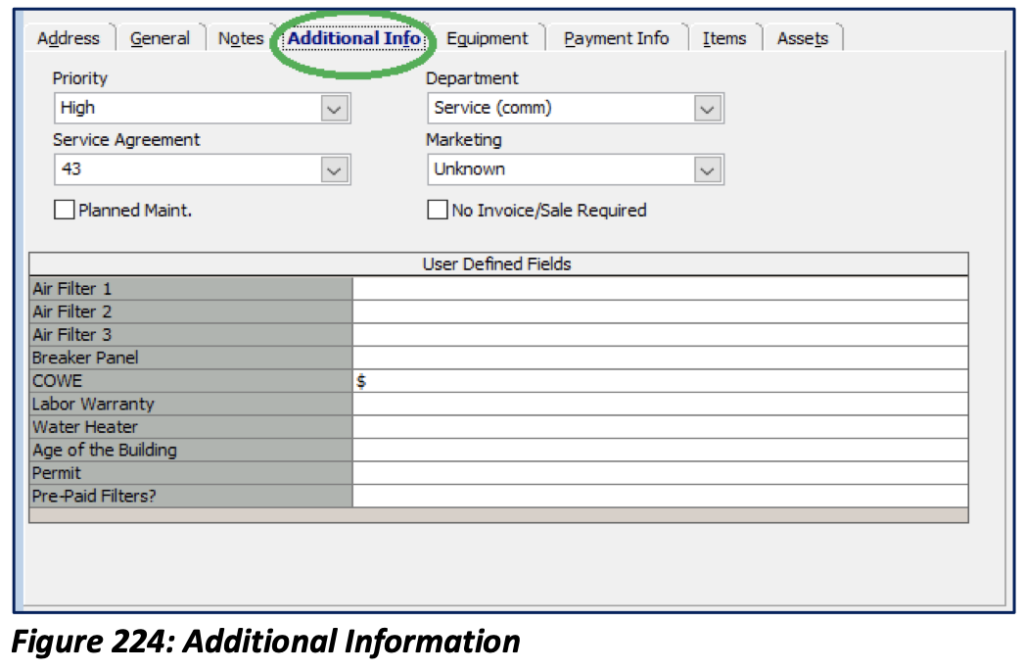
The Additional Info Tab lists any and all User Defined Fields that have been set up. If any equipment exists for the selected Customer:Job it will be listed. The following fields are also available:
Priority: Assign a priority to the WO. High, Medium, or Low. This will auto populate with the Default Priority selected in Company Preferences.
Serv Agmt (Service Agreement): Customers may own more than one Service Agreement. Use this drop-down list to choose a Service Agreement to associate with the Work Order. Typically, you will only select this if the Work Order is directly associated with the Service Agreement you have with your Customer.
Planned Maint.: Click this check box to manually mark this Work Order as one of the Planned Maintenance Work Orders for the Service Agreement selected.
Marketing: Select from the drop-down list, the marketing effort that generated this Work Order. This will auto populate from the Customer:Job Default.
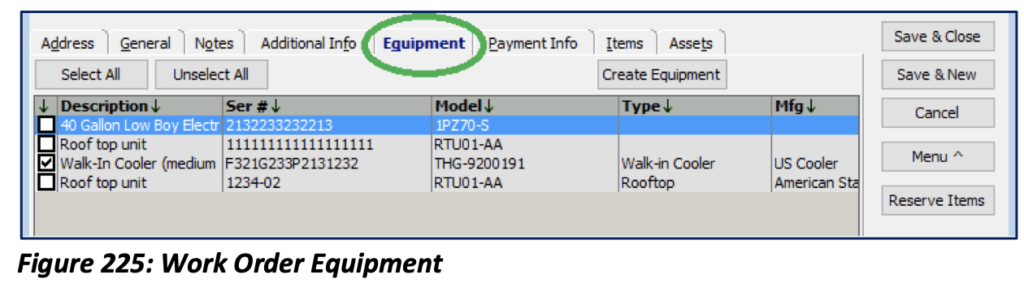
You may also Create a new piece of equipment for that Customer:Job. Here you will select any equipment that is being serviced or diagnosed on this Work Order.
Save: Manually saves the form and leaves it open for further editing if necessary.
Equipment Tab
Payment Info Tab
Terms: This is the only field that can be edited on this tab. Use this area to select the terms for this Work Order. The default will populate from the Customer selected.
Items Tab
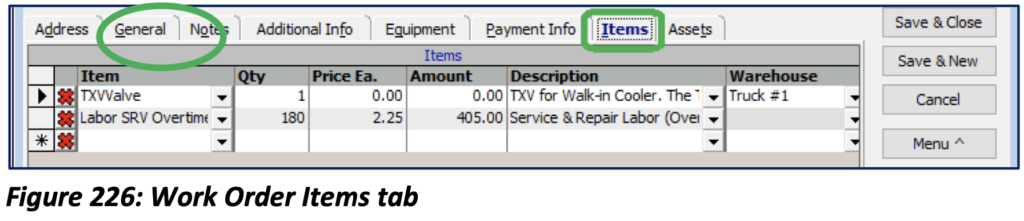
Item: The Name/Number of the selected Invoice Item.
Qty: The total quantity of the Item being used/sold.
Price Each: The retail price (price you charge the customer) for the item.
Amount: Retail price multiplied by the quantity (number sold). The bottom row of this column will display a total of all the amounts for all items listed.
Description: The description of the item sold. You can change this description. The change will not affect the description of the actual item, but rather how it appears on the Invoice for the Customer.
Warehouse: The location from which the item was sold. Total Office Manager allows you to set up multiple locations for inventory such as a main warehouse, service truck, etc. Your Default Warehouse or the Warehouse assigned to the Employee will auto populate. Click the drop-down to change the Warehouse if needed. Any Inventory and Serialized Parts need a Warehouse.
Please note: Work Orders are non-accounting related transactions which means it will not affect Financials or Inventory Quantities when items are selected.
Assets Tab
This tab allows you to assign company property to this work order. The items listed are found in the Asset Manager.
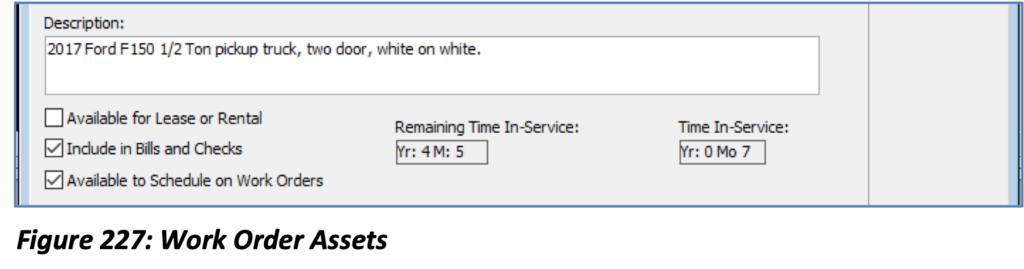
The “Available to Schedule on Work Orders box must be checked in order for the asset to be available in the Work Order Asset tab.
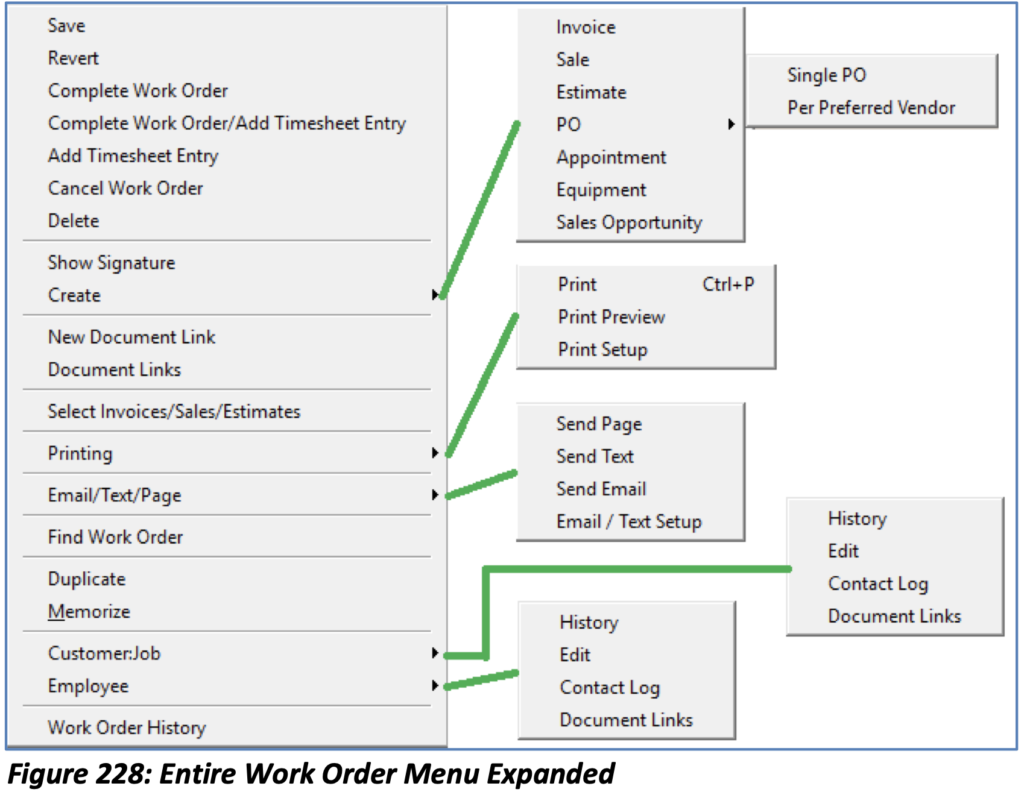
Work Order Menu Options
Complete/Un-Complete Work Order: Sets the Work Order status to complete or un-completes a Work Order that was previously completed.
Complete/Un-Complete Work Order and Add/Delete Timesheet Entry: If the Work Order had been marked complete and was given a timesheet entry by mistake, this option un-completes the Work Order and removes the Timesheet. If the Work Order is not completed, you may complete the Work Order and assign it a timesheet entry.
Add Timesheet Entry: Opens the assigned employee’s timesheet. Many of the fields in the employee timesheet will automatically be populated with information from the Work Order such as Employee, Customer:Job, Work Order #, Start Time and Hours. Work Orders are calculated based off Start Time and Duration in minutes from the Work Order which suggests the End Time automatically.
Cancel Work Order: Set the Work Order status to “Canceled” and crosses it out on the Schedule Board. Canceling a Work Order is generally recommended over deleting a Work Order. Problem customers sometimes call many service companies only to award the service call to the one who arrives on location first. They then cancel all other Work Orders placed with other companies. By canceling a Work Order instead of deleting it, a history of this behavior can be established.
Create: Has several sub-menu options:
Create Invoice: Creates a new invoice for the Customer who appears on the Work Order. The Invoice will automatically be filled in with the Customer name and any pertinent Customer information which can be brought forth from the Customer record. The invoice will automatically have the Work Order assigned to it, thus keeping the history of flow intact.
Create Sale: Functions exactly like Create Invoice, except payment is being received immediately, rather than invoicing the Customer for payment expected at a later date.
Create Estimate: Functions exactly like Create Invoice, except it creates a new estimate for the Customer on the WO.
Create PO: Creates a new Purchase Order where the shipping destination is set to the location of the Customer appearing on the source Work Order, rather than your company’s default shipping destination. The Purchase Order is then tied to that specific Work Order for tracking purposes.
Create Equipment: Opens the Add Customer Equipment form, an important feature used to records Customers’ equipment.
Select Invoices/Sales/Estimates: Under many circumstances an association between a Work Order and a sales form is automatically created because either the sale was generated from the Work Order, or the Work Order was generated from the sale. The “Select Invoice/Sales/Estimates” command is used if it is necessary to manually create this association on a Work Order. A similar command, “Menu, Assign Work Orders” is found in the sales forms and is used to create the same association if it is more convenient to do so. This is most commonly used in conjunction with the Duplicate Work Order Feature to automatically complete and Invoice more than one Work Order for a specific job.
Printing:
Print: Used to print a hard copy of the Work Order
Print Preview: Used to preview a pending hard copy of the Work Order
Print Setup: Used to set up Work Order printing preferences
Email/Text/Page: Used to Email, Text, or Page a Work Order to an employee. Send Page: Click this option to bring up your email client (i.e. Outlook). The email will be auto populated with the assigned employee’s pager address (if provided). The email will auto populate with the Customer:Job and Work Order information. This feature is used for pagers that allow you to “page” a person’s pager or phone using an email address such as XXX-XXX-XXXX@pager.pagenet.net. A phone line is not actually used, but an Internet connection is required.
Send Text: Click this option to send a text message. This option will bring up your email client. The email will be auto populated with the assigned employee’s text message address. Some wireless carriers use special formatting for the number when sending emails as text messages, such as XXX-XXX- XXXX@tmomail.net. If you have any questions regarding this, please speak with a representative of the wireless carrier for the phone you wish to send the text message to.
Send Email: Click this option to bring up your email client. The email will be auto populated with the assigned employee’s email address (if provided). The email will auto populate with the Customer:Job and Work Order information.
Duplicate: Creates an exact copy of the Work Order minus the “Assigned To” technician. The duplicated Work Order can be edited as necessary without having to start from scratch. This is useful when sending a technician back to the same job the following day, or when more than one technician is assigned to the same job. In order to use this feature, you must enable the “Allow Duplicate Work Numbers” preference. If the preference is not enabled, the program will assign the next numerical Work Order number available. With the preference off, a copy of the Work Order is created. With the preference on, the Duplicate Work Order Utility appears with several options.
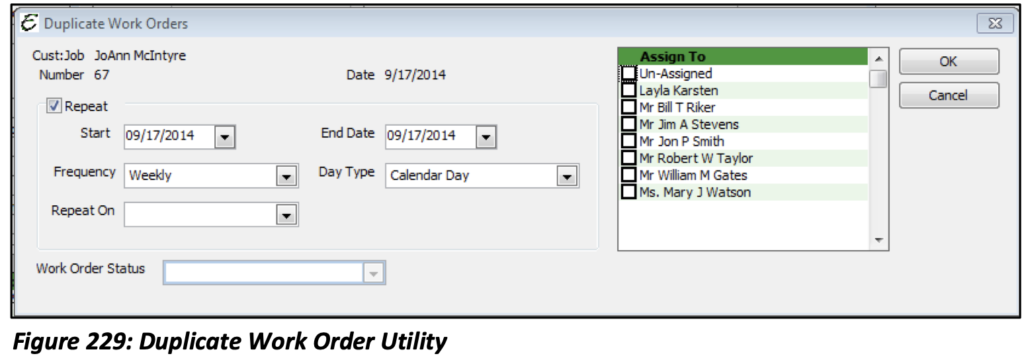
Customer:Job, Work Order Number and Date fields are auto populated from the Work Order you wish to duplicate. These cannot be changed. However, by selecting the Repeat option, this Work Order can be manipulated with when the Work Order duplication will Start and End, the frequency of Work Order duplication, and which day it will repeat on. By assigning it to a Technician, you will be able to change the Work Order Status to either Not Scheduled, Scheduled, Dispatched, En Route, Working, Completed or Canceled. Click OK to save.
Memorize: A memorized transaction is useful for Work Orders that occur on a regular basis. You can use the Memorize function to be reminded to create the Work Orders on a regular basis
Customer:
Customer History: Opens the Customer’s history form which displays every sale, check, purchase order, bill, item receipt, service agreement and more for that Customer.
Edit Customer: Opens the Customer record for review or edit.
Contact Log: Opens the Customer’s Contact Log, used to enter detailed notes about the account.
Document Links: Opens the Customer’s Document Links List.
Employee History: Opens the history for the Employee record. Edit Employee: Opens the employee record for review or edit.
Contact Log: Opens the Employee’s Contact Log, used to enter detailed notes about the Employee. Document Links: Opens the Employee’s Document Links List
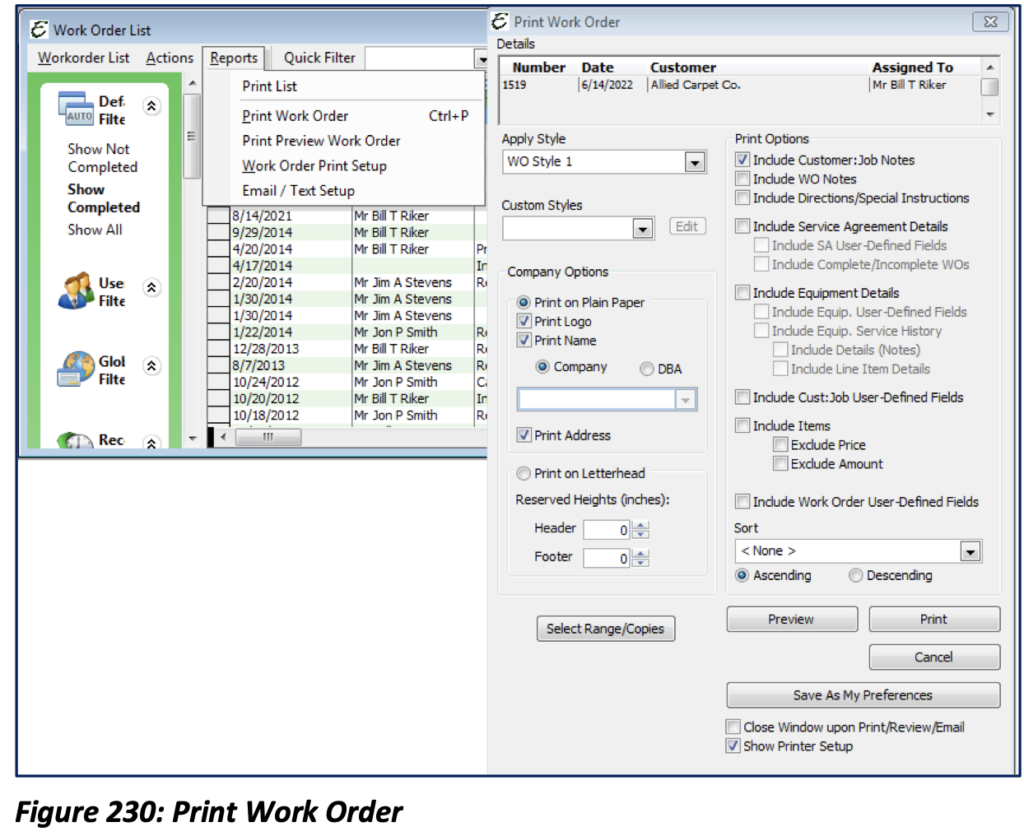
Printing Work Orders: When printing a Work Order there are several options available. You may print the entire list of Work Orders as they appear on the screen, Print any selected Work Order (without preview), preview any selected Work Order before printing or open print options setup before preview and/or printing.
Apply Style: There are six available styles from which to choose how the information will be displayed on your printed Work Orders.
Custom Styles: These are styles that you have created using the Custom Work Order Template provided by Total Office Manager. From the drop- down list select <Add New> to create specialized Work Order Templates.
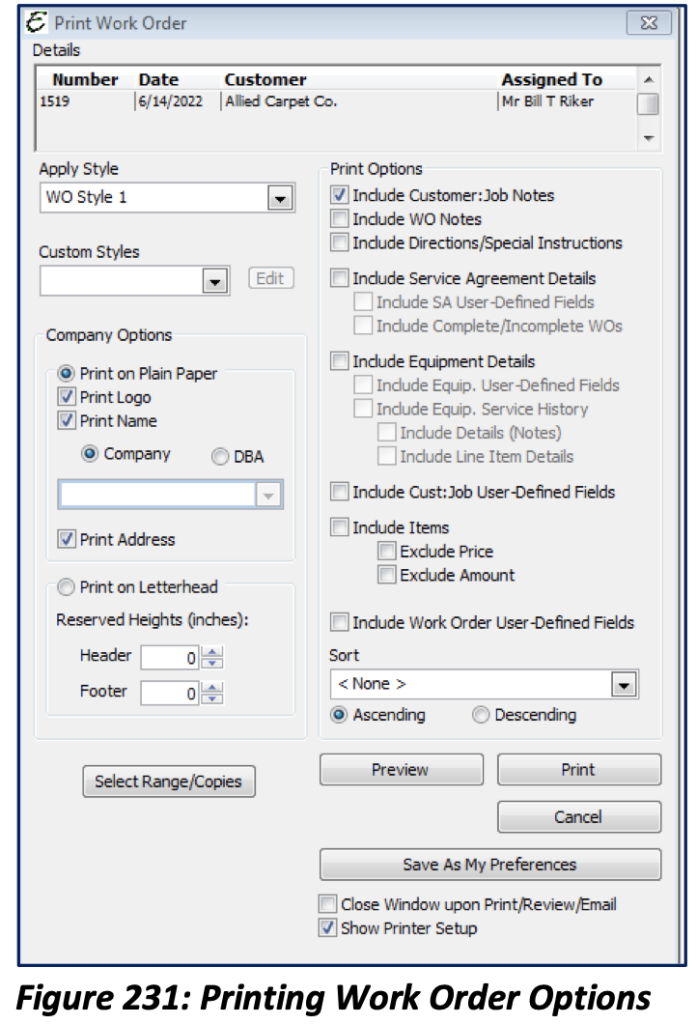
Company Options
Print on Plain Paper: If you are printing on paper without letterhead
Print Log: Prints your company logo on the Work Order
Print Name: Prints your company name on the Work Order Company VS DBA: Choose to include your company’s main information on the Work Order or your company’s DBA (Doing Business As) name.
Print on Letterhead: Assumes that your letter head includes your company name and logo already and allows you to specify the Header and Footer margins.
Print Options: The following is information you may elect to print on the Work Order: Customer:Job Notes, Work Order Notes, Directions/Special Instructions, Service Agreement Details, SA UDFs (User Defined Fields), Complete/Incomplete Work Orders Associated with the Service Agreement, Equipment Details, Equipment UDFs, Equipment Service History, Equipment Details (Notes), Line Item Details, Customer:Job UDFs Work Order UDFs, and Items on the Work Orders.
Please note: Once you have set your print preferences, be sure to select the “Save As My Preferences” option. With this selected, each future Work Order will print based off your saved preferences. This option is user specific and does not affect any other users.