Schedule Board Scheduling
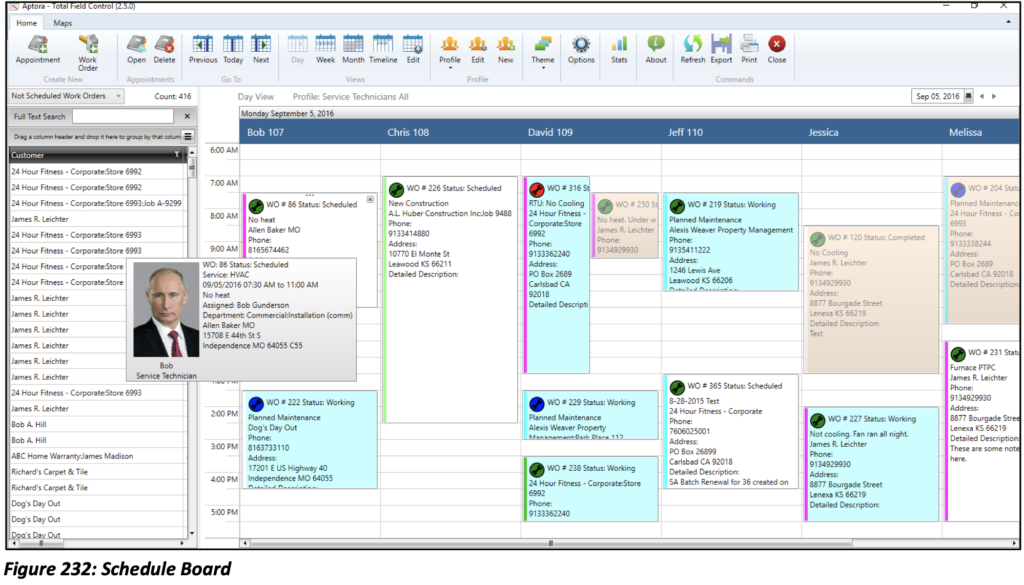
The Schedule Board is a tool used to display and schedule Work Orders and Appointments. To access the Schedule Board, select Schedule Board from the Company main Menu.
Date Selector: Use the Date Selector to set the Schedule Board to a specific day.
Now: Click the Now button to set the Schedule Board to the current date.
Profiles: The Profiles drop-down list displays your Schedule Board Profiles.
Edit Profile: Once you have selected a Profile it can be edited with this button.
Day (View), Week (View), Month (View): Click each to display the Schedule in Day, Week or Month view.
List (View): Displays the Schedule Board in a view similar to a daily desk planner.
Options: Click the Options button to modify the various Schedule Board Preferences.
WO Type: The WO Type drop-down list is used to filter the Unscheduled Work Orders by Work Order Type.
Month Filter: The Month Filter is used to filter Unscheduled Work Orders by a particular month and year.
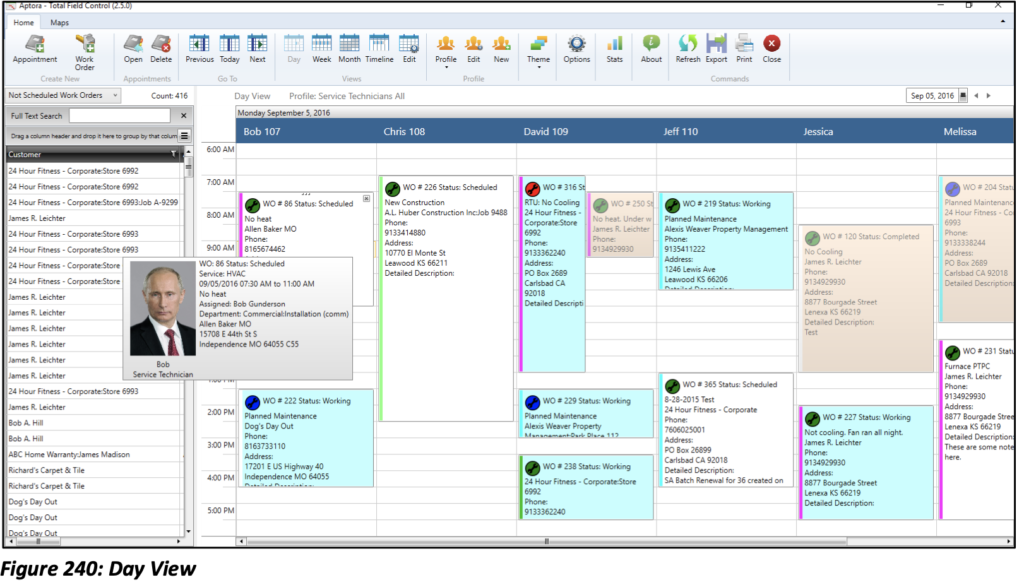
Schedule Board Display
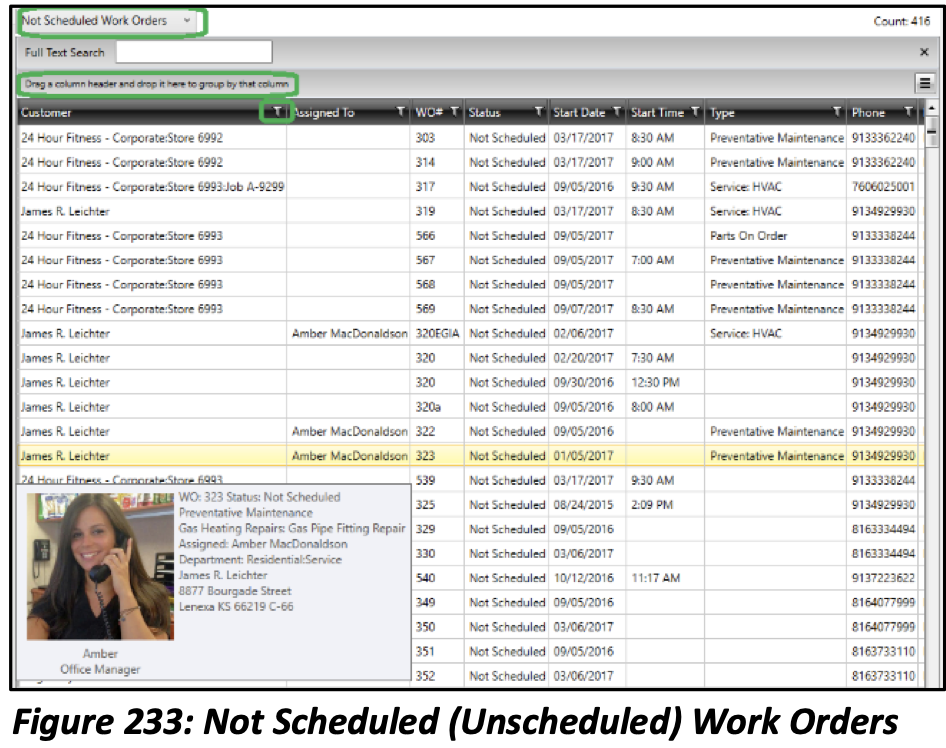
Not Scheduled Work Orders: The Not Scheduled Work Orders area of the Schedule Board displays Work Orders that do not have a status of “Scheduled”. For a Work Order to achieve “Scheduled” status, it must meet the following criteria: a Technician, a Date, a Start Time, and Duration. If any one of these conditions are not met, the Work Order is considered “Unscheduled” and appears in the Unscheduled Work Orders area of the Schedule Board.
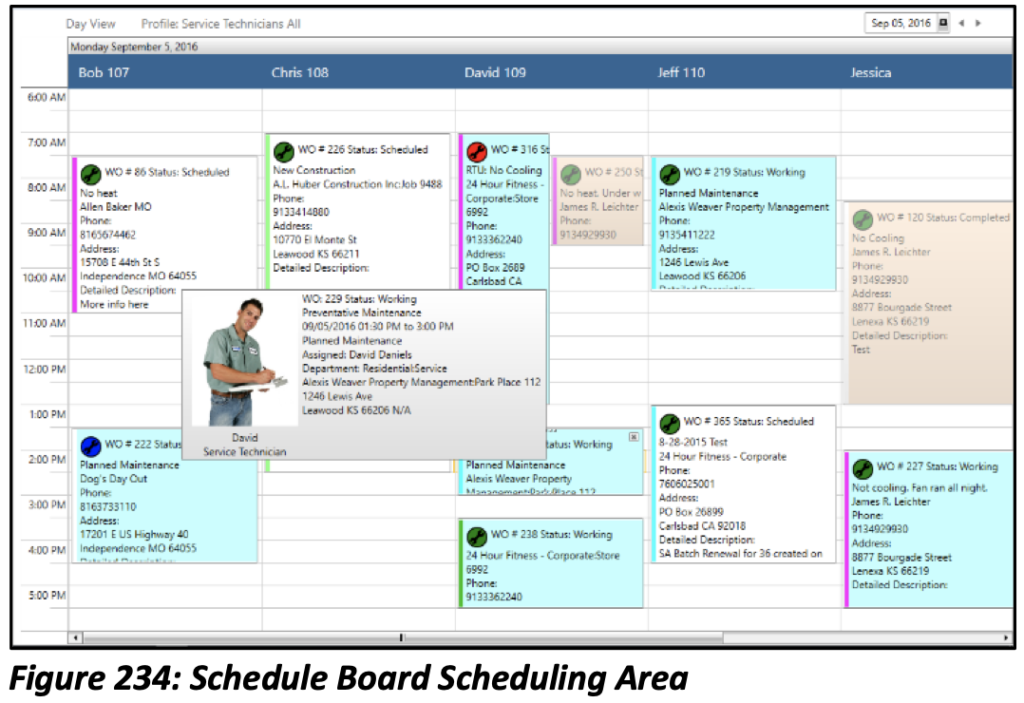
Schedule Board: Use the scheduling area of the Schedule Board to manage Work Orders. Work Orders on the Schedule Board are easily “dragged and dropped” from the Unscheduled area to the technician and time slot desired. Work Order duration is easily manipulated by “grabbing” the top or bottom of the Work Order with your mouse pointer and stretching it to cover the time frame the Work Order requires. Right-Click on any Scheduled Work Order to see a pop-up menu of other convenient options.

Info Balloon: When the mouse pointer hovers for a moment over a scheduled Work Order, an Info Balloon which contains the most important Work Order information will pop up. Instead of having to open the Work Order to review details, the Info Balloon will display them for you.
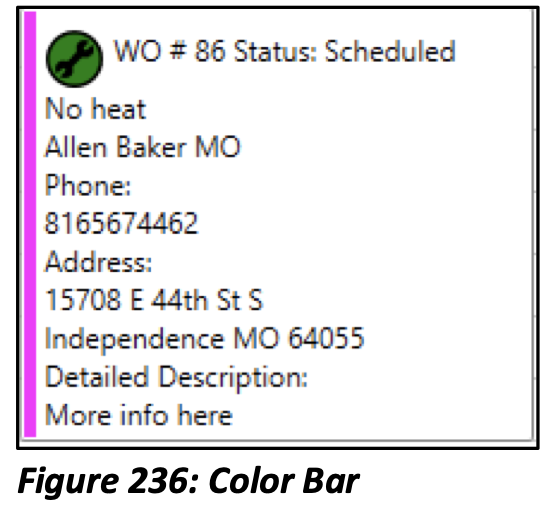
Color Bar: The Color Bar is a very helpful area of the Schedule Board. During setup, a color can be assigned to each Work Order Type in your company. In turn, each Work Order Type then has a corresponding Color Bar. When a Work Order is placed on the Schedule Board, the color associated with its Work Order Type is displayed on the Color Bar for that Work Order.
Schedule Board Options
The Schedule Board Options allows you to customize the Schedule Board by user. Select the Options button from the top of the Schedule Board.
General Tab
The General Tab allows you set the format by which the date will appear on the Schedule Board.
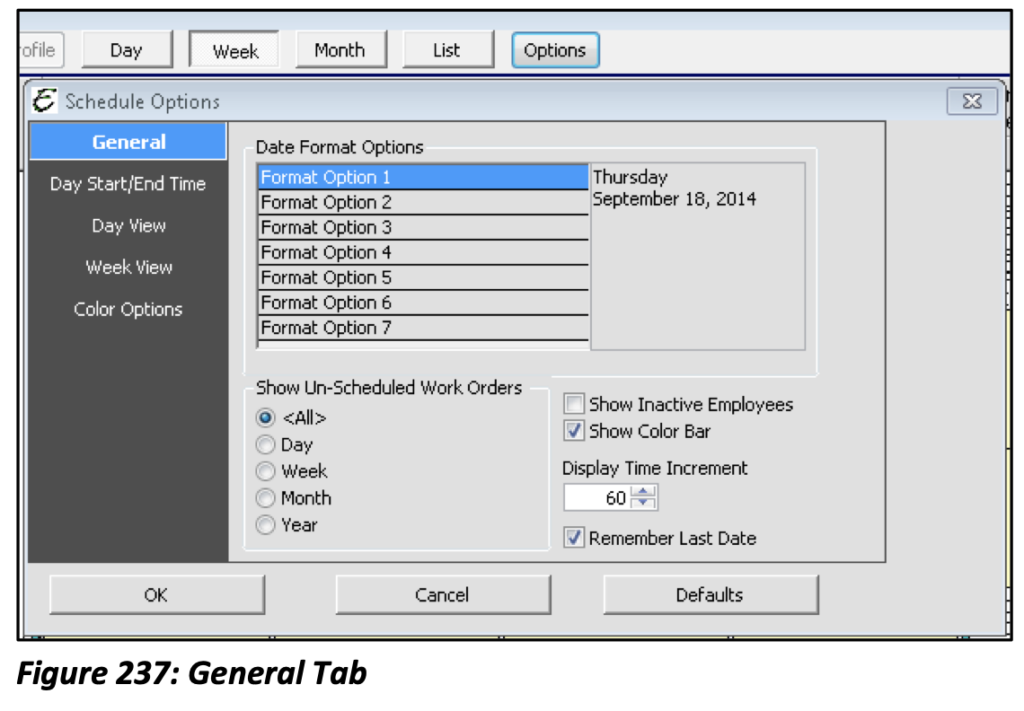
Show Un-Scheduled Work Orders: Allows you to display Unscheduled Work Orders for the current day, week, month or year.
Show Inactive Employees: Employees who have been inactivated will appear on the Schedule Board.
Show Color Bar: Toggles whether or not a Color Bar appears on the Scheduled Board.
Display Time Increment: Allows you set the increments by which time is displayed on the Schedule Board (in minutes).
Day Start/End Time Tab
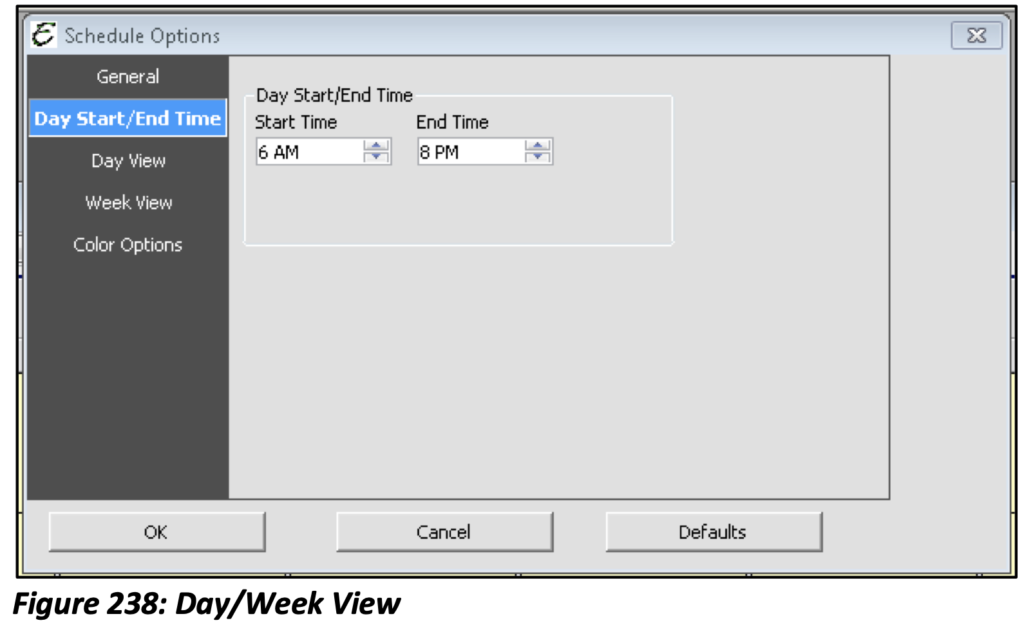
This tab allows you to set the start and end time that will display on the Schedule Board. The Start Time cannot be sooner than 12:00 am and the End Time may not exceed 11:59 pm. Times may not exceed 24 hours.
Day/Week View Tab
The Day View Tab allows you to view Days, Assigned To and Time Increments with either a Top or Left Margin setting.
The Week View Tab allows you to do the same option, but also allows you to set the day on which your week starts and the length of days in your work week.
Color Options Tab
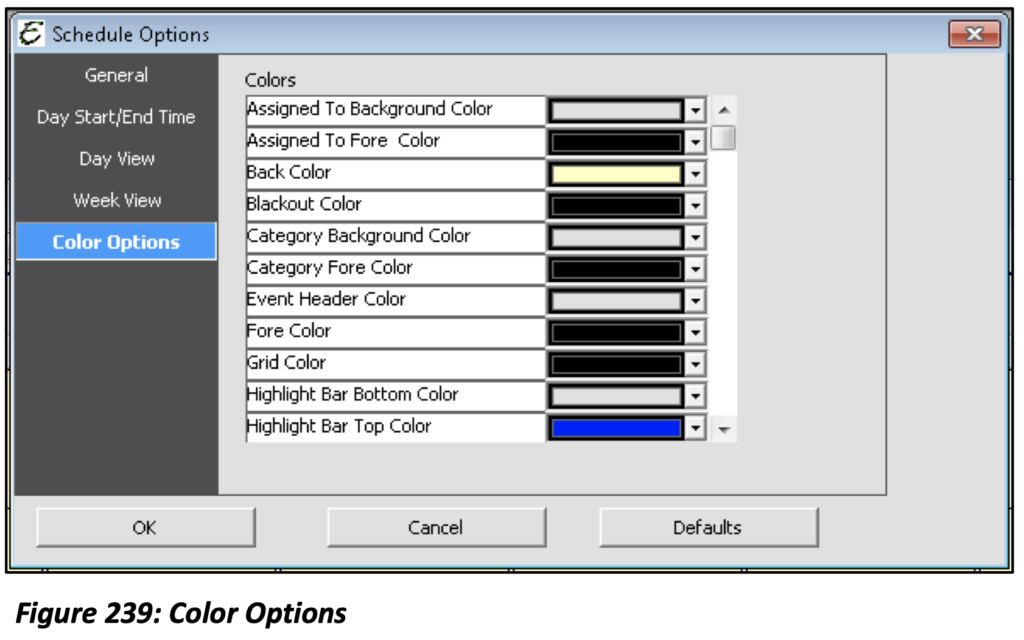
The Schedule Board can be completely personalized with a powerful color scheme function that Total Office Manager provides. The list is very extensive available to create a truly individual Schedule Board color scheme.
Schedule Board Views
There are four views available.
Day View: Displays only the selected Day.
Week View: Displays the length of days in the week starting with the selected Day.
Month View: Displays the Schedule Board for the Month selected.
List View: Displays the Schedule Board as a daily desk planner.
Timeline: Displays the Schedule Board in a more condensed fashion. You can see more activities but fewer details of each.
Schedule Board Profiles
Schedule Board Profiles allow you to create different displays of information for your Schedule Board. Each Profile can be designed to focus on different aspects of your Work Orders, Appointments, Technicians or a combination of the three. To access your Schedule Board Profile List, select Lists from the Company main Menu option and then select Schedule Profile List. Once you have created and selected your Schedule Board Profile, the Schedule Board will only display information based off the selections within your profile.

Please note: Even when Employees are selected within a profile, each Employee must still be selected to show on the Schedule Board. To check this option, go to Employees│Employee List│Double Click to edit the Employee and check the option on the right-hand side of the form that says, “Show on Dispatch Board”.

Name: Begin by giving the Profile a Name.
Activity: Choose between; All, Work Orders Only or Appointments Only.
Status: Choose between; All, Complete or Incomplete.
Employee Tab: Choose one, several or all Employees to be displayed within this Profile.
Work Order Types Tab: Choose one, several or all Work Order Types to be displayed within this Profile. If Work Orders are created without a type, you will also want to include Work Orders without a type.
Appointment Types: Choose one, several or all Appointment Types to be displayed within this Profile.
Make this a Global Profile: Selecting this option allows other users to see and use the Schedule Profile you have created.
Schedule Workflow
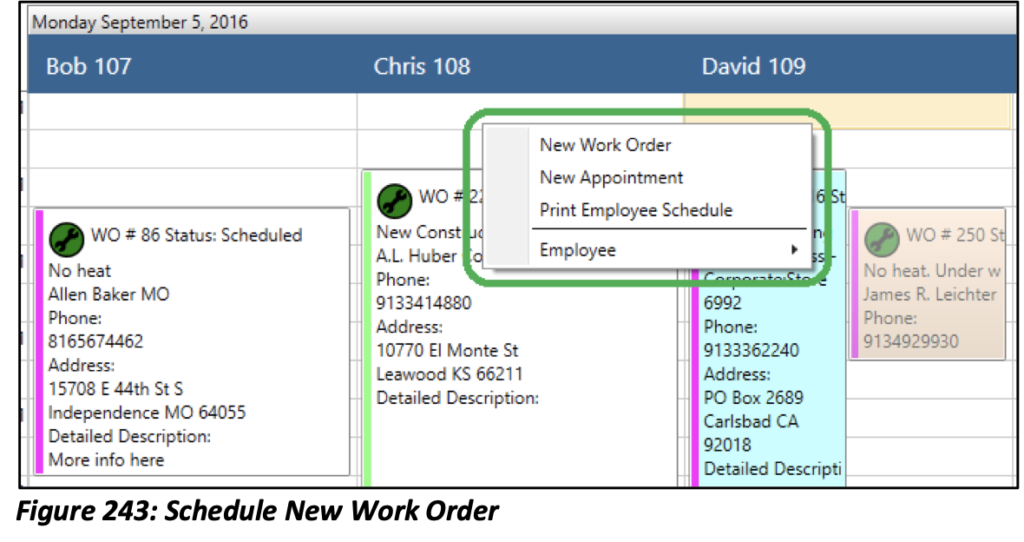
The Schedule Board is such a powerful tool because all of your Schedule Management functions can be performed without leaving the page. Everything from the creation of a Work Order to its completion, assigning Timesheets to creating Sales Receipts or Invoices can be managed from the Schedule Board.
If you Right-Click anywhere on the Schedule Board, all of these functions below will become available. Choose New Work Order or Appointment and a form will open that will have William scheduled for 3:00 p.m.

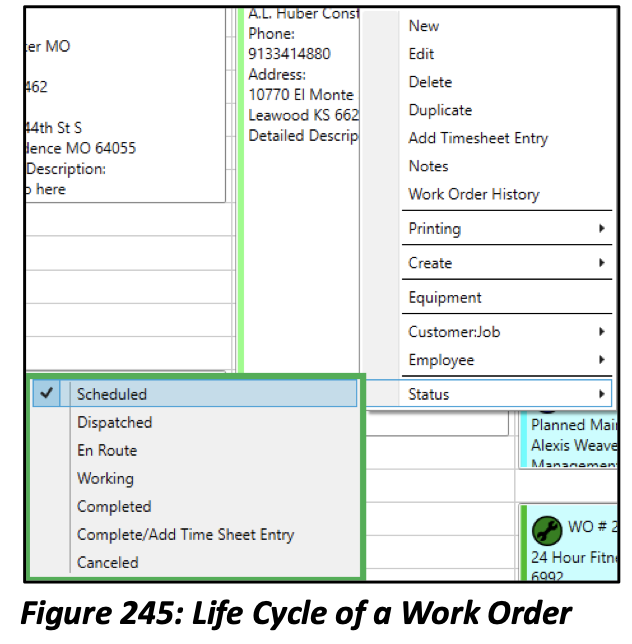
Once you have Work Orders scheduled on the Schedule Board, if any need to be edited, deleted or duplicated this all can be done from the Right-Click menu of the Work Order itself.
The life cycle for a Work Order can include: Not-Scheduled, Scheduled, Dispatched, En Route, Working and Completed. Ideally Work Orders are to be completed daily. This doesn’t necessarily mean that all work was completed, but at the end of the day the Work Order should be “marked” as completed if the work on that specific Work Order was completed. If follow up is necessary for that same Work Order, it should be duplicated and scheduled for another day for which the work can continue or be completed.
If when Dispatched, your Technician needs a physical copy of the Work Order, it can be printed from the Right-Click menu of the Work Order, and put into the queue for him to pick when he arrives at the office.
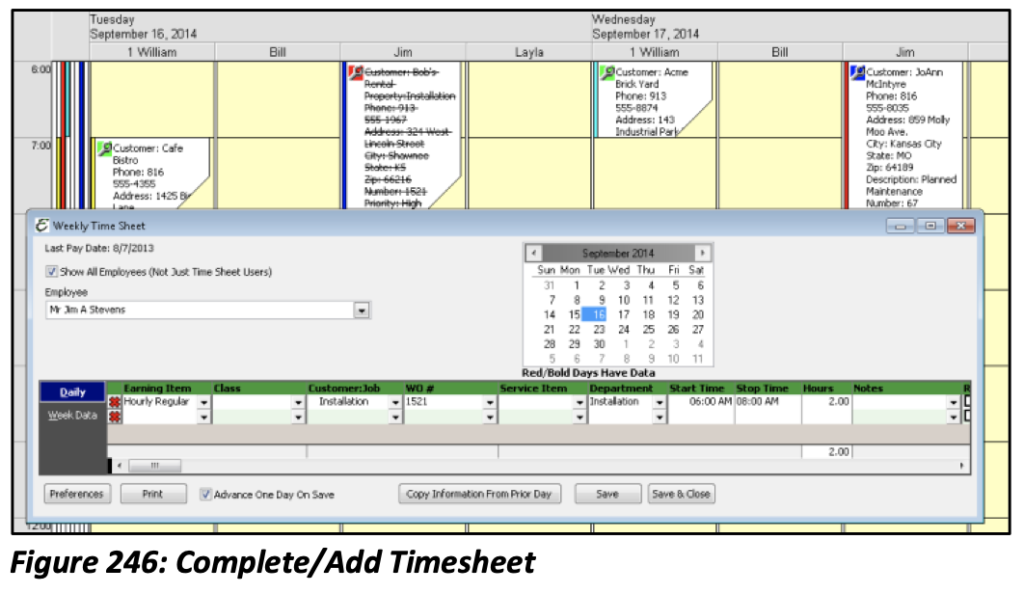
Complete/Add Timesheet
Once the Work Order has been completed (for that day) and a timesheet needs to be entered, that can also be done from the Schedule Board by Right-Clicking on the Work Order. By selecting “Complete/Add Timesheet Entry”, the weekly time sheet form will open for the Employee (technician) assigned to the Work Order.
All information pertaining to the Work Order that has been provided will auto populate on the Timesheet Entry. If the Employee has been set up with a “Default Earning Item” it will populate as well. All fields can be edited if necessary. By providing as much detail on the Work Order as possible, less data entry will be necessary on the timesheet form. Select “Save & Close” to save the information and return to the Schedule Board. Notice that on the Schedule Board the Work Order has been “crossed out”. This letsyou know that it has been completed and the next step can be taken.
Create Estimate/Invoice/Sales/Credit
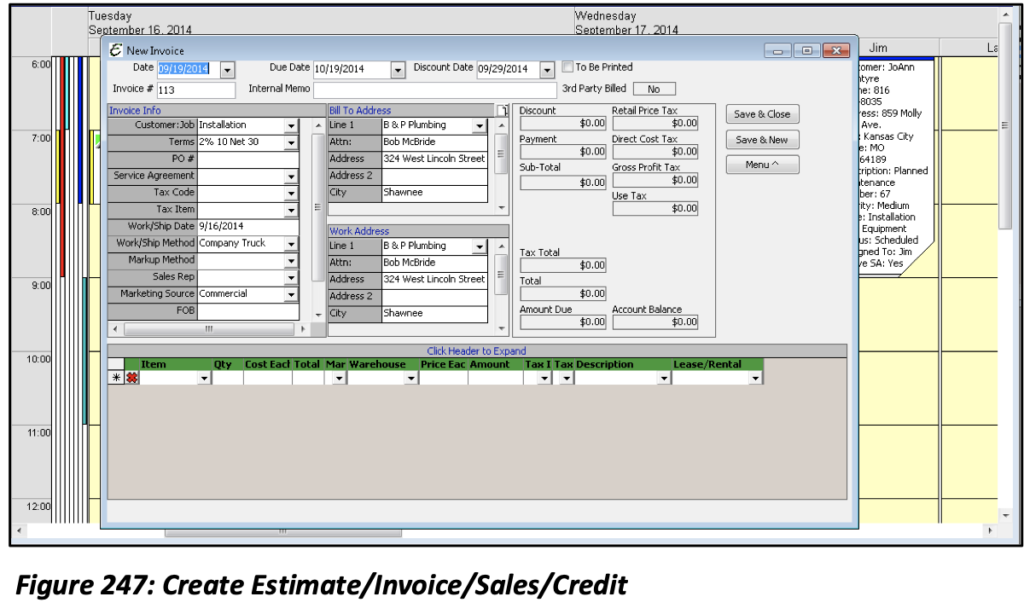
By Right-Clicking on a Work Order from the Schedule Board, all sales forms can also be created. Notice that all Customer information auto populated into the sales form. Add any items that need to be charged to the Customer. Once the form has been completed select “Save & Close” to return to the Schedule Board.
Please note: You can add a Timesheet Entry without completing the Work Order. Once you create an Invoice/Sale from the Work Order, the Work Order Status will automatically update to completed.
Create Purchase Order
Once the Technician has received the Work Order and notices that parts are needed to complete the work which aren’t on the truck or in the company warehouse, the Technician may need to create a Purchase Order. A Purchase Order can be created for parts. Purchase Orders can also be used to replenish any parts used in the completion of work that was completed. To create a Purchase Order from the Schedule Board, Right-Click on the Work Order and select to Create Purchase Order.
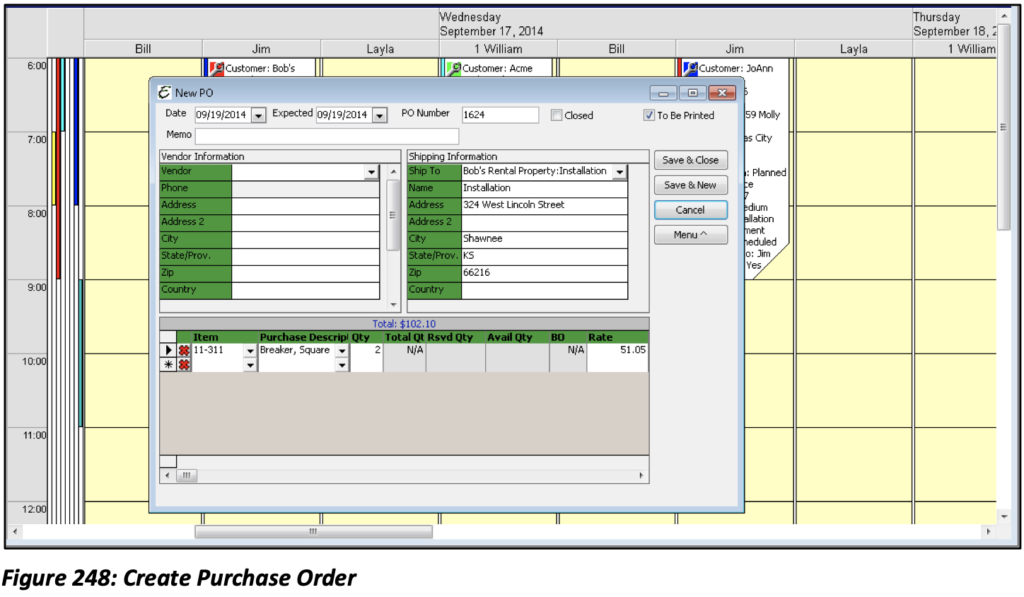
The Customer’s shipping information will auto populate on the Purchase Order along with any items that were included on the Work Order (as long as the preference is enabled to Include Work Order Items Automatically on a new Purchase Order in Work Order Company Preferences). The Vendor from which you order these parts will need to be chosen and now this Purchase Order is complete. Select “Save & Close” to return to the Schedule Board.
Edit Customer/Employee Information
By Right-Clicking on the Work Order from the Schedule Board you can access either the Customer:Job or Employee record for review or edit. You can also access the Contact Log, and Documents.
The Schedule Board is a very extensive tool for the operation of your business. Your day to day functions can mostly be performed without closing the Schedule Board.
Work Order Email/Text/Page
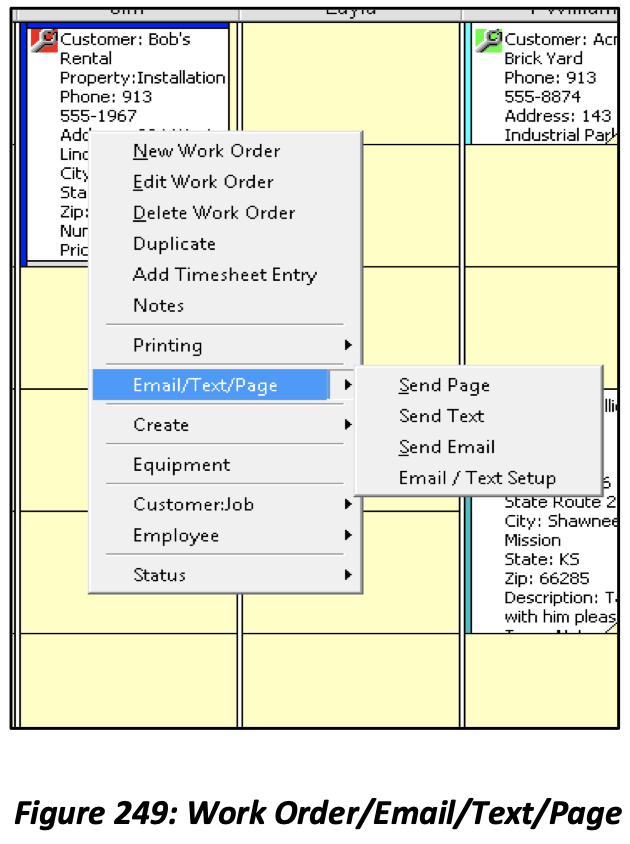
By right-clicking on a Work Order from the Schedule Board, you can send Work Order details to a technician’s email, cellphone or pager.
Email/Text/Page: Used to Email, Text, or Page a Work Order to an employee.
Send Page: Click this option to bring up your email client (i.e. Outlook). The email will be auto populated with the assigned employee’s pager address (if provided). The email will auto populate with the Customer:Job and Work Order information. This feature is used for pagers that allow you to “page” a person’s pager or phone using an email address such as XXX-XXX-XXXX@pager.pagenet.net. A phone line is not actually used, but an Internet connection is required.
Send Text: Click this option to send a text message. This option will bring up your email client. The email will be auto populated with the assigned employee’s text message address. Some wireless carriers use special formatting for the number when sending emails as text messages, such as XXX-XXX- XXXX@tmomail.net. If you have any questions regarding this, please speak with a representative of the wireless carrier for the phone you wish to send the text message to.
Send Email: Click this option to bring up your email client. The email will be auto populated with the assigned employee’s email address (if provided). The email will auto populate with the Customer:Job and Work Order information.
Email/Text Setup: Click this option to open the Work Order Preferences and choose the information you which to include. From here, you will also need to enable “Use Message Spanning” setting when “texting” Work Order information. This will tell Total Office Manager when to cut off each message after a set (set by the Administrator) number of characters and include the rest in a second (third, fourth etc.) message. Message spanning limits are usually set by your phone service provider.
Schedule & Work Order Reports
Schedule Reports
There are several reports that can be generated to allow you to review and analyze the work being done and by whom.
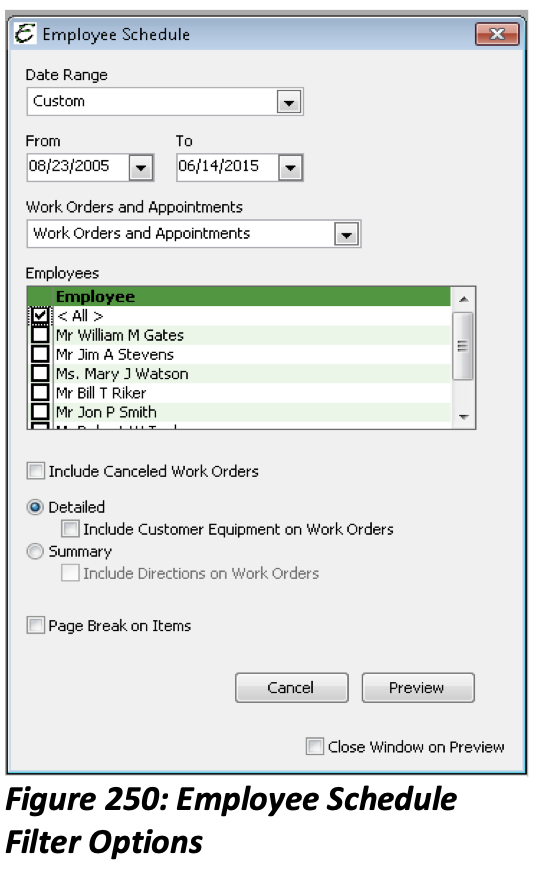
Employee Schedule Report
Date Range: Select a predefined date range (This Week, Last Week, This Month, Last Month etc.)
From/To: Manually enter a date range.
Work Orders and Appointments: Select to view either Work Orders, Appointments or both.
Employees: Select a single Employee, several Employees, or all Employees.
Include Canceled Work Orders: This option will display any Work Orders assigned to the selected employees that have been canceled.
Detailed: This option will display all information pertaining to the Work Order on the report, such as, Work Order #, Bill To Address, Work Address, Status, Priority, and Terms.
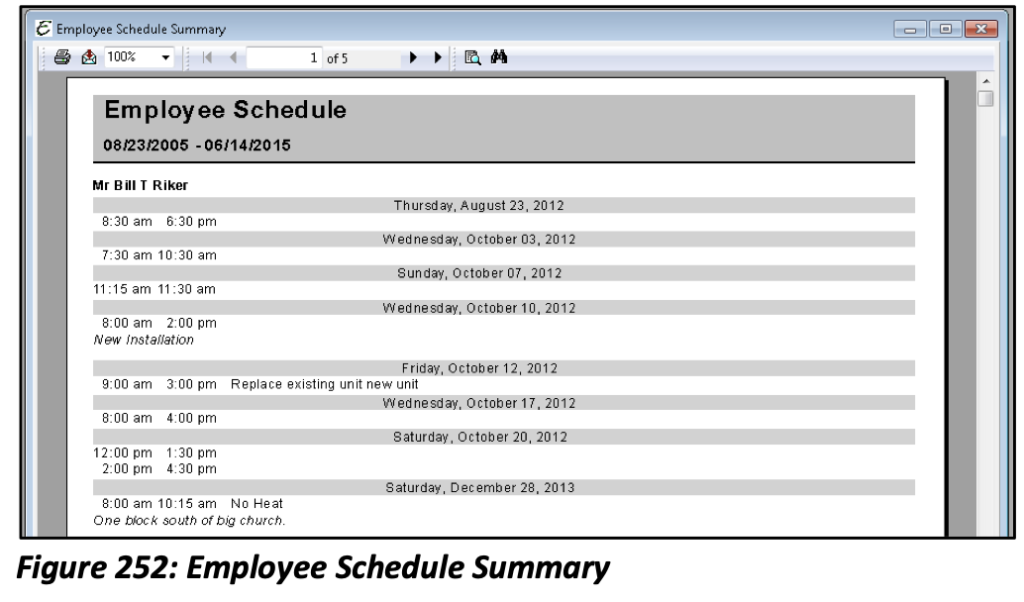
Summary: This option will list the days and times of the Work Orders. No other information will be displayed.
Page Break on Items: This option will create a page for each Work Order. *Drill Down Capable: Opens the Work Order or the Appointment.

*Drill Down Capable: Opens the Work Order or the Appointment.
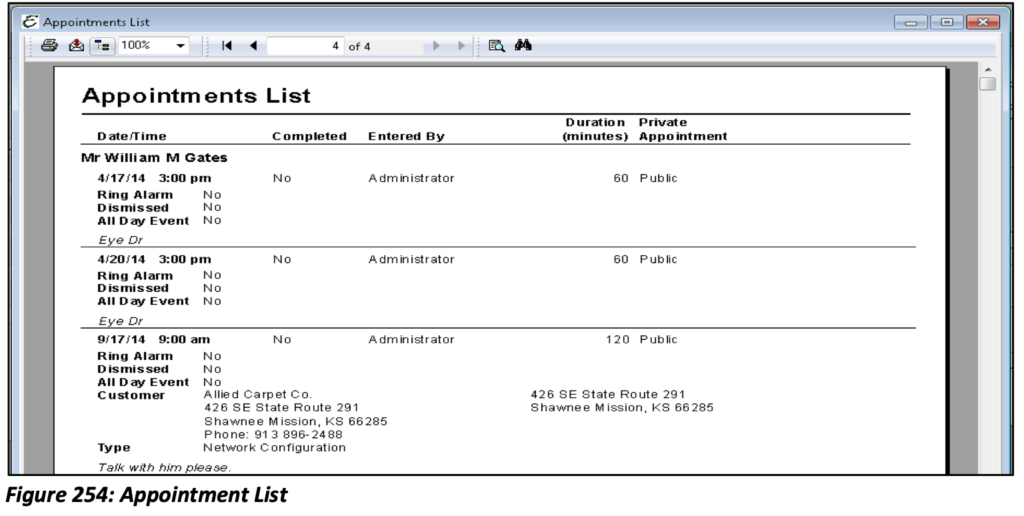
Appointment List Report
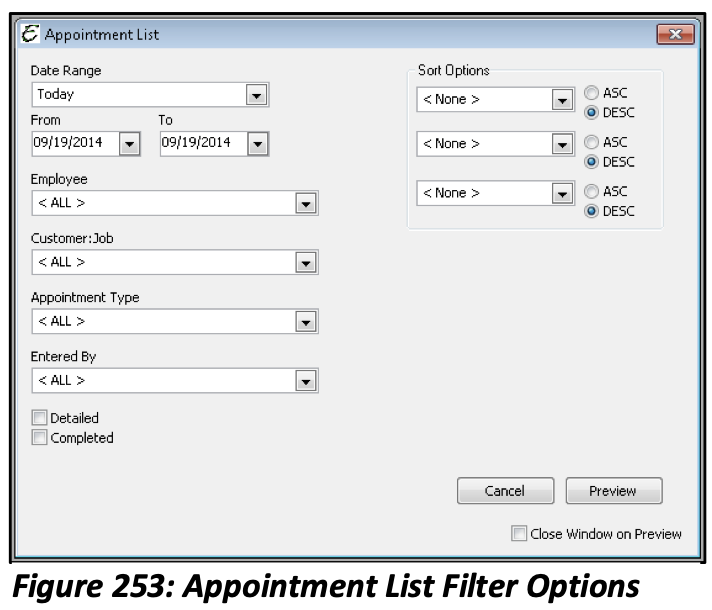
Date Range: Select a predefined date range (Today, Yesterday, This Week, Last Week etc.)
From/To: Manually enter a date range.
Employee: Select a particular employee or choose to view all.
Customer:Job: Select a particular Customer:Job or choose to view all.
Appointment Type: Select a particular Appointment Type or choose to view all.
Entered By: Select Appointments by the user that entered them or choose to view Appointments regardless of who entered them.
Detailed: This option will include all details of the Appointment (Alarm Setting, Completion Status etc.) on the report.
Completed: This option will include all Appointments that have been completed on the report.
*Drill Down Capable: Opens the Appointment selected.
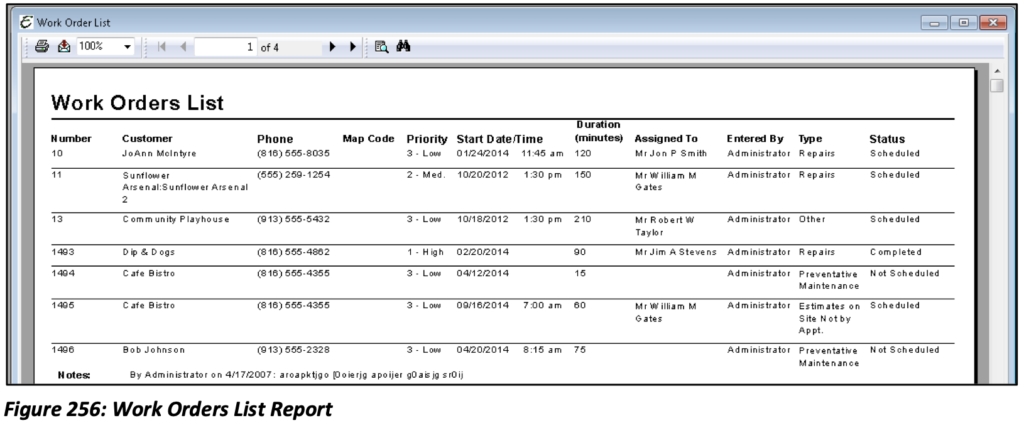
Work Order List Report
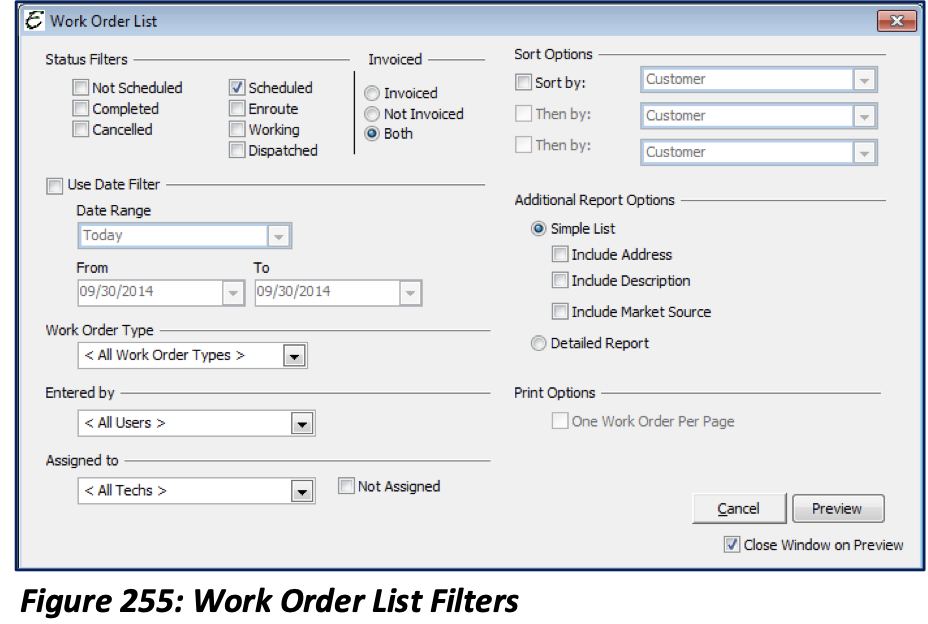
Status Filters: Choose which Work Orders you would like displayed depending on their status (select all that apply).
Invoiced: Select either Invoiced, Not Invoiced or both.
Date Range: Select a predefined date range (Today, Yesterday, This Month, Last Month etc.).
Work Order Type: Select a particular Work Order Type or choose to view all.
Entered by: Select Work Orders by the user that entered them or choose to view all Work Orders regardless of who entered them.
Assigned to: Select Work Orders assigned to a particular tech or choose to view all.
Not Assigned: This option will display Work Orders that have not yet been assigned.
*Drill Down Capable: Opens the Work Order selected.
Work Orders in Progress Report
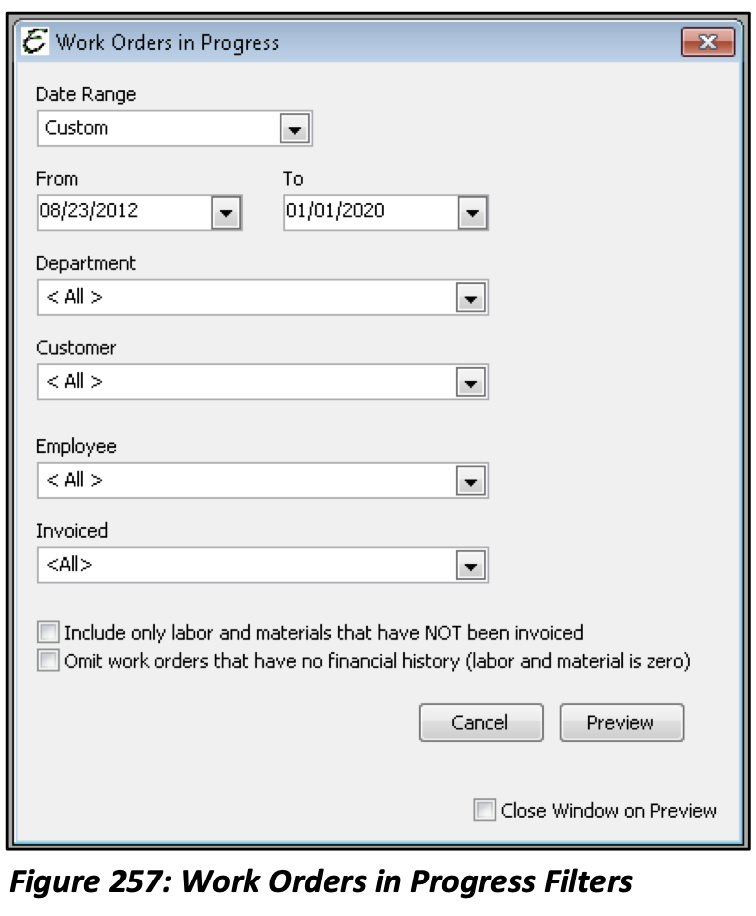
This report displays the progress of Work Orders based off purchases made and time sheet entries entered along with what has or has not been invoiced.
Date Range: Select a predefined date range (Today, Yesterday, Last Week, This Week etc.).
From/To: Manually enter a date range.
Department: Select a particular department or choose to view all.
Customer: Select a particular Customer or choose to view all.
Employee: Select a particular Employee or choose to view all.
Invoiced: Select Work Orders that have either been Invoiced, Not Invoiced or view all.
This report also gives you the option to include only labor and materials that have not been invoiced for the Work Order. This report also gives you the option to omit Work Orders that have no financial history (labor and material is zero).

*Drill Down Capable: Double clicking on the item from this report will open the item to view it.