Improve your Marketing efforts by using the Marketing List Generator. The Marketing List Generator identifies contacts that fit defined marketing criteria. For example, the MLG can identify contacts that live in a certain zip code but have never bought a Service Agreement. Those contacts appear in the list, which are then used for marketing purposes like direct mail or cold calls.
Marketing Lists are created through queries (searches) of your contacts and/or by Sales activity. These queries can be very simple or somewhat complex, depending on the degree to which the contacts are filtered. The Marketing List Generator is quite powerful because of its ability to conduct multiple separate queries, adding the results of each search to the results list. The results can then be sorted, and duplicates can be deleted as necessary. Finally, the results can be exported for use in other common programs (like the mail merge function in MS Word) in order to create a marketing letter, mailing labels and more. To access the MLG, select Marketing List Generator from the Tools main Menu.
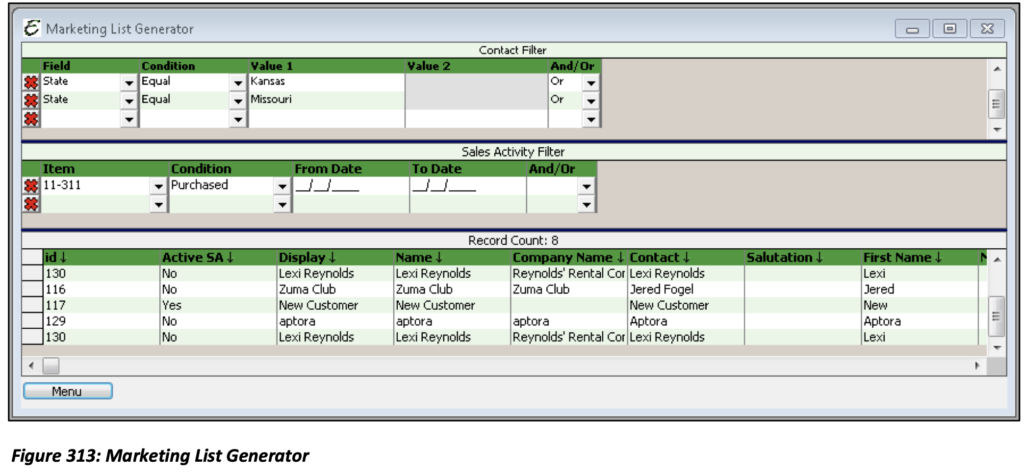
The above search requested a list of all contacts that purchased item 11-311 whose business is located in either Kansas or Missouri. A contact’s information needs to be as complete as possible so that each search field selected will include a result to return.

Please note: Menu│Print Setup allows you to utilize the Custom Template Designer to create your own marketing letter directly from Total Office Manager. When a report is created, all results from the list will automatically be used to printout letters for the Customers you wish to mail them to. The Custom Template Designer could also be used to do a Service Agreement Renewal Letter.
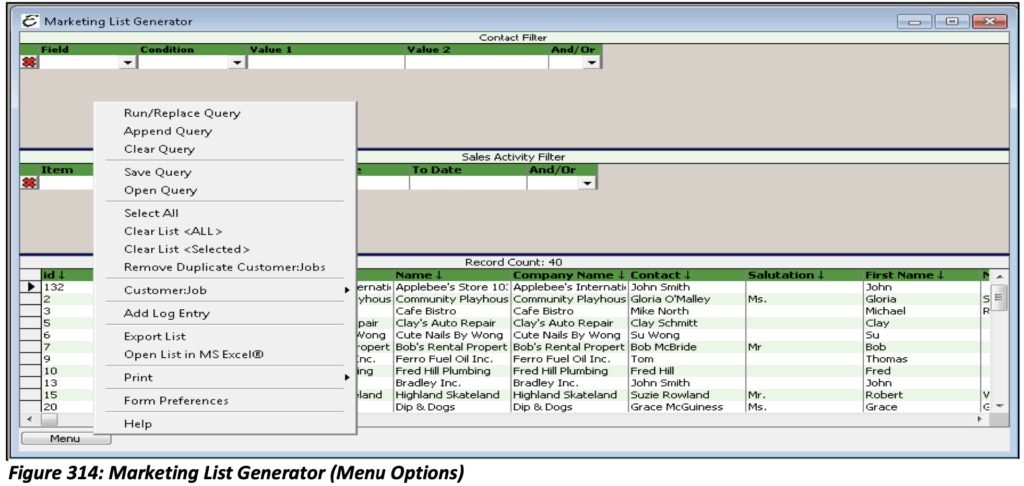
Marketing List Generator (Menu Options)

Run/Replace Query: Performs a search based on the setting in the Contacts and/or Sales Activity filters. The output is sent to the Results List. Any pre-existing data in the Results List will be replaced with the new data.
Append Query: Performs a search based on the setting in the Contacts and/or Sales Activity filters. The output is added to any pre-existing data in the Results List.
Clear Query: Erases all queries (search definitions) set up in the both the Contacts Filter and the Sales Activity Filter.
Save Query: Allows you to save the parameters that you have entered.
Open Query: Allows you to open a previously saved query.
Select All: Selects all records in the Results List.
Export List: Exports the contents of the list to an ASCII text file. You will be offered a chance to select a delimiter.
Open List in MS Excel®: This will open the list in MS Excel.
Clear List <All>: Removes all records from the Results List.
Clear List <Selected>: Removes the selected (highlighted) records from the Results List.
Edit Contact: Opens the records on which focus is set. The focus indicator is a right pointing triangle in the first column of the Results List. Focus is automatically set to whatever record is right-clicked, making it easy to open a record by right-clicking on it and selecting Edit Contact from the pop-up menu.
Add Log Entry: Add an identical note to the Contact Log of every selected contact in the Results List. This is useful for example, when you are attaching a note to your entire marketing list at once. Imagine that a marketing letter has been sent to a list of contacts. To document this activity, use the “Add Log Entry” command to create a note for each of the recipient’s Contact Log. This note might read “Mailed Direct Mail Letter #1234 First Class Mail”. The date, time and Total Office Manager user who created the entry is automatically added to the Log Entry.
Remove Duplicates: Removes any duplicate records from the Results List.
Print│Print Setup│Print Preview: These options allow you to Print the list you have generated, setup a letter to Print, or Preview the letter prior to printing it.
Form Preferences: Used to select which fields are displayed in the Results List. Please note that it also controls which fields are exported. Only the fields which appear in the Results List are included when exporting data. Place a check in the check box of each field to appear in the Results List and click the “Apply” button when finished.

The Contact List that you have built can be sorted. This is handy when you need to review your list and remove unwanted Contacts.
If the Contact has been added to your No Call List, they will NEVER appear in your list. In other words, if you have checked the No Marketing check box in the Customer:Job form, that contact will not be included in any search.
Sorting the Contact List has no effect on how the list is exported. The list will always be exported in alpha/numeric order using the first field of each record.
It is possible to build a list that contains duplicate records. Use the Remove Duplicates prior to exporting if those duplicates are not wanted on your report.
Although this feature was designed primarily for marketing purposes, it can be handy for performing more advance searches (searches the Advanced Search feature can’t handle).

