Any small business owner can tell you that paying Employees involves a lot more than writing a check every week or two. There are a number of laws governing Employee compensation and they change all the time. If you don’t want to have trouble with any of the various government agencies, you have to be well organized and stay up to date on federal and state guidelines.
Payroll Setup
The key to staying on top of things is setting up a good system that complies with all the applicable state and federal laws. To get started, the following is a step-by-step approach to setting up a simple payroll system.
- Get an Employee Identification Number (EIN). You can apply for a number by filling out IRS Form SS-4.
- Get state and local identification numbers if they are required in the area or areas where your business operates.
- Separate your independent contractors and full-time Employees. You don’t have to withhold taxes from an independent contractor’s pay. This does not mean that classifying each of your Employees as independent contractors is acceptable. Just the opposite. The IRS may penalize your business heavily if you designate regular workers as independent contractors in an attempt to defraud. For details, see IRS Pub 15 Circular E, The Employer’s Tax Guide.
- Have each Employee fill out and sign IRS Form W-4. The form provides two critical pieces of information: the Employee’s Social Security Number and the allowances the Employee is claiming for Income Tax purposes.New workers should fill out a W-4 as soon as possible. Employees who marry or divorce, have children, gain or lose a dependent or want to change withholding amounts for any reason should also complete and sign a new W-4.If you do not have an Employee’s W-4 on file, you are required by law to treat the Employee as a single person with no exemptions for withholding purposes.
- Have all of your Employees complete an I-9 Form. This is a federal requirement. You must have these on file for all Employees.
- Establish a pay period. Most states require that employers pay workers on regular paydays. A few states allow some Employees to be paid once a month, but most require that you pay your Employees at least twice a month. Check with your state department of labor for your state’s specific guidelines.
- Establish payroll records. For federal Tax purposes, you must keep the following information on file:
- The name, address and Social Security Number of each Employee
- Copy of driver’s licenses
- Copy of Social Security Card
- The total amount and date of each Paycheck issued
- The portion of each payment that constituted Taxable Wages
- Copy of each Employee’s W-4
- Dates and amounts of Tax Deposits
- Copies of returns you filed
- Copies of any undeliverable W-2 Forms
- Decide if you will pay workers for time spent in orientation, sick days, meals or working from home. Your state department of labor can tell you if you are required to pay for this time.
- Decide what benefits your company will provide such as vacation, paid personal time, paid leave, etc.
- Check your local overtime rules. According to the Fair Labor Standards Act, any work that exceeds 40 hours per week must be compensated with at least one and a half times the Employee’s hourly wage. Various states may have stricter policies. Please consult with your account professional for details.
- Determine the applicable taxes to withhold. The IRS provides Publication 15 as a guide to tax withholdings. State Department of Revenue/Labor also provides tax publications. Please check with your local government agencies for requirements. Many business owners save time and reduce the risk of errors by hiring a bookkeeper or payroll service. An outside payroll person or service can perform basic payroll-related tasks, deposit Tax payments, prepare W-2s, and take care of insurance and retirement plans.
- Now that your business has met the guidelines of federal and local government to be recognized as an authorized payroll administrator it is time to set up your payroll in Total Office Manager.
Pay Groups
Instead of processing payroll for each of your Employees Individually Total Office Manager offers creating Pay Groups to make this process quicker. Pay Groups are used to organize your Employees into groups that can be paid as a batch. To access the list of your Pay Groups and to create new Pay Groups, select List from the Employees main Menu option, then select Pay Group List.
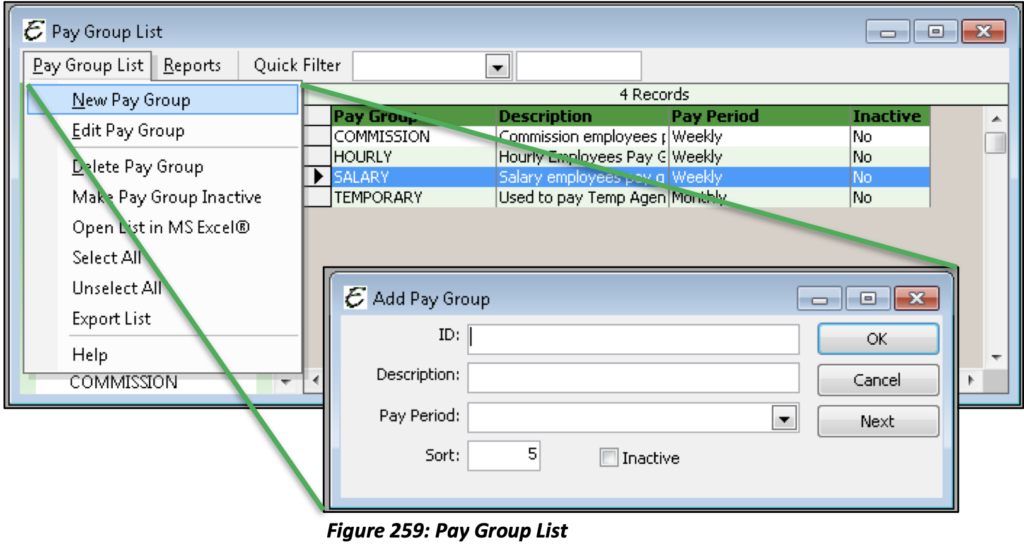
Field Explanations
ID: This is a name to identify the Pay Group.
Description: This is a further description of the name to identify the Pay Group.
Pay Period: This refers to the pay period that you may have already set up. (Weekly, Bi-Weekly, Salary, etc.)
Sort: This is a number you enter to determine the order that this record appears in the Pay Group List.
Payroll Items List
Payroll Items are used to track what and how much an Employee is to be paid or how much is to be withheld from his/her Paycheck. Payroll Items also include Employer Liabilities. To access your list of Payroll Items or create new Payroll Items, select Lists from the Employees main Menu option, then select Payroll Items List.
Type: Refers to the type of Payroll Item that was created (Addition, Deduction, Earning, Tax, Liability, and Time Off).
Payroll Item: The name of the Payroll Item.
Inactive: Displays whether the Payroll Item has been made inactive.
Order: How the Payroll Item is sorted numerically within each type.
Description: A brief explanation of the Payroll Item’s purpose. This is the name that will appear on Payroll related reports.
Vendor: Indicates the Vendor to which the Liability, Tax or Deduction is owed.
Deduct From: Either Net Pay to calculate after taxes or Gross Pay to calculate before taxes.
Calculation Type: How the Payroll Item will be calculated. Calculation Types are available based off the Payroll Item Type: Fixed, Hours, or Percent for Additions; Annual Salary, Fixed Amount or Hourly for Earnings; Fixed Amount, Hourly Amount, Hourly Percent, or Percent for Deductions; and Federal, State, Local, Fixed Amount, Hourly Amount, Hourly Percent or Percent for Taxes and Liabilities.

Payroll Item Setup
Total Office Manager includes six different Payroll Item Types:
- Tax Item
- Employer Liability Item
- Deduction Item
- Time Off Item
- Earning Item
- Addition Item

Below, we will cover each Tax Item in detail.
Tax Item: Taxes are the first item to deal with in Total Office Manager since Taxes affect Earnings, Deductions and Liabilities. Tax Types are essential to Payroll. They are used to deduct Taxes from Employees’ Paychecks. Tax types include Federal Tax, Social Security, Medicare, State Tax etc.
Employer Liability Item: Employer Liability Items represent money that the Company owes to a third party because of processing Payroll within Total Office Manager. Typical Employer Liabilities include, but are not limited to: FUTA, SUTA, Medicare, Social Security, company paid insurance premiums, company contributions to Pension Plans, etc.
Deduction Item: Deduction Items are used to describe common wage deductions such as health insurance, dues, garnishments, etc. Deduction Items represent money to be withheld from the Employee’s Paycheck.
Time Off Item: Time Off Items are used to track time off accued by Employees including the frequency time off is accrued, the hours or amount of time, and when/if accrued time off resets.
Earning Item: Earning Items can be used to describe a type of compensation such as shop salary, service tech compensation packages, bonuses, etc. Each Earning Item typically includes one or more Tax Items.
Addition Item: Payroll Additions are a way of adding a monetary amount to an Employee Paycheck without affecting their gross/net wages or Taxes. A prime example would be an advance on pay.
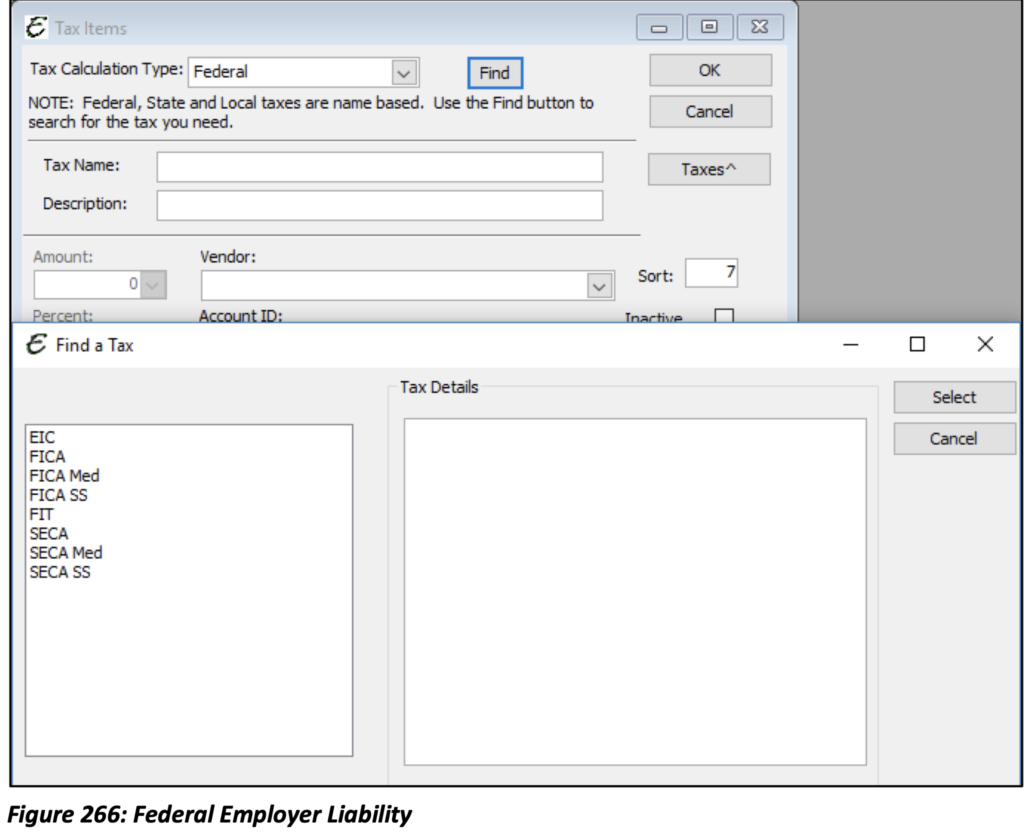
New Tax Item
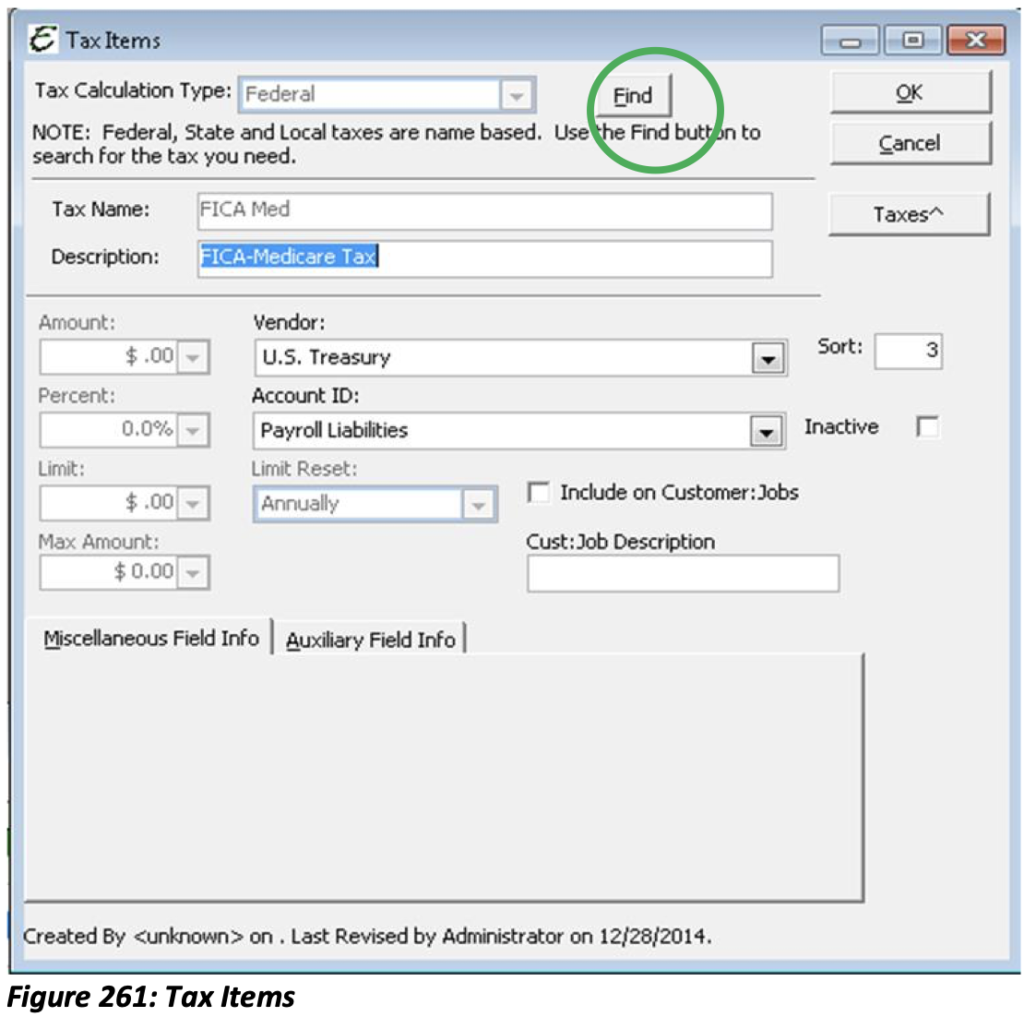
Tax Items are the Taxes that will be withheld from your Employees’ wages that are owed to the IRS. These Items can be created either manually or automatically. Federal, Local and State all use Tax Tables that are a part of the software and maintained automatically through software updates. When choosing any of these three options, the Find function will need to be used to find the proper Tax. You’ll notice that when any of these are selected, the Amount, Limit, Percent, and Max Amount fields are greyed out and cannot be edited. The reason for this is that they are automatically calculated based on the Tax Tables.
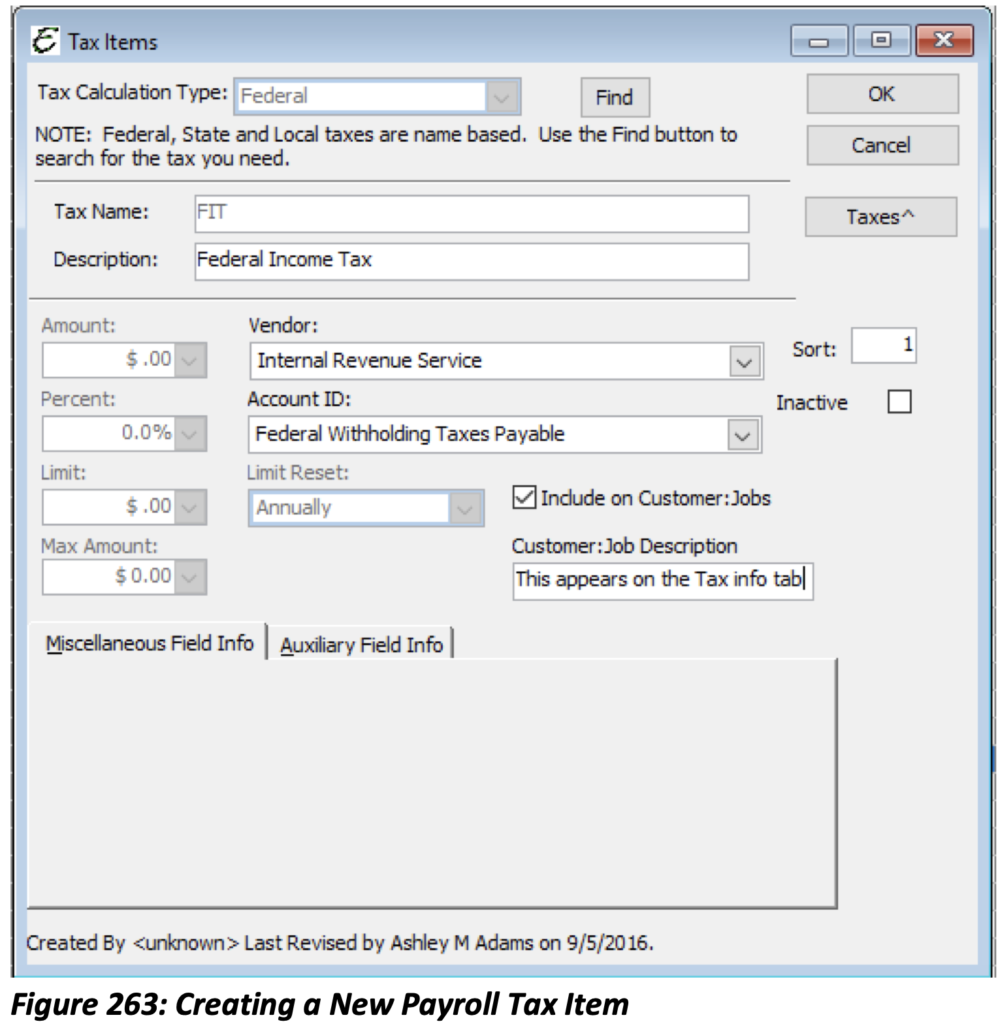
Tax Calculation Type: There are seven: Federal, State, Local, Fixed Amount, Percent, Hourly Amount, and Hourly Percent.
ID: Enter a short name for this Tax Item. Once the record is saved, you cannot change the ID.
Description: Enter a description for the Tax Item (recommended, but not required).
Find Button: When entering a Federal, State, or Local, tax, you will want to use the Find button. This allows you to select the tax calculation from our database of payroll taxes. Aptora maintains these tax rules and they are part of your paid software updates.
Account ID: Select the appropriate account that will be used to track the Tax. This will typically be of type “Other Current Liability.”
Vendor: Select the Tax Authority to whom the Tax will be paid.
Amount: Enter the dollar amount of the Tax, if “Fixed” or “Hourly Amount.”
Percent: Enter the percentage or the type if “Percent” or “Hourly Percent.”
Limit: Enter a dollar amount to represent the limit for the Tax Amount to reach to stop calculating.
Max Amount: Enter a dollar amount to represent the represent the “Maximum Wage Base” for the Tax to stop calculating at.
Important note: If the Tax Calculation Type is anything other than Federal, State or Local, you will need to maintain the Percent, Limit and Maximum Wage Base.
Once you have chosen a Tax Item from the list, the name (ID) and details (Description) will populate on the New Tax Item form.
Please note: The Federal Tax Items include the FICAs and FIT withholding items due to the IRS. When setting up these Tax Items they need to be selected through the Find function. This tells Total Office Manager to search the Tax Table to find the appropriate Tax rate. All applicable Tax Items need to be created. You will add the necessary Tax Items to each Earning Item.
The Amount, Percent, Limit, and Max Amount fields are greyed out. This information is pulled from the Tax Table within Total Office Manager and will calculate appropriately when applied to your Employees. You will however still need to select the appropriate Account and Vendor (Tax Authority). The State and Locality Taxes will also need to be selected using the Find function.
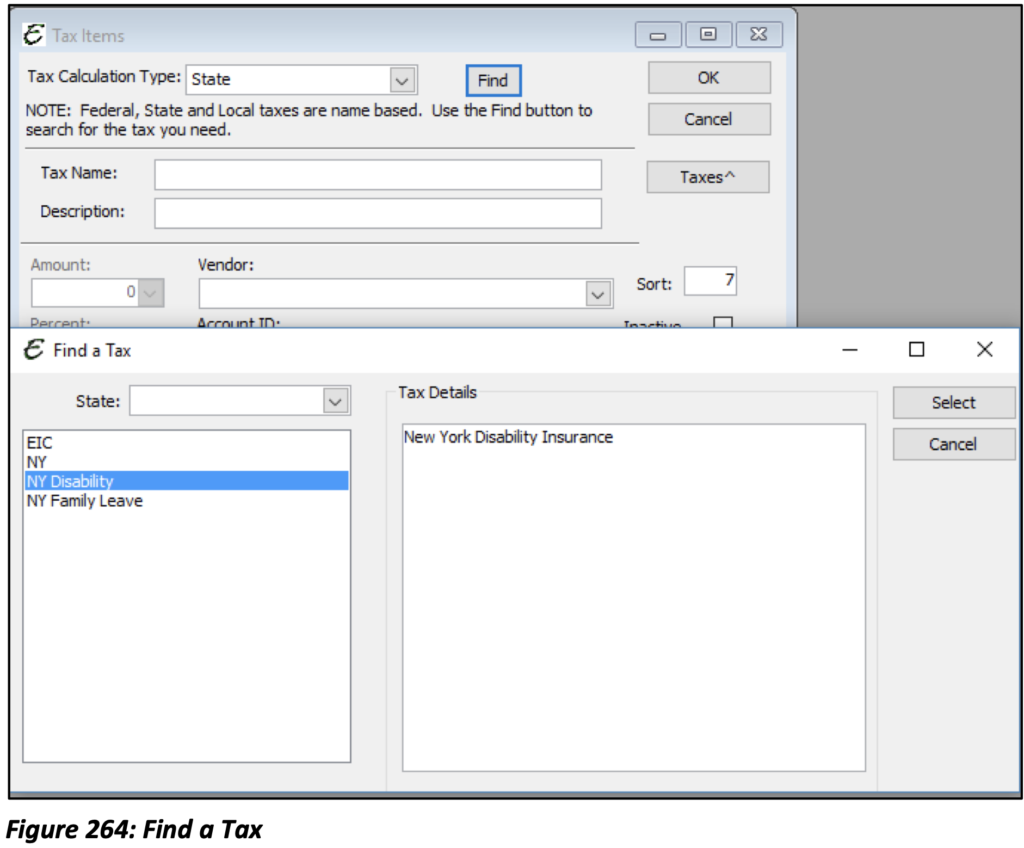
Once the Find form has opened you will need to choose the applicable state from the drop-down menu for state taxes. If you have Employees who live in different states than from where they report, each state’s taxes will need to be set up. All available Taxes will appear on the left-hand side. Under Tax Details, a description of the tax chosen will be displayed.
The Amount, Percent, Limit, and Max Amount fields are greyed out. This information is pulled from the Tax Table within Total Office Manager and will calculate appropriately when applied to your Employees. You will, however, still need to select the appropriate Account and Vendor (Tax Authority).
New Employer Liability
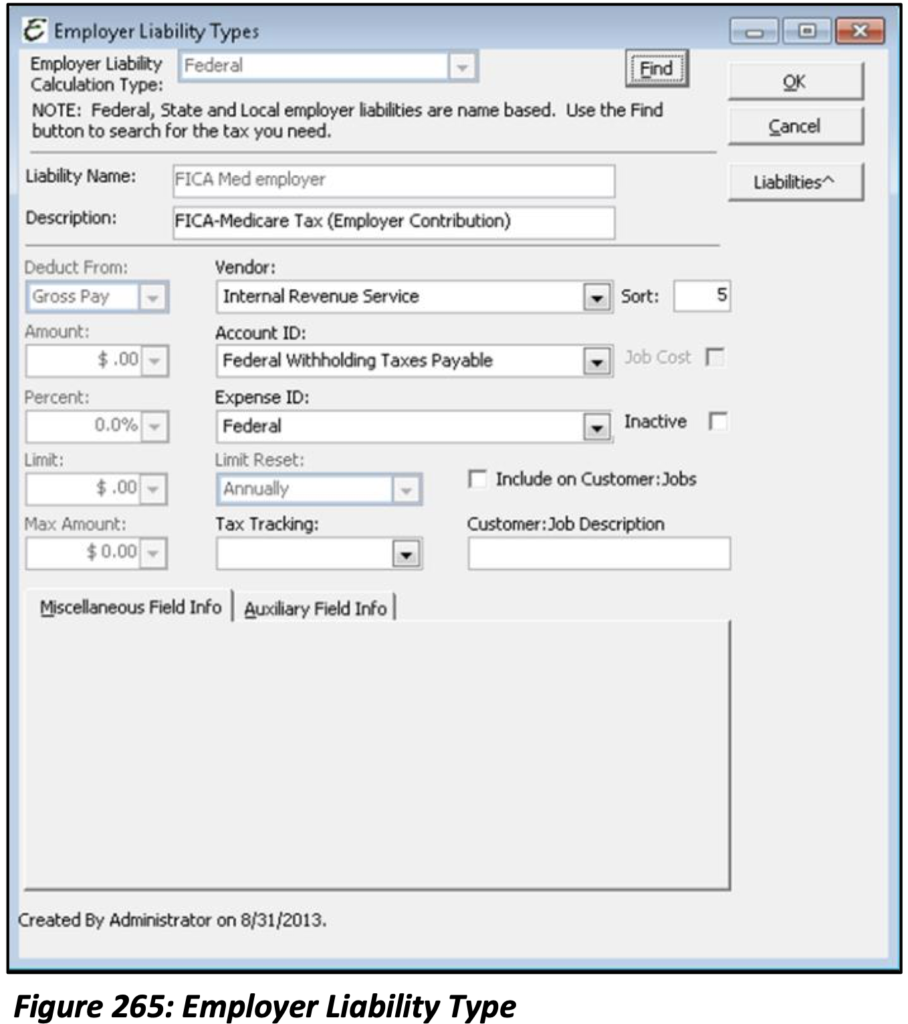
Employer Liability Items represent money that the Company owes to a third party as a result of processing Payroll within Total Office Manager. Typical Employer Liabilities include but are not limited to: Federal and State Liabilities, company paid insurance premiums, company contributions to Pension Plans etc.
Federal, Local and State all use Tax Tables that are a part of the software and pulls Tax Rates directly from the IRS. When choosing any of these three options, the Find function will need to be used to find the proper tax calculation. You’ll notice that when any of these are selected the Amount, Limit, Percent, Max Amount and Calculate Using fields are greyed out and cannot be edited. The reason for this is that they are automatically calculated based on the Tax Tables.
FUTA and SUTA
There are two exceptions on Federal and State Liabilities that do not use the built in Tax Tables, FUTA and SUTA.
To setup the rates used for FUTA and SUTA, you will first need to create these Items, then go to Employees│Unemployment Tax Rates from the Main Menu.
There are several fields on the Liability Item form that are different from the Tax Item form.
Expense ID: The offsetting Expense account that you will report the Liability against.
Calculate Using: Gross Pay or Net Pay.
Tax Tracking: Indicates if the Employer Liability is a particular type of Pension Plan. This information is important as it pertains to the W2.
The Federal Tax Liabilities include the FICA and FUTA withholding items due to the IRS. When setting up these Items, they need to be selected through the Find function. This tells Total Office Manager to search the Tax Table to find the appropriate Tax rate. All applicable Tax Items need to be created. You will add the necessary Liability Items to your Employees’ Payroll Item List.
Once you have chosen a Liability Item from the list, the name (ID) and details (Description) will populate on the New Employer Liability Item form.
The Amount, Percent, Limit, and Max Amount fields are greyed out. This information is pulled from the Tax Table within Total Office Manager and will calculate appropriately when applied to your Employees. You will, however, still need to select the appropriate Account and Vendor (Tax Authority) as well as the Expense Account.
The State and Locality Liabilities will also need to be selected using the Find function.
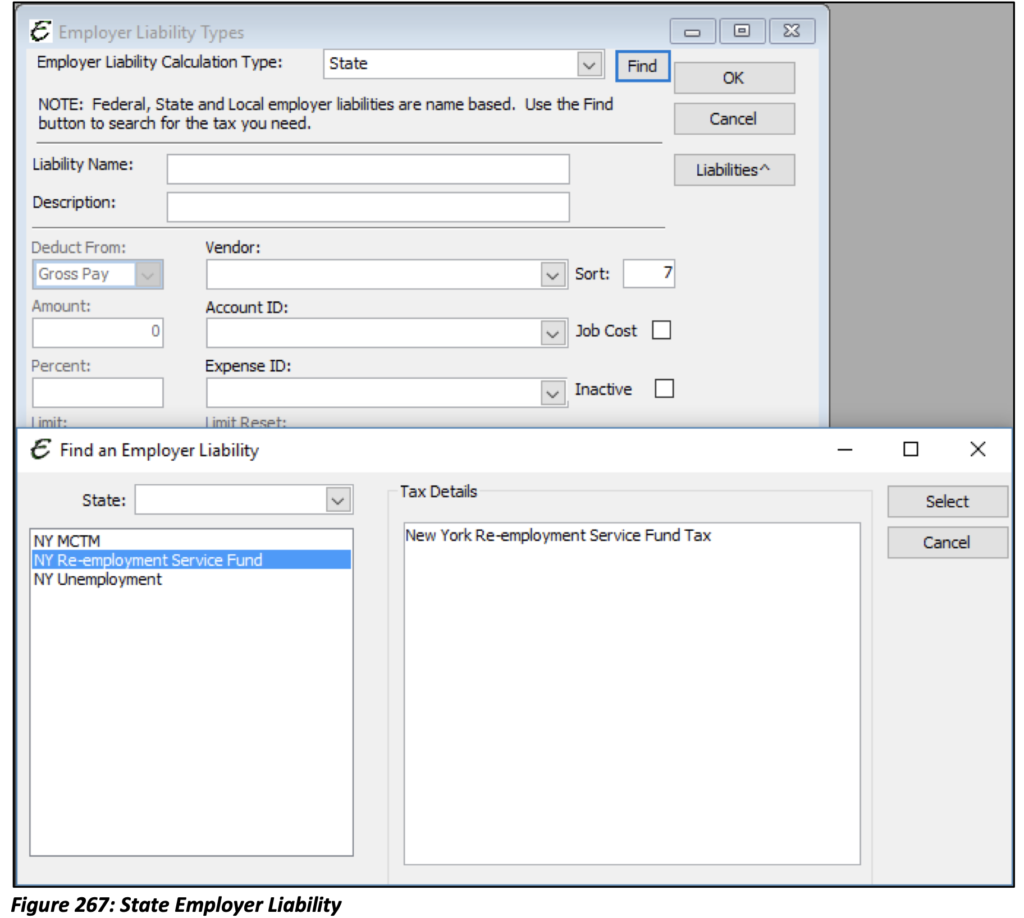
Once the Find form has opened you will need to choose the applicable state from the drop-down menu. If you have Employees who live in different states than from where they report; each state’s Liabilities may need to be set up. All available State Liabilities will appear on the left-hand side. Under Tax Details, a description of the Liabilities chosen will be displayed.
The Amount, Percent, Limit, and Max Amount fields are greyed out. This information is pulled from the Tax Table within Total Office Manager and will calculate appropriately when applied to your Employees. You will however still need to select the appropriate Account and Vendor (Tax Authority) as well as the Expense Account.
Unemployment Tax Rates
Once you have set up FUTA and SUTA, you will need to set up the Unemployment Tax Rates. To access the Unemployment Tax Rates, from the Main Menu, go to Employees│Unemployment Tax Rates.
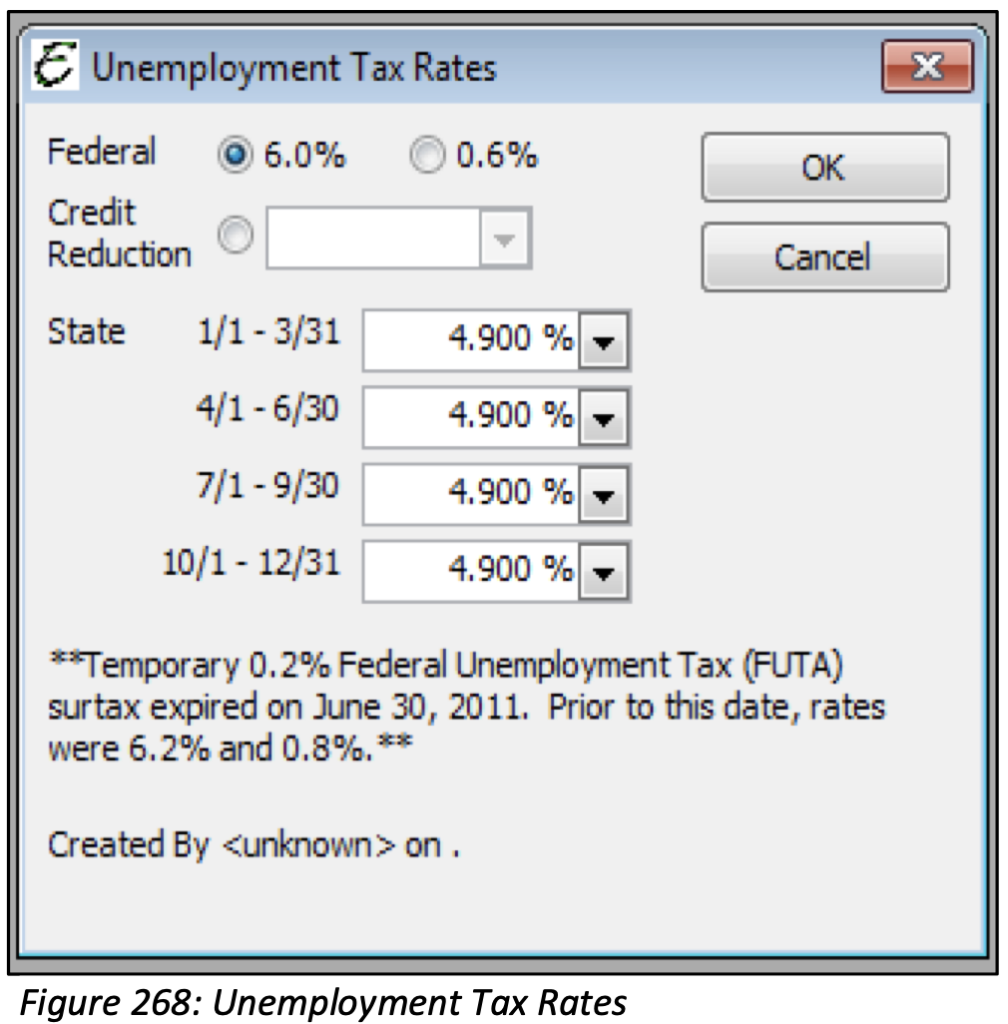
Federal: The unemployment tax rate for the United States Federal Government. This rate is either 6% or .06%. Please contact your accountant for clarification on which percentage you should choose for your company.
Credit Reduction: This field is only applicable to those companies that operate in a Credit Reduction State. Please contact your accounting professional for more information on this topic.
State: The unemployment tax rate for the state your company resides in should be entered for each quarter listed.
New Deduction Item
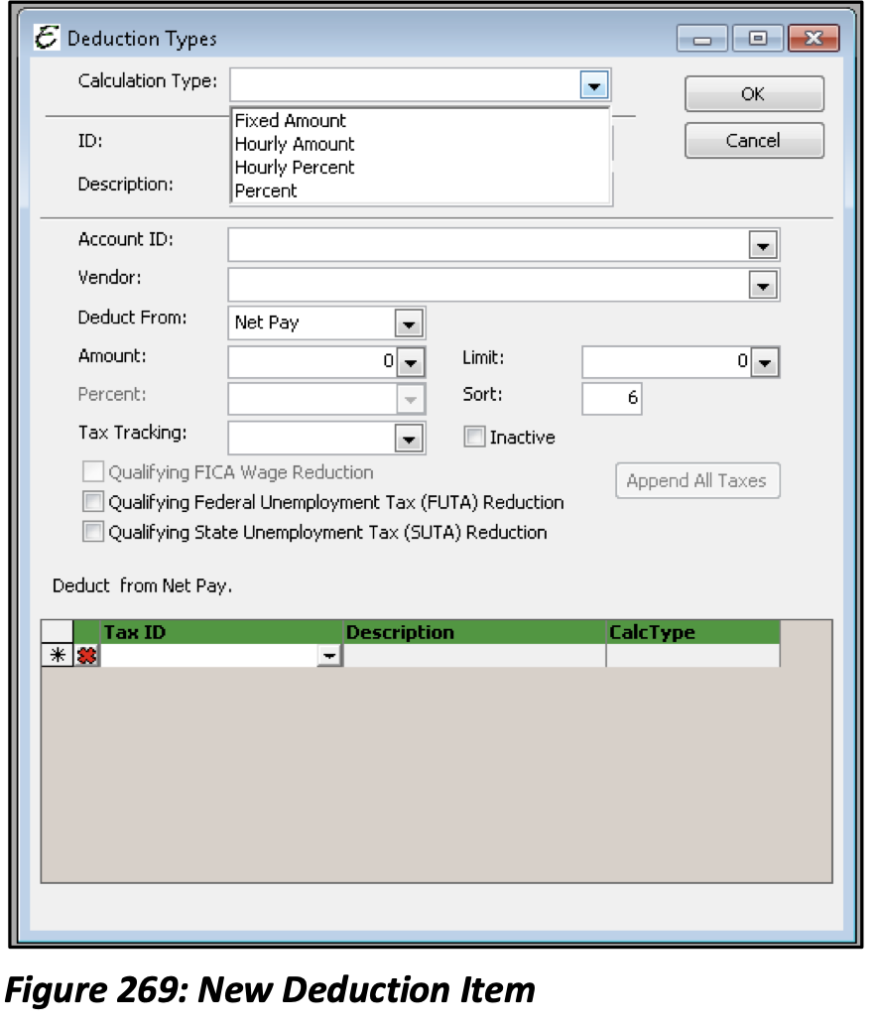
Deduction Items are used to describe common wage deductions such as health insurance, dues, garnishments, etc. Deduction Types represent money owed by the Employee to a third party.
Deduction Items are not calculated using any Tax Tables. The Federal, State, and Local calculation types are not available. Deduction Items are only calculated based on a Percentage or Amount that you specify. You can however indicate when these Deduction Items should affect your Employees’ wages. (To be calculated/withheld before or after Taxes.)
Account ID: If the Deduction is an Employee portion paid to a third party, select the appropriate Liability account here. This Deduction will then be included in your Payroll Liability form for payment later.
Vendor: This is a required field. If this is a Tool or Reimbursement Deduction, create a Vendor account with your company name and select the Vendor here. If the Account ID selected is an Expense, the Vendor selected won’t apply.
Deduct From: Net Pay or Gross Pay.
Amount: If this differs by Employee, leave this blank and fill it out on the Employee Deduction tab.
Tax Tracking: Just like Liabilities, select this option to track special health plans, pension plans, or retirement benefits. This information will be used on the Employee’s W2.
Qualifying FICA Wage Reduction: If this box is checked you must set this deduction to withhold before FICA Taxes. This box should be checked if you have either FICA SS or FICA Med in the Tax Grid.
Qualifying Federal Unemployment Tax (FUTA) Reduction: If this box is checked you can set this deduction to adjust Federal Unemployment Liabilities (FUTA) for the company. The deduction amount will be subtracted from the Gross Pay amount on the check prior to FUTA being calculated.
Qualifying State Unemployment Tax (SUTA) Reduction: If this box is checked, you can set the deduction to adjust State Unemployment Liabilities (SUTA) for the company. The deduction amount will be subtracted from the Gross Pay amount on the check prior to SUTA being calculated.
When you have a Gross Pay Deduction, the tax grid (bottom portion of the form) shows all of the Taxes that will be calculated AFTER the deduction amount is withheld from the Gross Pay. To add a Tax, click on the Tax ID field and select the down arrow button to display a list of taxes or click the “Append all Taxes” button to add all taxes and remove any that don’t apply.
New Time Off Item
Time Off Items are used to track time off accrued by Employees when time off is accrued, the amount of time to accrue and when/if accrued time off resets.
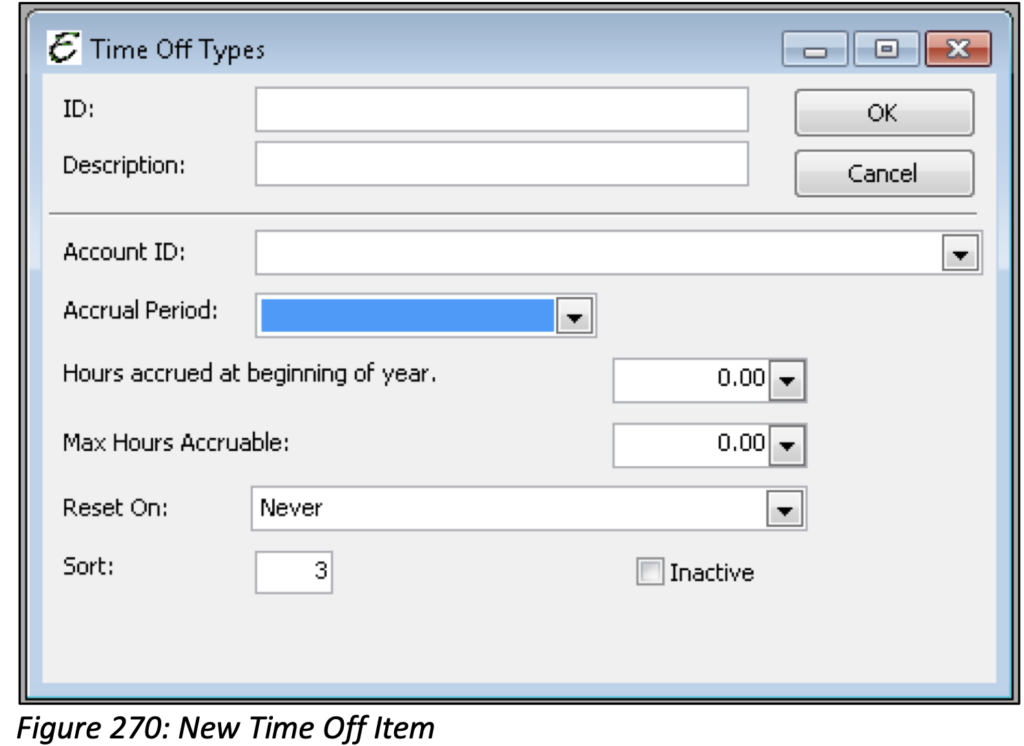
ID: Enter a short name for this Time Off Item.
Description: Enter a short description for the Time Off Item.
Account ID: Select the appropriate account (Expense usually) from your Chart of Accounts.
Accrual Period: Select the period when time off begins to accrue. (Beginning of Year, Employee Anniversary, Every Paycheck, or Every Hour on Paycheck.) This can be changed on the Employee if it differs.
Hours Accrued at Beginning of Year: Enter a value to determine how many hours accrue at the beginning of the year (if applicable). Leave this blank if it differs by Employee and enter it in the Employee Payroll Items.
Max Hours Accruable: Enter a value to determine the max number of hours that can be accrued. Reset On: Select when time off should expire/reset. (Never, Employee Anniversary, or Beginning of Year). This can be changed on the Employee Payroll Items if it differs by Employee.
New Earning Item
Earning Items can be used to describe a type of compensation such as shop salary, service tech compensation, bonuses, etc. Each Earning Item typically includes one or more Tax Item. Earning Items will determine how your Employees will be paid and at what rate and frequency.
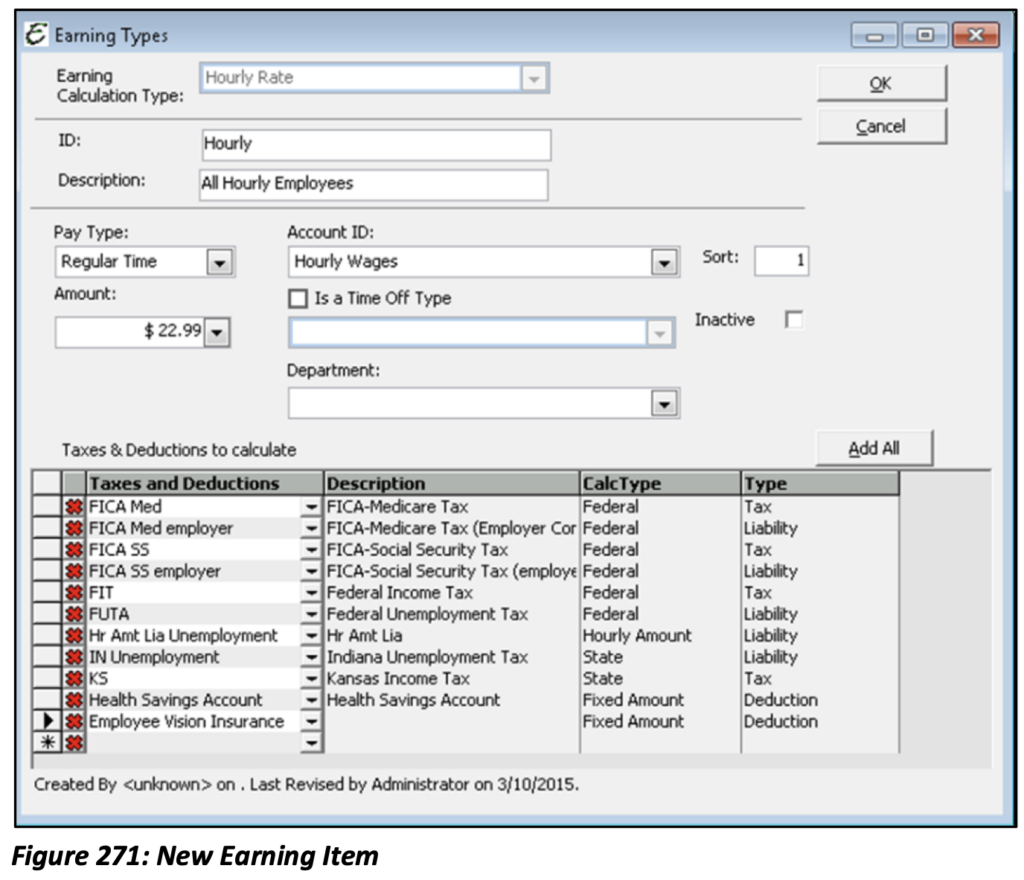
Calculation Type: Annual Salary, Fixed Amount or Hourly Rate.
Annual Salary: Employees are given a total yearly amount. This amount can be entered into the “Amount” field. When processing payroll, the amount to pay is automatically calculated based off the pay frequency. All that is needed is to create the Paycheck. The amount can be left blank and filled out on the Employee, specifically when it differs by Employee.
Fixed Amount: If regardless of hours or work completed an Employee is paid an amount that doesn’t change he/she can be given a Fixed Amount calculation type. The weekly (or applicable pay frequency) wage amount needs to be entered into the “Amount” field. When processing payroll, there is no data entry necessary as the amount auto populates and all that is needed is to create the Paycheck.
Please note: This amount can be filled out on the Employee Payroll Items.
Hourly: This calculation type is based on how many hours an Employee has worked during the pay period. In the “Amount” field the Employee’s Hourly Wage should be entered. If this Employee uses timesheets, then entering hours will not be necessary.
Description: Enter a short description for this Earning Item (optional).
ID: Enter a short name for this Earning Item (cannot be changed).
Pay Type: This indicates what the wage is use for. Select from Regular Time, Overtime, Prevailing Wage, Time Off, or Other.
Account ID: Select the appropriate account from your Chart of Accounts List.
Amount: Enter the hourly amount or leave it blank to fill it out on each Employee specifically.
Time Off Type: Check this box if this Earning Item should remove available time off. Choose the Time Off Item from the drop-down menu.
Department: Select a department to which the Earning Item is to be expensed (optional).
Add All: Adds all of the Employee Tax Items you have set up, or within the Tax Grid you may add fewer if all are not necessary.
Please note: If the Employee does not use timesheets then their hours worked (Regular, Overtime, Sick or Vacation) will need to be entered when processing payroll. If the Employee has earned a Bonus or Commission, those amounts will need to be added through the Add Commissions functions.
New Addition Item
Payroll Additions are a way of adding a monetary amount to an Employee Paycheck without affecting their gross/net wages or taxes. Examples of Additions would be; Mileage Reimbursement or Expense Reimbursement.
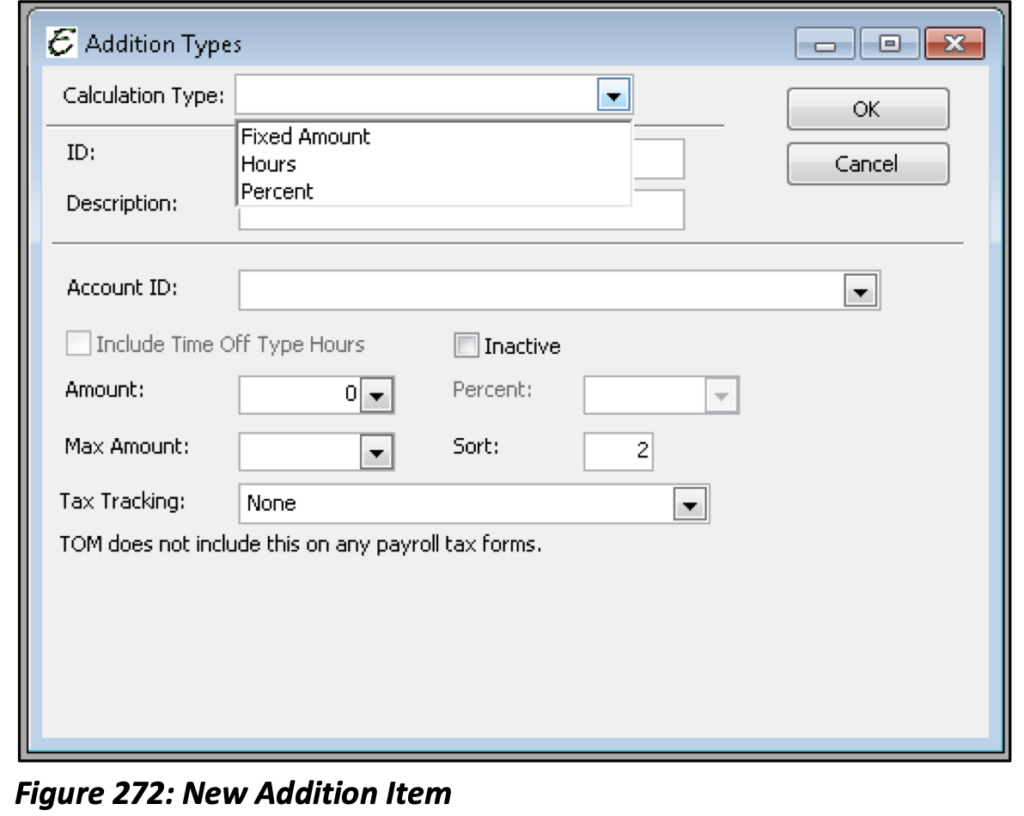
Calculation Type: Fixed Amount, Hours, or Percent.
ID: Give the Addition Item a name.
Description: Give the Addition Item a brief description.
Account ID: Select the appropriate account (usually Expense) from your Chart of Accounts.
Amount: Enter the appropriate dollar amount.
Percent: Enter the appropriate percent.
Max Amount: Enter the amount at which the Employee may no longer earn the Addition once it has been reached.
Tax Tracking: Select either None or the appropriate option for your purposes. If you have questions on which one to use, please seek the advice of your accounting professional.
Extra – Managing Tool Allowances
Contractors occasionally offer extra pay to help employees cover the cost of acquiring or replacing personal tools used for company purposes. One method is to pay employees 20 cents (or any amount) more per hour. That money is then placed into a fund to be used to pay for replacing broken tools or acquiring additional tools.
The following is an example of how to setup and manage such a tool allowance program.
- Set up the employee as a Vendor
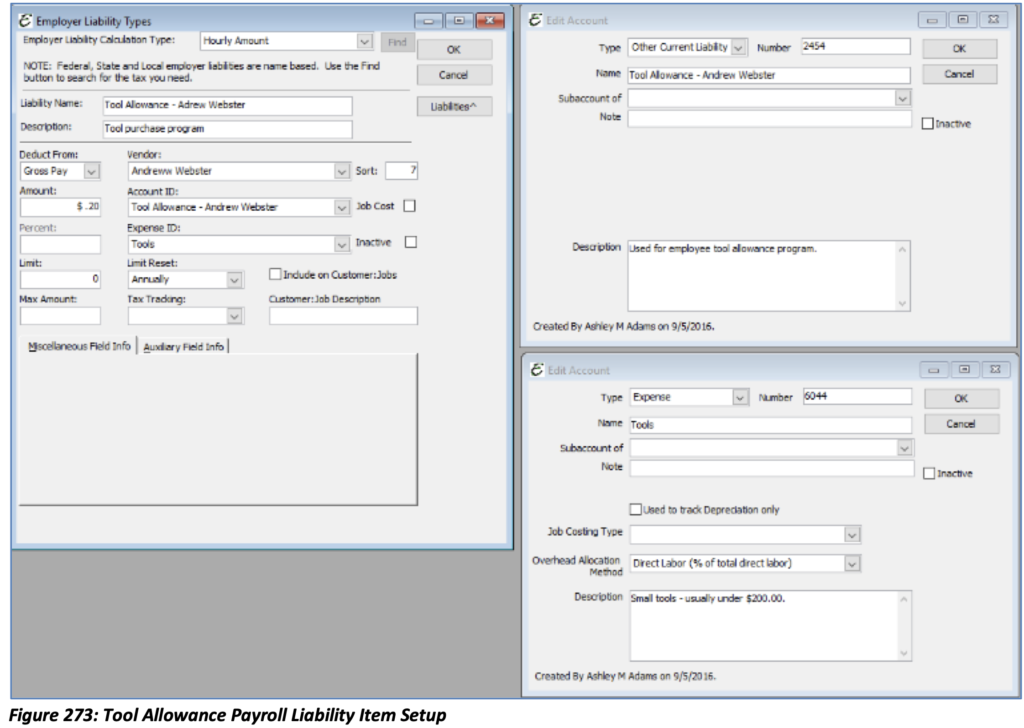
- Set up the Chart of Account and Other Current Liability as shown.
- Set up the Employer Liability Payroll item
- Enter the Hourly Amount. Example: The amount could be .20
- In the Account ID, enter the chart of account you just set up in step 2
- For the Expense, select whatever chart of account used for recognizing tool expenses
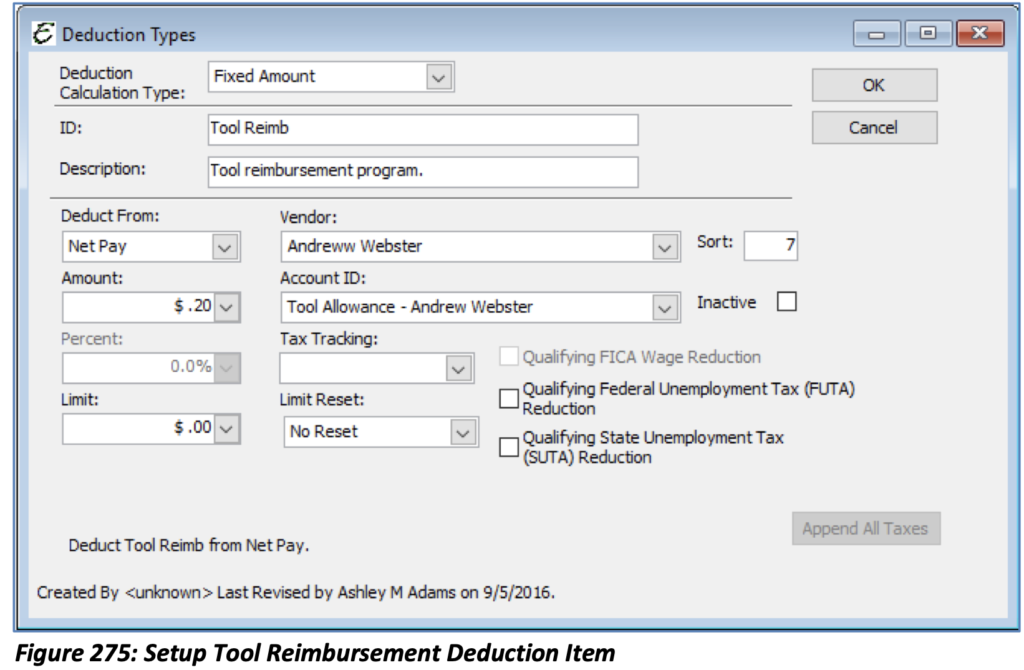
For employees wishing to deduct more, create a deduction item:
NOTE: This should go to the same liability account associated with the Employer Liability Payroll Item.
Add the item to the employee’s record:
Note: The Max Per Year
As Payroll processes the amount will accumulate. This recognizes the expense and the liability.
When purchasing tools off of this account, under the expenses tab (on a bill, credit card charge, or check) enter the Other Current Liability you set up in Step 2, the amount of the purchase, and the vendor set up in Step 1.
The financial balance of the liability account will be reflected on the balance sheet. Because payroll is a separate function, you will have to do periodic payroll liability adjustments (not affecting accounts) to make the payroll liability match the General Ledger.

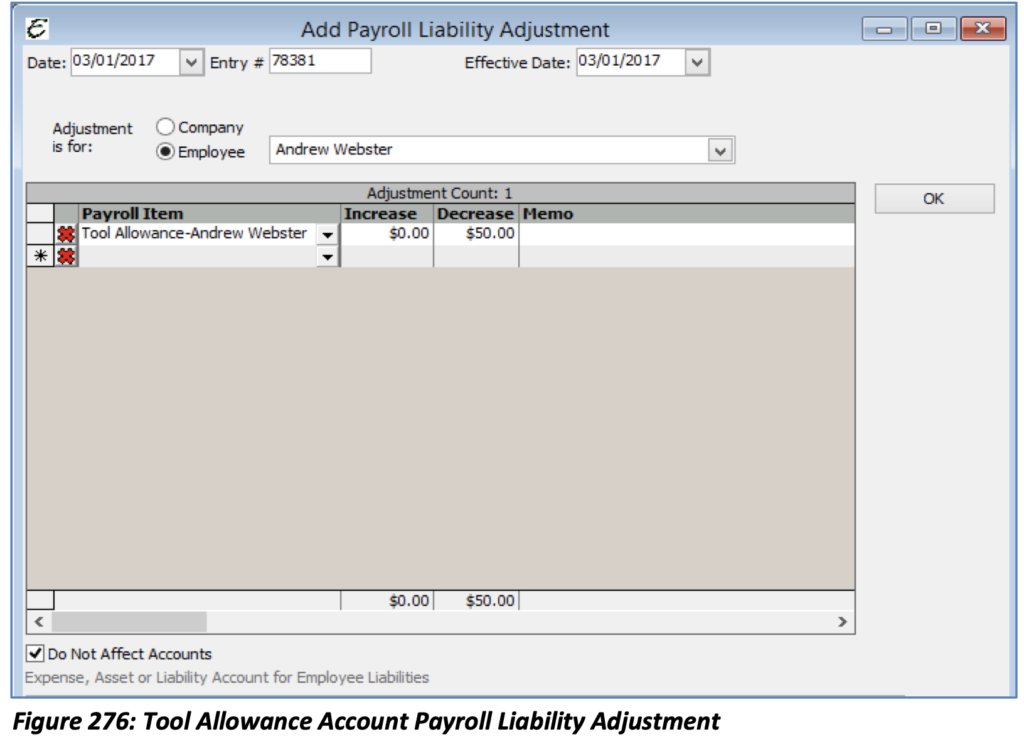
Note: The G/L will always reflect the true balance.
You would repeat this for each employee and set up separate accounts to represent the separate, respective tool allowances.